At DoorDash, we are intentional in our approach to engaging people of all backgrounds while fostering an environment of diversity and inclusion. We empower employees to build and drive the culture they want to experience through fundamental programs like our Employee Resource Groups (ERGs).
This February, in collaboration with our Black@ ERG, we continued to reflect on the significance of Black history while spurring growth through various initiatives.
We launched the #BlackFoodEnergy campaign, which is a celebration and movement of Black food and culture meant to feed change, deliver it forward, and give people a seat at the table.
We also invited all DoorDash employees to participate in a series of virtual panels and workshops focused on amplifying authentic relationships, Black cuisine, Black wealth and Black artists and entertainers.
We kicked off Black History Month with a focus on mental wellness thanks to family and marriage counselor Kiaundra Jackson, who helped our teams understand ways to build healthy relationships, both personally and professionally. We continued our focus on the long-term approach to wellness with experts from Charles Schwab, who offered insights on how to build generational wealth through saving, investing and money management.
Local heroes in communities of color joined us to share insights about their unique challenges faced as Black-owned merchants. Former Top Chef Finalist and Pinch & Plate Co-founder, Chef Eric Adjepong led a special cooking class for our employees, which featured the vibrant, mouthwatering flavors of West African cuisine.
And to close out our month of celebration, we enjoyed a virtual block party with comedian Big Fred, singer/songwriter DJ Marlee XX, Brooklyn-based poet Lyrical, singer/songwriter Funsho and sounds and beats provided by DJ Bo.
Our support and celebration of Black culture doesn’t stop at the end of Black History Month. We recognize there is plenty of work left to be done and have established programs and initiatives to help level the playing field for Black-owned businesses and the Black community during Black History Month and throughout the year.
How we’re supporting Black-owned businesses
Our Entrepreneurship & Access programs in the U.S. and Canada connect systematically excluded business owners to resources like low-interest loans (in the U.S., we also match loans at 0% interest rate and no fees in partnership with Kiva), free Restaurants Canada memberships, technical assistance, and education.
In 2021, we also launched the Main Street Strong Accelerator in five cities across the United States. Together with the Accion Opportunity Fund, we constructed a seven-course curriculum that provides restaurant owners with immersive classes designed to help grow their businesses.
How we’re recruiting Black and Underrepresented Talent
During Black History Month, we partnered with the National Black MBA Association’s Atlanta Chapter and sponsored the New York/New Jersey Chapter of the National Sales Network. At the NBMBAA Black History Month Expo, we shared open role opportunities at DoorDash, while also highlighting to local entrepreneurs and local businesses how we empower communities through our products. The National Sales Network has been a powerhouse of Black talent development, boasting an 81% member makeup. We’ve partnered with that organization to support their professional network through development programs and hosted events.
Over the last year, we’ve identified a variety of organizations to enhance Black talent through events and partnerships such as Sistas in Sales, Black is Tech, Dev/Color and The Juneteenth Foundation. And we’re always actively seeking new partnerships and event opportunities, with our next sponsorship slated for March 16-18 at the Tribaja Diversitech Summit featuring our own Martins Agbayekhai, Janet Sun, and Sejal Kacharia. We’re looking forward to bringing together Black and LatinX tech talent to learn from seasoned professionals in the tech space through workshops and panel discussions, hear about employment opportunities and network with leaders and mentors.
How we’re driving change
Lastly, we are thrilled for our Black@ ERG’s partnership with our Brand Marketing and Social Impact team to support active organizations that are driving change within Black communities. DoorDash has committed a $100K donation partnership across the U.S. and Canada by contributing funds to BCA Global, Black Lives Matter and Canada Black Chamber of Commerce in our mission to empower local economies.
To learn about how we’re making room at the table and to find open roles, click here
Creating a better customer experience often requires flexible software that can be updated to accommodate new situations without requiring developers to be involved. But there aren’t many off-the-shelf solutions that provide such a platform. DoorDash has faced this challenge repeatedly as we have worked to create an excellent experience for consumers, Dashers and merchants. Our rapid growth has meant that multiple new issues arise regularly. It can be time-consuming to rely exclusively on engineering teams to build solutions for new problem types as they are identified. To move nimbly to address customer problems, we knew we had to find a better way.
Our solution would need to allow customer experience teams to address new challenges directly. That meant allowing our customer experience operators to build customized workflows to resolve problems without relying on engineering. Building this kind of flexible platform posed an engineering challenge; we realized we would need to build a no-code solution and develop tools for our operators to create and deploy business workflows to a live production environment. Lacking non-proprietary solutions to achieve this objective and wanting to avoid vendor lock-in, we decided to build our own no-code solution using open source technologies such as Kotlin, Postgres, and React.
Key challenges to support a rapidly changing landscape
An effective no-code workflow platform needs to be flexible enough to interact with customer experience team members or consumers, allowing users to select choices to drive the next step in the workflow execution; for example, consumers should be able to choose whether they want to get a refund, credit or redelivery. The platform must allow execution of automated processes, such as clearing the way for customer experience team members to determine the eligibility of a customer’s request for a refund. And the platform’s user interface needed to allow operators to build a new workflow and roll it out seamlessly into a live production environment.
Deciding whether to build vs. buy
We reviewed a number of tools already on the market, but ultimately concluded that we would need to build a solution ourselves. Because DoorDash’s business operates in a dynamic environment, there are relentless uncertainties and constantly changing business priorities to be addressed. None of the existing solutions we reviewed were flexible enough to meet our requirements. Additionally, we were concerned that choosing a commercial solution would lock us in with a vendor who might not be able to adapt quickly enough to DoorDash’s fast-changing business needs.
Instead of buying a solution off the market, we decided to leverage open source technologies such as Kotlin, React, and Postgres that we could support ourselves to achieve DoorDash’s technology vision.
Creating DoorDash’s Workflow Studio and Execution Engine
We needed to build two sets of tools, each intended for different audiences:
Workflow Studio allows our operators to create workflows rather than having our development team add them to the existing tooling. As shown in Figure 1, we built a UI using React to allow users to draw workflows. We built backend APIs using Kotlin to accept workflow configuration data and store it in JSON – JavaScript Object Notation – within our Postgres database. The workflow configuration data forms a decision tree that is serialized into a JSON format for storage.
Figure 1: The workflow builder view lets operators create new workflows that represent a decision tree
Workflow Execution Engine allows our customer experience team members and consumers to interact with the workflow and execute steps, such as enabling consumers to choose the reason for a cancellation from a drop-down menu. The UI is built in multiple channels – web, iOS, and Android – to serve both customer experience team members and consumers. We used Kotlin to build the backend API; the workflow configuration is fetched from a Postgres database and deserialized into an object format that represents a decision tree. As shown in Figure 2, we execute automated steps repeatedly in a loop, responding back to the UI if a manual step is encountered.
Figure 2: The architecture behind the workflow platform has sets of APIs that interact with Workflow Studio and its clients
Instead of trying to complete the entire project at once, we opted for an iterative approach with each iteration building on top of the existing platform. This allowed us to improve our platform incrementally without delaying its functional rollout.
The initial MVP solution focused on enabling workflows that consisted of manual steps. A manual step contains an instruction that a customer experience team member can follow to resolve a customer problem. This solution allowed our operators to convert knowledge articles – guides used by customer experience team members to determine the steps to troubleshoot a customer problem – into workflows.
Our second iteration automated the manual workflows from the first iteration, introducing automated steps, such as processing refunds, that can be chained together to create customized workflows.
In our third iteration, we added internationalization support for our workflows. Because the workflow platform’s core principle focused on developing a self-serve model, we added the capability for operators to configure steps with multiple language support.
Finally, our fourth iteration focused on enabling workflows for self-help customers who use the consumer web, iOS, or Android applications as well as Dashers who use the Dasher iOS or Android applications.
Stay Informed with Weekly Updates
Subscribe to our Engineering blog to get regular updates on all the coolest projects our team is working on
Please enter a valid email address.
Thank you for Subscribing!
Resolving workflow execution challenges
Workflow solutions present unique challenges that are not typically seen when building an API solution. Rather than allowing two applications to interface, workflow configurations are represented as a decision tree that starts with a finite state and can end in one of many terminal states.
Dealing with unexpected failures
Problems cropped up when a workflow execution failed after executing some states without completing the process as expected. Because it was counterproductive to reverse all the transactions that had been completed, we decided to stop workflow execution when there is a serious error but to continue execution if the error won’t significantly affect the expected outcome.
Maintaining state
Another issue revolved around how to maintain state so that the multiple steps executed could be grouped into a single workflow instance. The resolution involves passing a “request id” attribute back and forth between the client and the backend to correlate the steps of a single workflow execution. To reduce complexity, we decided not to maintain state in the backend. Instead, every automated step is executed independently and does not depend on the workflow execution context. This allows us to build automated steps that can be plugged into any workflow at any step.
Dealing with scale
We also needed to prevent workflows from getting too big or having the same set of steps repeated across workflows. To resolve this, we built a “workflow jump” feature that lets operators configure smaller workflows that can be chained together into a larger workflow.
Conclusion
Our journey toward creating a custom no-code workflow platform sheds light on open-source tools and techniques to create build-it-yourself workflow solutions without vendor components, leveraging a general technical stack that is used in day-to-day software development. Our no-code workflow platform creates a reusable pattern to solve a wide variety of problems at DoorDash. Now we are leveraging the platform to solve customer problems across multiple channels – the web, iOS, Android, Chat, and IVR phone automation. The technology can serve the needs of a variety of audiences, including operators, customer experience team members, consumers, Dashers, and merchants.
Acknowledgement
Thanks to JR Maitre, Abin Varghese, Bhaavyaa Kapoor, Pnina Eliyahu, Kevin Nguyen, Ashish Keshri, Han Yan, Dan Behar, Kumaril Dave and Han Huang for their contributions to this project.
Part of being a modern-day Android developer is keeping up with Google’s latest update that can have outsized effects and consequences on application’s performance, especially when new changes affect how older app versions function.
Generally, Google releases two types of changes that impact developers: API changes and behavior changes.
Fortunately, API changes tend to be obvious. They are primarily coding changes that trigger compilation errors or lint warnings.
Behavior changes, on the other hand, are not so obvious, particularly when Google changes or adds constraints around an established feature, such as a background execution. If developers don’t pay attention when a new version of Android is released, the number of bug reports or QA tickets stating that a feature is no longer working as intended can skyrocket.
In this post, we take a look at changes that started in Android 12 that alter how generic web intents resolve. Because many applications use outside web links that direct users into the application – a process called deep linking – there are key fixes required in light of the latest Android updates. We’ll go over why the change was made to web intents and what developers need to do to accommodate it. While the coding changes are small, there are background processes taking place that must be kept in mind to achieve optimal outcomes.
Why Google changed how deep links work
Deep links help us provide a seamless experience between the DoorDash website and the mobile application. Assuming the application is installed, when a user taps a link from an email client or search engine results, we want the Android device to route the request directly to the DoorDash application instead of the web experience.
As a practical example, let’s say a user taps on https://www.doordash.com/store/fusian-columbus-76690/ from a google search result. Android dispatches a “generic web intent,” that routes the user directly to the store within the DoorDash application.
However, according to the new android version:
Starting in Android 12 (API level 31), a generic web intent resolves to an activity in your app only if your app is approved for the specific domain contained in that web intent. If your app isn’t approved for the domain, the web intent resolves to the user’s default browser app instead.
Why did Google make this change to web intents?
In Android 6, Google gave us the ability to create Android App Links, allowing developers to designate their apps as the default handler for a given link, such as an HTTP link. If your application is the default handler, then Android will open your application immediately. Otherwise, a different handler or application will be used.
Now, starting in Android 12, Google requires you to use Android App Links for HTTP and HTTPS links. Not utilizing Android App Links will result in links always being shown in a web browser and not your application.
We will explain step by step how generic web intents work and how to use Android App Links to resolve this issue.
Stay Informed with Weekly Updates
Subscribe to our Engineering blog to get regular updates on all the coolest projects our team is working on
Please enter a valid email address.
Thank you for Subscribing!
Understanding generic web intents
In Android, there are two types of intents: explicit and implicit. Explicit intents happen when you know specifically the Android component you want to launch. DoorDash uses these frequently to start activities within our applications.
Implicit intents, on the other hand, are when the desired component is not known or when Android is asked to find an application to handle a request. The following is an example of asking Android to seek an application to handle an intent:
val webpage: Uri = Uri.parse("https://www.doordash.com/store/fusian-columbus-76690/")
val intent = Intent(Intent.ACTION_VIEW, webpage)
startActivity(intent)
Android’s activity manager uses this intent to scan through activities to try to find one that can handle Intent.ACTION_VIEW and data of a particular URL, which, in this case, is a DoorDash URL. Most of the time, this intent will resolve to a web browser to view the web page. Ultimately, this is close to the intent triggered when a user clicks on a link within a browser or email client.
Resolving generic web intents
To instruct Android to use a local activity for this intent, insert an intent filter inside the android manifest as shown here:
This way, Android can see and attempt to use the DeepLinkActivity because it has an intent filter with the action of Intent.ACTION_VIEW and a data field matching the requested URL. This can be useful to establish a connection between an HTTP link and the application.
Until the advent of Android 12, we used this technique at DoorDash to navigate the user directly into a specific store, the user’s cart, various account features, and many other features as shown here:
What happens on Android 12
What should happen
Because of the behavior change in Android 12, we now are required to do some additional work to accomplish deep linking.
Following the deep linking path
Our solution begins with creating a digital link between the application and the domain for the Android system to verify. Below are the step by step instructions.
Step 1 – Update the Android Manifest
First we must update all intent filters that can respond to an HTTP link with the android:autoVerify=”true” attribute:
Optionally add tools:targetApi=”m”to appease the Lint warning
According to Google, the autoVerify attribute “allows your app to designate itself as the default handler of a given type of link. So when the user clicks on an Android App Link, your app opens immediately if it’s installed — the disambiguation dialog doesn’t appear.”
In practice, this means the Android system will securely verify ownership of the link you are trying to process. The system uses a digital asset links file to accomplish this. Asset links are a protocol that securely captures statements made by digital assets such as websites or mobile apps and provides information about the statements’ relationship with other digital assets. Deploying this protocol is straightforward; simply generate the digital asset link file described in the next step.
Step 2 – Create the assetlinks.json file
There are three options for creating the digital asset link file.
Option 1 – Create the assetlinks.json file manually
Create an empty file named assetlinks.json
If working with a single application, place the following information inside this file:
To find the application’s package, look for the application ID declared in the app’s build.gradle file or if the apk is available, use the aapt command: aapt dump badging [path-to-apk].
To find the SHA256 fingerprint, use Java’s keytool command. If the keystore is available, use the following: keytool -list -v -keystore [my-release-key.keystore]. Or if working with the .apk file, use this: keytool -printcert -jarfile [path-to-apk]
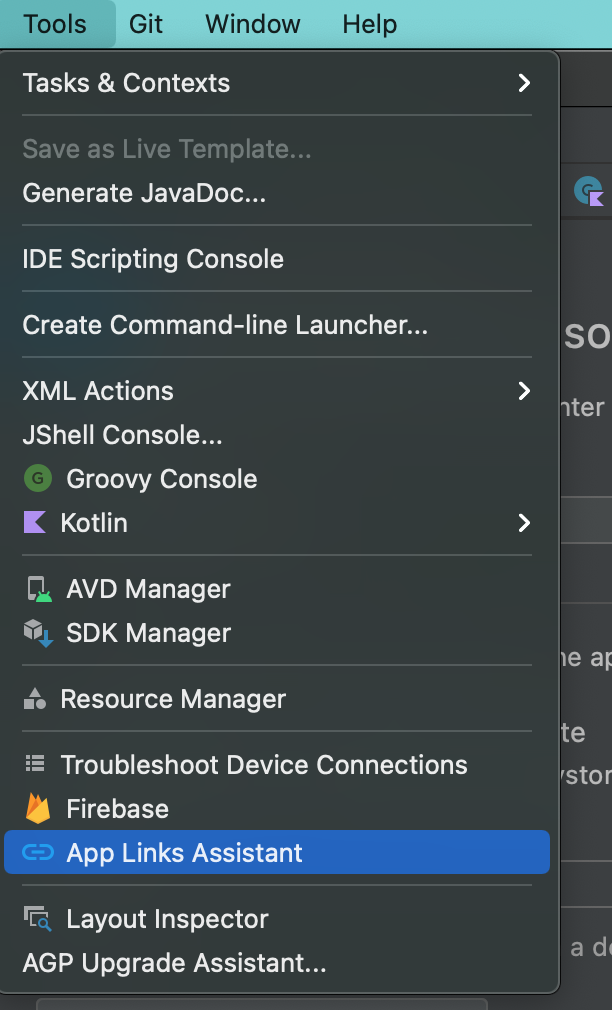
Option 2 – Use Android Studio’s App Link Assistant
Android Studio provides a tool for generating the assetlinks.json file for one application, automatically finding the app’s package name and SHA256 fingerprint. If there are multiple applications, the generated file must be updated manually with the other applications.
Option 3 – Use Google’s statement list generator tool
The assetlinks.json file must be accessible without any redirects (no 301 or 302 redirects) and must be accessible by bots (your robots.txt must allow crawling /.well-known/assetlinks.json).
The assetlinks.json file must be served with content-type application/json.
The assetlinks.json file must be accessible over an HTTPS connection, regardless of whether the app’s intent filters declare HTTPS as the data scheme.
Step 4 – Verify that the assetlinks.json file is correct
Now that we’ve generated the assetlinks.json file, how do we confirm that the file is correct? Luckily, Google provides a Digital Asset Links API to verify the accuracy of the assetlinks.json file:
If all goes well, the API will respond with the following:
Step 5 – Verify your changes on Android
Congratulations! The Android Manifest is updated and the app is associated with the assetlinks.json file required by Google. After redeploying the app, test the deep link process using the command line:
adb shell am start -a android.intent.action.VIEW \
    -c android.intent.category.BROWSABLE \
    -d "https://www.doordash.com/store/fusian-columbus-76690/"
This ADB command launches an implicit intent with the action VIEW, category BROWSABLE, and data containing a DoorDash store, all of which is similar to the implicit intent executed when clicking on a link.
If there are still glitches at this point try manually invoking the domain verification on the device or emulator. Google lists the steps here as well as the possible return values.
Conclusion
To summarize, here are the key takeaways from this post:
Utilize android:autoVerify=”true”in the Android Manifest within intent filters that respond to intents with http links.
Generate an assetlinks.json digital asset file to create a link between the host and the application.
Work with your infrastructure team to deploy the assetlinks.json file to the host(s) or hosts (if you are handling multiple domains).
Google’s documentation can be perilous for inexperienced Android developers, particularly when behavior changes are involved. We hope this guide will help you steer clear of any issues around deeplinking. If you are interested in directly impacting the end user’s experience check out our open roles on our career page
Previously, DoorDash relied on Postgres as its main data storage and used Python Django database models to define the data. By default, an ID field is automatically added as the primary key which is an auto-incrementing Integer value, whose upper bound is about 2.1 billion(231-1). However, to support the rapid growth of business, we needed to evolve the data models from Integer to BigInt before we ran out of the Integer ID range to avoid integer overflow. While we were able to complete the primary key data type upgrade in tables without downtime. We needed to guarantee our systems were fully compatible with the table’s BigInt upgrade.
The compatibility challenges of upgrading to BigInt
To launch IDs beyond Integer, we needed to upgrade the table’s primary key and other tables referencing the primary key to BigInt. Also, applications that use the upgraded tables must be able to correctly insert and accept data beyond the Integer limit. Below were some challenges we needed to address before we started to roll out the BigInt for our systems:
Foreign key constraint was not always present in cross-referencing between tables
When upgrading the primary key data type in a table, we needed to upgrade other tables that have fields referencing the upgraded primary key, for example, the tables with foreign key on the updated primary key. However, some tables just defined an ordinary field instead of using foreign key constraints to reference the upgraded primary key. In our case, when the ID of an order in the order table was passed down to another service, the order ID was saved as an ordinary field with an unrelated naming of target_id in their table. Such references without the foreign key constraint were harder to identify.
Hard to detect if IDs were handled properly in backend applications with a microservice architecture
There was not an easy way to confirm if applications’ code could handle the new ID data type properly. Particularly for data that were used across domains under the microservice architecture, different flows are running in isolated services. It’s hard to tell exactly how the upgraded table ID is flowing and how it is handled inside the services using the ID. For example, if the data type of the ID is defined as Integer in the API request and response between services, or if there is data type downcasting from Long to Integer in the code, we could end up with code exceptions or incorrect data when we begin to use the IDs exceeding the Integer range in any table.
Guaranteeing compatibility on all client platforms and versions
Similar issues of data type incompatibility could also happen on user-facing clients, such as our Android, iOS and Web apps. For example, if a client application defines a data object with an Integer ID to receive a response from the backend, the client won’t work when the backend returns a response with the ID that exceeds the Integer range. We also needed to make sure that clients that are compatible with the BigInt upgrade worked well not only in the future versions of clients, but also in the older app versions.
Identifying compatibility issues by using separate postgreSQL sequences to control data creation
We developed a solution that could experimentally use the BigInt range on small-scale users to identify compatibility issues before bigInt reached all users. Here was the high-level process:
Created a new additional postgreSQL sequence with starter ID greater than the upper bound of Integer, besides the original default sequence, to associate with the primary key datatype upgraded table
Developed a new code path to specially use the new sequence to insert data beyond Integer range.
Rolled out the new code path on small-scale users to find out and fix potential issues using ID beyond the Integer range, while the original sequence of IDs within the Integer range continue to serve the remaining user traffic
Switched the new sequence as default sequence for a table when experiments confirmed it works reliably.
Stay Informed with Weekly Updates
Subscribe to our Engineering blog to get regular updates on all the coolest projects our team is working on
Please enter a valid email address.
Thank you for Subscribing!
Step 1: Create additional sequences for the bigInt upgraded tables
After the datatype of primary key in a table and columns in other referencing tables were upgraded from Integer to BigInt (how to upgrade the column datatype in tables is another big topic but not the focus of this blog), the tables had capacity to deal with data beyond 231-1. We created a separate sequence with a starter id greater than the Integer upper bound. We chose the new starter of 232. Values between 231 and 232-1 would wrap around and become negative when truncated to be represented in 32 bits signed Integer. Negative integers could represent a precious escape hatch if we didn’t get all systems ready on time before we overflowed. A sample below showed how we created the sequence:
CREATE SEQUENCE __bigint_tablename_id_seq START WITH 4294967296;
Step 2: Use the two different sequences for data insertion to the same table
We continued to use the original default sequence associated with the table to generate the primary key within the Integer range for public traffic. Meanwhile, we created a new parallel code path that specifically used the new sequence from step 1 to generate the ID beyond Integer limit when inserting records into the table. We created an experiment to control which code path to use before inserting the data. The flow was shown in Figure 1 below.
Figure 1: Using two different sequences to insert data for ID values in different data type range depending on whether we are using a new sequence or not
The code sample below showed how we implemented the flow of Figure 1 in a Kotlin based microservice using JDBI to interact with the database.
 @GetGeneratedKeys
 @SqlUpdate("insert into $sampleTable ( $insertColumns ) values ( $insertValues )")
  fun create(@BindKotlin obj: DBObj): Long
We originally used the query above to insert new data, where $insertColumns, $insertValues didn’t include the ID column and its value, so it would be automatically generated by the default sequence associated with the table. The default sequence generated IDs within the Integer range.
@GetGeneratedKeys("id")
@SqlUpdate("insert into $sampleTable ( $insertColumnsWithId ) values ( $insertValuesWithIdInNewSequence )")
   fun createWithIdInNewSequence(@BindKotlin obj: DBObj): Long
Meanwhile, we defined the new interface above to specify the ID value when inserting new data. This specified ID value was generated from the new sequence we created. In the query, insertColumnsWithId = ":id, $insertColumns" and insertValuesWithIdInNewSequence = "nextval('__new_sampletable_id_seq::regclass), $insertValues".
The nextval('__new_sampletable_id_seq::regclass) was to get the next value from the new sequence. In this case, the data we would insert from this interface was ID beyond Integer limit, so we could test the systems to handle BigInt.
We ran an experiment to select which sequence to use when inserting data into our system. When the new sequence was selected, we were able to use the ID beyond the Integer range for data insertion.
if(User in experiment){
     createWithIdInNewSequence(obj)
} else{
    create(obj)
}
Step 3: Utilize the ability to insert data beyond the Integer range to detect issues
As we stated in Step 2, we kept the default current ID sequence to serve the public traffic before confirming all flows and apps were able to handle the BigInt upgrade. Meanwhile, we rolled out a bit of traffic for internal users to use the new sequences code path and monitored for any abnormality.
We were able to detect a number of issues during our gradual rollout:
Read failure on PK upgraded table because API defined the ID in the request/response payload as Integer
Though we successfully inserted data whose IDs were greater than the Integer range to the table, some APIs failed to retrieve such data because the API request only accepted integer IDs. To fix such errors, we just needed to fix the problematic endpoints by upgrading the param data type from Integer to Long in the request or response.
Write failure on referencing tables because referencing tables were not upgraded
From placing an order to an order being delivered, complicated data is flowing through different services, and the services persist the needed data into their respective databases. During the test rollout, we got reports from our downstream service that they had failures of data persisting to their table due to an ID reference from our table.
It turned out that we didn’t upgrade their table with a reference column(not using foregin key) to our BigInt upgraded table. The column in their table referencing our upgraded primary key was still in the Integer format, which led to failures to write data to their table when the referring ID was generated by the new sequence. We fixed these overlooked tables by upgrading the reference column data type to align with the upgraded BigInt table.
Wrong IDs were persisted into tables due to ID downcast without error exposure
Writing and reading successfully from the BigInt new sequence was not enough; we also needed to confirm the correctness of the data. For example, one of the teams had an ETL job to join the data from the Transaction table with the Order table on the order ID to generate a data report. The ETL job was running a query with the following structure:
select * from order o
join transaction t on t.order_id = o.id
where …..
Though the data type of the order ID in both Order table and Transaction table had been upgraded to BigInt, there was a line of code downcasting the original order ID from Long to Integer and the result was persisted to the Transaction table.
targetId = orderId.toInt()
This Long.toInt() data type casting operation could perform without any error. But the resulting value is represented by the least significant 32 bits of this Long value. So the data generated from the new sequence was able to be written and read successfully but not correctly. Due to the wrong casting of data type, the ETL job couldn’t get the expected result before we fix it!
Step 4: Switch the new sequence as default sequence for table
After resolving all the issues in step 3, we were confident that our systems were compatible when the IDs began to exceed the Integer range. The last thing to be done was to replace the default original sequence with the new sequence as our default ID generator. This was necessary because even though the original sequence could generate IDs greater than the Integer range, it wasn’t aware that part of the IDs beyond the Integer range had been occupied from the new sequence. Before the two sequences overlapped, we needed to use the new sequence only. so we associated our new sequence as default with the table and abandoned the original sequence.
When we reached this point, the migration of Bigint upgrade was smoothly done and our systems could support ID’s beyond the integer range.
Conclusion
This article presented the technique of adding additional postgres sequences to detect compatibility issues during postgres table bigInt upgrade to make sure there were no blind spots in our systems with the upgrade. BigInt migration is a company-wide task that could be challenging from the lower storage layer for data migration to the higher layer of applications compatibility. A recent blog suggests using BigInt by default, examining production-scale database with properly sized hardware can handle the slight overhead with no problem. If you need to go through the bigInt upgrade, we hope our article could shed light on how to detect the compatibility issues to fix them!
Acknowledgements
Many thanks for the great support from Cesare Celozzi, Zhengli Sun, the awesome work from Alessandro Salvatori for table schema change and migration, and the timely help from Patrick Rogers, Saba Khalilnaji, Justin Lee, Malay Harendra and Andy Liu to fix the issues to make the upgrade go smoothly.
As machine learning (ML) becomes increasingly important across tech companies, feature engineering becomes a bigger focus for improving the predictive power of models. In fact, data scientists and ML engineers now spend 70% of their time on feature and data engineering.
At DoorDash, most of our ML applications leverage our real-time prediction service (Sibyl), which is supported by a Redis- based feature store. But while our serving stack is now fairly mature, developing new features and iterating on existing features still form a major chunk of a data scientist’s development lifecycle.
So, to accelerate development of E2E pipelines for feature engineering and serving, we built Fabricator as a centralized and declarative framework to define feature workflows. Within the past few months, data scientists have leveraged Fabricator to add more than 100 pipelines generating 500 unique features and 100+B daily feature values. In this blog, we visit some of the motivations, designs, and learnings around building the framework.
Reimagining feature engineering at DoorDash
Our legacy systems were functional but not ideal.
Figure 1: This flow describes at a high level the lifecycle of feature development at DoorDash.
In our current ecosystem shown in Figure 1, most data science verticals
Author and manage the feature generation ETLs written on top of our internal data engineering infrastructure using Snowflake and Airflow.
Handwrite hundreds of lines of SQL joins to produce the final training datasets.
Collaborate with the ML platform to productionalize features for online feature and model serving.
Why is this legacy workflow proving harder to scale?
Currently E2E feature engineering is an amalgamation of loosely coupled systems. This introduces the following problems:
Too many touch points: Data scientists work with the data infrastructure to maintain their ETLs, hand-write their offline feature serving code, and work with the ML platform to author their online models. This makes model development velocity slow. Additionally, the overhead of understanding each system and its technologies closely (Snowflake, Airflow, Redis, Spark, the list goes on) makes onboarding really difficult.
Infrastructure evolution is slow: Given the loosely coupled nature of systems with different charters, the evolution of the infrastructure is difficult. Small changes can break the entire flow. And, as our data grows with the company, it makes our systems slower and/or costlier. The entire framework needs more iterability to keep the cost curves flatter.
We have no management UI for features: Data scientists have no access to explore hundreds of features made by other members of their org, share them across teams, or observe their lifecycle. Each feature has to be code searched across repos to access the full picture. Additionally, given that feature observability and monitoring is an ad hoc process we do not have the ability to understand drift and quality of features over time. Lack of these two abilities further reduces the development velocity for new features.
What does an ideal feature platform look like?
We embraced two major Doordash philosophies to design a more appropriate feature engineering platform:
Build products not systems: The value is from having feature engineering be a centralized product, with a single touch point that enables every component.
Make it easy to do the right thing: Customizations are always needed, but 80% use cases fall into a set of common templates. We wanted to make it extremely easy to do the defaults, leaving room for advanced users to add customizations with marginally more effort.
Stay Informed with Weekly Updates
Subscribe to our Engineering blog to get regular updates on all the coolest projects our team is working on
Please enter a valid email address.
Thank you for Subscribing!
Considering the components we wanted to provide to our data scientists, we drew inspiration from really good open source solutions such as Feast and in-house solutions such as Palette from Uber and Zipline from Airbnb for the high- level design shown below in Figure 2.
Our vision for an ideal feature platform was formed from the following components:
Data plane:
Feature generation: A guided low-friction process to develop new features.
Offline serving: An abstract API layer to fetch features from their underlying storage to enrich training datasets.
Online serving : A seamless workflow to materialize produced features to an online feature store as soon as data is ready.
Control plane:
Feature management and discovery: An accessible UX to track and maintain the current catalog of features, their definitions, and their lifecycle status.
Feature observability: An integrated solution to track statistics about usage and drift on features in production.
Figure 2 : High-level vision for a feature platform that focuses on reducing data scientist’s interaction to a single point, automating all the other components needed.
How Fabricator delivers a centralized and declarative framework
Fabricator delivers the above design using three key components:
A central declarative feature registry that allows users to define their entire workflow all the way from generation to serving.
A unified execution environment that provides a set of high-level APIs to freely use multiple storage and compute solutions.
Automated and continuously deployed infrastructure, which reduces operational overhead to zero.
Figure 3 : Fabricator’s design aims to automate infrastructure operationalization and pipeline executions behind a simple declarative feature registry.
Creating a declarative feature registry
A big bottleneck in feature development is the boilerplate and domain specificity of the systems used to build its components. As such, the machine learning operations (MLOps) community has been gravitating toward templated YAML and SQL to manage various definition spaces at a higher level of abstraction for a while now.
We’ve had similar findings within DoorDash as well, from projects like Riviera. Fabricator provides a single YAML-based repository of definitions, which are backed by a protobuf schema and stored into a central feature registry.
Introducing sources, sinks, and features
Utilizing protocol buffers (Protobuf) as a schema definition layer for the definition objects allows our YAML files to be structured in backward- and forward-compatible ways. We achieve full descriptive power through three concepts: Sources, sinks, and features. Sources: This YAML template describes a generative definition for a feature source. The flexibility of the proto schema allows us to use the same definition for real-time and batch features. A sample source definition is shown below:
We declare the output storage format in the source definition. This is quite flexible and allows us to support multiple batches (S3 and Snowflake) and real-time outputs (Kafka).
The compute spec is an extensible definition that allows separate customization based on compute type. Spark, Snowflake SQL or Flink SQL are currently supported.
Additionally, a trigger spec allows us to further customize when this pipeline should be run. As we see later, this makes it easy to automate pipeline orchestration.
Sinks: Apart from their persistent storage, features may need to be materialized to a different store for online serving. We use sinks to define such materialization stores. We currently support Redis and Kafka as materialization stores.
Features: The primary goal for the definitions is to identify the feature lifecycle. Features are identified by name and connected to their generative source as well as materialization sinks using the YAML definition as shown below:
A key blocker towards iterability for data scientists is having a really quick release cycle to their entire feature pipeline. Fabricator maintains a repository of all YAML definitions and updates the central registry as a part of every product release CI/CD cycle. This enables their changes to take effect within minutes of their commits.
Setting up a unified execution environment
Providing an easy-to-use definition language and enabling quick deployments sounds helpful, but it’s only part of the development process. As a data scientist, testing feature pipelines and then deploying those is equally important. Traditionally, playgrounds operate in separate environments from production, making translating development code to production DSLs a cumbersome process.
To solve this, Fabricator provides a library of APIs to provide a unified execution environment during development and production, that integrate natively with the DSL. These APIs reduce the boilerplate required to build complex pipelines and offline feature serving as well as provide efficient black-box optimizations to improve runtime performance.
Using contextual executions
Fabricator provides extensible Pythonic wrappers around the YAML DSL called Contexts, which can be specialized for more specific pipelines. An example base class and its specialization for executions is shown below:
Why is this simple wrapper important? Conceptually, this is quite straightforward, but behind the scenes we leverage it for three important reasons:
Fabricator pipelines are authored to “run” a Context. Every YAML compute spec translates to an appropriate context and applies user code to it. This makes development and production work in the same way.
Contexts hide infrastructure interactions, as we’ll discuss later. You can operate freely between multiple storage layers (Snowflake, S3, etc) and compute layers (Spark, Snowflake SQL or just simple Pandas) through these Context objects.
Existing definitions can be easily referenced in an abstract way. FeatureContext.from_source(‘consumer_engagement_metrics’) would give you the fully formed Context for the YAML we defined in the previous section.
Enhancing with black box optimizations
As our compute and storage offerings expand, there are a range of technological nuances to master. These questions aren’t universally known across data science. With the information stored inside Contexts, we provide healthy defaults that make onboarding really smooth.
For example, when you’re writing a Spark data frame out to S3, there’s a few open optimization questions. How should the data be partitioned? Will partitions run through a single reducer? Is there a data skew or partition skew? Answers to some of these questions may decide if a pipeline runs in fifteen minutes or four hours. We provide APIs such as write_data_spark(context, df) that identify the number and type of partitions that are optimal for your data.
Enabling offline serving
Offline serving is the portion of the workflow that focuses on using generated features to create an enriched training or validation dataset. Fabricator provides a simple get_features API that allows the naming features that are pulled for a provided DataFrame. The API infers the related Contexts and storage information and constructs efficient joins to facilitate the work.
Since these joins are blackbox APIs as well, we can apply optimization techniques to all existing jobs in one fell swoop. We were able to accelerate multiple jobs by ~5x when we leveraged key-based repartitioning for feature joins.
Automating infrastructure integrations
The discussion so far has centered primarily around creating and using features offline. But feature engineering has a few other parts to its lifecycle. Fabricator’s framework and central registry enable automation in two major ways :
We can automatically infer orchestration and online serving needs using the same definitions that are committed to the registry. Users get this for free.
We can add additional integration points to Fabricator to other parts of our data platform, such as our central data portal or data quality tools and amplify the gains across hundreds of features.
Automating workflow orchestration
Fabricator can automatically construct and update DAGs and dependency management for our user’s pipelines. At DoorDash, we leverage Dagster to construct date-partitioned slices of user DAGs, which automatically infer dependencies from the definitions and can be used to concurrently backfill new pipelines as far as a year within a few hours.
Automating online serving
With a simple setting of materialize spec, one can set up their pipeline to materialize features to the online feature store. Features are typically uploaded to our feature store within minutes of the data being available in offline storage.
Making feature discovery self-serve
The central registry enables multiple central UX services to surface a catalog of features and their lineage. We leverage Amundsen internally to connect our features and their source table information to the rest of core data information to create a holistic data lineage graph.
Improving feature observability
We are now starting to leverage the YAML spec to also configure observability details such as thresholds for feature defaults in production or data quality rules for output feature data using frameworks like Great Expectations or Deequ.
Conclusion
We’ve come a long way since we first ideated this framework. Since its launch, Fabricator has helped double the number of feature pipelines supported within DoorDash. Throughout the development of this project we have been able to learn some key things and also make a large impact on the productivity of our data scientist which we will go into more detail on below.
Results
Leveraging centralized changes such as array native storage and Spark-based UDFs for embeddings helped scale many of our embeddings pipelines by more than 12x in running time.
An automated orchestration layer has made the process of backfilling much less cumbersome. We have backfilled more than 70 new jobs for up to one year of data, accelerating experiment timelines by many days in some cases.
Learnings
Optimizations are multiplicative : If you leverage a storage optimization that has twice as high throughput, and couple it with a UDF-based compute that is six times faster, cumulative wins are 12x. Such black box optimizations have brought down cumulative running times for many of our jobs from > 120 cluster hours to a few hours per day.
Standardization accelerates development: Once you package 80% of the standard use cases behind a few simple knobs, the easing of the decision process makes iterations significantly faster, even if the underlying process didn’t change significantly.
Parallelizable backfills provide a big boost to velocity: Backfills are an under-rated problem in machine learning data engineering. Just because one year of data backfill may take up to a few days to set up, data scientists may choose a small subsample of data to iterate faster. Having that data in a few hours instead makes iteration velocities much easier.
Future bets
Much of this blog has focused on the batch abilities of the framework, but in reality ML data engineering is quickly navigating into lambda architectures. Fabricator was designed to natively operate between real time and batch feature pipelines, as the YAML describes, and leveraging that into working with hybrid pipelines (batch features bootstrapped with real time incremental features) is the future path.
Acknowledgements
Fabricator is a result of a large amount of cross functional collaboration across various platform and data science teams. I would like to acknowledge Hien Luu, Brian Seo and Nachiket Mrugank Paranjape for contributing to the growth of the framework. I would also like to acknowledge Satya Boora and his team for integrating Fabricator with our Data Infrastructure, as well as Abhi Ramachandran, Yu Zhang and the rest of the Data Science team for partnering with us to test our work.
Creating multiple language versions of the DoorDash app not only lets us offer our delivery logistics platform in more countries, it also removes language as a barrier to communications. A Spanish speaker may place an order on the app to a French-speaking restaurant and have an English-speaking Dasher — our name delivery driver — close the order. The DoorDash app shows each individual their language of choice, helping to facilitate a problem-free delivery. In addition to our U.S. operations, DoorDash currently operates in Canada, Australia, Japan, and Germany, requiring the app to be able to display several different languages. The translation platform we have built has been critical to the success of these international operations, as it sped up our time to launch in non-English-speaking regions by facilitating quick and accurate translations of product text.
Making the DoorDash app multilingual has not been a trivial task. Along with customizable language settings in the app itself, each new language we add requires building a platform on the backend to translate every word shown to our consumers, merchants, and Dashers. Considering the vast amount of text in our product, it’s a challenge to ensure everything is accurately translated. Our recent global expansion into new markets has given us an opportunity to build a scalable and developer-friendly translation platform. Among its myriad benefits:
An easy way to translate millions of strings
Simplified integration allowing developers to streamline translation of strings to multiple languages
Support for a myriad of client types and file formats, giving developers visibility into issues reported by translators
Tools to allow developers to translate strings easily as DoorDash deploys entirely new languages
Guardrails and reporting to ensure quality control for all new translations
Internationalization (i18n) and localization (l10n)
Internationalization — referred to as i18n because there are 18 letters between the i and the n — is the process of developing software that supports local languages and cultures. Localization — or l10n — adapts software for use in specific regions. Both processes go beyond simple translation from one language to another; developing software that takes into account social and cultural norms also plays a critical role, as does sensitivity to differences in the same language between different regions. For example, Spanish spoken in Mexico is quite different from Spanish spoken in Chile.
Good internationalization and localization, including high-quality translations, ensures a consistent brand voice across the platform, among other key benefits.
Challenges of building a translation platform
DoorDash platform developers create strings based on U.S. English. As the platform expands into new markets, all strings across every product must be translated in bulk to the regional language or dialect. The strings either can be in static files across multiple formats such as Android, iOS, or JSON, or they can be dynamic strings that can be added/modified without needing a code deploy. Developers need an easy way to add/modify strings and get translations for supported languages. Simultaneously, product managers need a way to audit the translated results to ensure a high-quality product.
Outlining the translation flow
Any text displayed to a user in the DoorDash app is stored as one or more static or dynamic strings in our systems. Understanding both types of strings is an important part of showing each user text that they can understand.
Static strings are key-values organized into a set of files, one for each target locale. The actual code then uses keys to look up the text to be presented instead of using the text embedded in the string. Locale settings on the user’s device and their DoorDash account determine which file should be used to present the final text. These files — including Android strings and iOS strings — are modified using change requests, which need to be merged and deployed in order to take effect. We will discuss how our system handles static strings, later in the post.
Stay Informed with Weekly Updates
Subscribe to our Engineering blog to get regular updates on all the coolest projects our team is working on
Please enter a valid email address.
Thank you for Subscribing!
Dynamic strings can be translated without the kind of code deployment required by static strings. The dynamic strings service stores translations in a database; strings can be sent over for translation using a dynamic strings UI or via an API call. The dynamic strings service also has a dynamic strings client used to continually ask the service for new translations. Services that already have a UI to create new strings use APIs provided by the dynamic strings service, while services that don’t have a UI use the dynamic strings UI. In either scenario, the service does not need a code deploy when requesting a translation. Just like static strings, the locale settings on the user’s device and DoorDash account determine which translated string is displayed.
Translation platform architecture
In Figure 1 below, the entire i18n platform at DoorDash which includes the Static Translations Service and the Dynamic Strings Service. The i18n Platform Clients interact with i18n Platform libraries which include libraries for “Names”, “Currency” and “Date” the use cases for these libraries is explained in detail in an earlier blogpost Overcoming Localization Challenges for International Expansions. In order to manage dynamic strings, the i18n Platform Clients interact with the Dynamic Strings Client which in turn interacts with the APIs of the Dynamic Strings Service (DSS). Static Strings are authored in source control and translations for them are managed by Static Translations (STS) through PRs. Both STS and DSS interact with the APIs of the Partner Translations Management System (PTMS) and abstract out the i18n Platform Clients from interacting with them directly. PTMS has glossary, style guides and context capture that our language experts and product managers can define to maintain consistency in DoorDash’s tone, voice, and style.
Figure 1 The translation platform consists of two services, the static translation service, or STS, which manages static strings, and the dynamic strings service, which manages dynamic strings.
The static translation service, or STS, is a backend service that is integrated with client Github repositories to provide developers with string translations as commits in their pull requests, or PRs, simply by commenting “translate apply” on the PR. The service also provides the translation job status and reports any issues raised by translators. STS interfaces with the APIs of a translation management system we partner with to abstract the process of obtaining translations.. Developer repositories integrate with STS by installing a Github app configured to call STS whenever there is any activity in the repository. Such activities include new commits or comments used by STS to manage translations on PRs.
Examples of STS implementations
We developed STS when we first launched DoorDash in French and subsequently used it to translate the DoorDash platform into Spanish. For our Japan launch, we added guardrails and checks on repositories to prevent PR merges containing new or updated strings without translations, as well as modifications of translated string files. These guardrails were put into place to ensure high-quality translations, discourage machine translations, and maintain consistency in DoorDash’s tone, voice, and style. We also expanded the “translate apply” command to let developers use a single command to request bulk translations for a given locale, streamlining support for new languages and enabling developers to request missing translations more easily. We also built a reporting tool to monitor the repositories continuously and ensure there were no strings without corresponding translations.
How we use dynamic strings
Not all strings are powered by static files, creating a need for services and systems to get translations for strings without a code deployment, including some of the dynamic strings shown on the homepage of the DoorDash app. We identified this need when we built and launched STS, prompting the creation of the dynamic strings service (DSS) . Like STS, DSS interfaces with the translation vendor’s APIs, abstracting the process of obtaining translations.
The translation platform’s future
At this writing, we have translated more than one million strings across four languages (English, French, Japanese, and German) using these new tools while also building a centralized translation platform for use across all DoorDash services. Onboarding a new language once required hours of developer effort, including manually sending string files for translation and then putting the translated files back into repositories. Today a new language can be triggered via a single command in one minute.
There is work underway to unify the STS and DSS codebases and databases to make them easier to maintain. We also plan to add some of the STS features such as guardrails, reporting, and bulk translations to the DSS. Currently, STS clients must wait for translations to be committed to the PR before they can be merged. We are working on allowing clients to merge their PR without translations, then allowing the STS to create a separate PR with translations; extensive reporting will ensure there are no strings with missing translations. As an extension of this, we are exploring moving all the static strings files to a new strings repo and using Git submodules on the client repos to reference those strings. This way, STS can merge the strings directly to the strings repo without needing any developer intervention.
Many companies build products for users who speak different languages. Most of them start with a manual process to translate strings in their products, which can be slow and error-prone. As products and features expand into new languages, we advise investing in a scalable and robust translation platform such as the one DoorDash has created.
While S3 has traditionally been a valuable resource for sharing documents its removal of V2 signatures has forced many companies to scramble for an alternative. Here at DoorDash, the majority of our infrastructure is hosted on AWS. One of the oldest and most reliable services in the AWS fleet is S3, an object store which is a generic term for a place to put files but not modify them like in a file system. S3 claims its durability has an impressive 11 nines — that’s 99.999999999% — meaning that it’s more likely that the planet will likely explode before AWS will lose a file. Durability is not to be confused with availability — a customer’s ability to access files — which comes with a more standard 99.99% guarantee. Coupled with IAM (the AWS Identity and Authorization Module) for data permissions, S3 has become the most common and generally cost-effective way to share files within AWS. Using S3 does not require servers to run, so there are no expensive EC2 compute costs for idle servers when the files are just sitting there. Instead, there is a small monthly charge of 2.3 cents or less per gigabyte.
Before DoorDash was the large international company it is now — the company needed a cheap and easy way to provide invoices to the merchants on the DoorDash platform. Given its high durability, low expense and easy sharing capabilities S3 was the logical choice!
The history of our invoice generation service
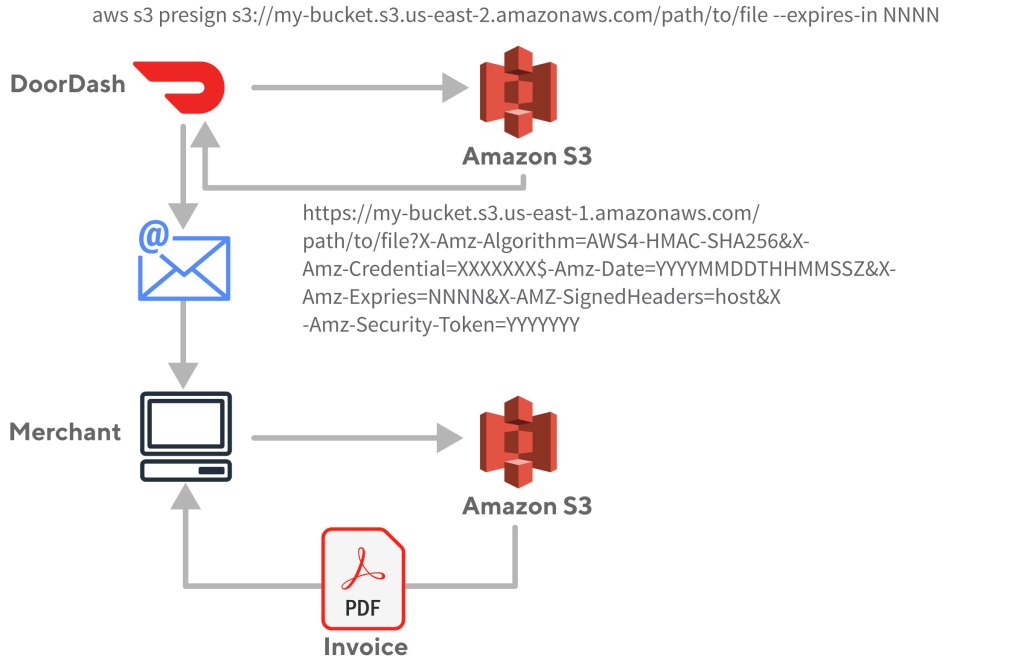
To better automate our back office functions DoorDash built an invoice generation system which places invoices into an S3 bucket, and then sends an email to the merchant with a link to download the actual invoice. While this was maybe not the best solution, it solved the problem quickly and allowed us to pivot back to the product work that was actively growing the business. This link needed to authorize only the merchant for which it was intended, requiring some security. This is where S3 signatures came into play. With no servers to manage, S3 provided an easy place to put the invoices and had a feature that allows signing URLs with IAM credentials to block general public access, but still allow access to those with the link. At that time, the expiration timeout for a signature could be quite long — even years, which allowed merchants to access an invoice even after some time had passed. The emails were sent out with very long expiration links and the accounting solution was complete.
The workflow had two steps. First the DoorDash application would place the object, in this case an invoice, in S3. Then the workflow would request a signed URL from S3 and email to the customer. When the customer clicked on the link, the signature would be validated and the invoice document returned directly from S3 to the customer.
Figure 1: The workflow that describes the signing and retrieving an S3 signed URL
How the move to V4 signatures compromised our invoice engine
This mechanism worked great but, in June 2018, AWS announced that S3 support for V2 signatures would be phased out over the next year and replaced with V4 signatures. At the time, DoorDash didn’t think much about this because we were busy building and growing. Besides, an announcement like that wasn’t exactly front page news and there were no public post references to it. As the June 2019 deadline approached we did not realize that our merchants would no longer be able to access their invoices. The problem was also more complex since simply upgrading to V4 wasn’t going to help because AWS had never intended for URL signing to be used in our use-case. When V4 signatures were introduced, AWS imposed a much shorter time limit on their validity than before. This was because in an age of replay attacks and bot armies trying to compromise data centers 24/7/365, it seemed a sensible precaution to limit signature validity times. The new limit was seven days, which meant we could no longer use this method to provide long-term access to old invoices. But we were unaware that all of this was coming at us.
Ten days before the deprecation deadline, AWS announced a one-year extension to June 2020 for any new S3 buckets; all existing buckets would continue to support the old signatures, which gave customers more time to migrate their code. Because our invoice bucket predated the new limits, once again we unknowingly dodged another bullet.
In late 2020, one of our security engineers picked up on the shorter time limits with V4 signatures and realized that we were headed for trouble. Work began to figure out how to stop using V2 signatures. Around the same time, DoorDash passed its one-billion-order milestone — with half of those being recorded in just the previous six months. Six months after that, DoorDash hit the two-billion-order mark. To say we were busy building and growing is an understatement.
One idea considered was to integrate access to the older invoices via the merchant web portal. The merchant would log in, which would allow us to provide the right invoice to the right merchant without compromising security. But this solution would take some effort and there were many other things going on. Expansion into Japan, convenience and grocery via DashMart, and many other company goals were fighting for engineering time, so we looked for other options to maintain access to invoices with minimal engineering time until a high-quality portal solution could be prioritized.
As luck would have it, a workaround solution arrived from another part of AWS just in time.
AWS releases a better way to sign URLs
In October 2020, AWS announced support for public-key-signed URLs via Cloudfront. This meant that we could sign a CloudFront URL to an invoice with a private key that we held, while giving CloudFront the corresponding public key to validate the signature. Cloudfront would hold a list of public keys to identify authorized signers; each corresponding private key would be tucked away in our secrets management infrastructure to allow applications to generate signed URLs as needed. Furthermore, these signed URLs could contain custom policies, including such things as valid date ranges or required retrieval from specific IPs or networks. Only the starting time is required as shown here in the documentation:
{
    "Statement": [
        {
            "Resource": "URL or stream name of the file",
            "Condition": {
                "DateLessThan": {
                    "AWS:EpochTime": required ending date and time in Unix time format and UTC
                },
                "DateGreaterThan": {
                    "AWS:EpochTime": optional beginning date and time in Unix time format and UTC
                },
                "IpAddress": {
                    "AWS:SourceIp": "optional IP address"
                }
            }
        }
    ]
}
Constructing the JSON directly is unlikely. Instead, one of the SDK’s helpers can be used, as shown in the full example below.
Alternatively, signed cookies also are supported for authentication. This mechanism could be used to grant limited access to a CloudFront website for select users — for instance during a beta period — or as a gatekeeper for subscriptions, with the signature expiring at the end of a paid subscription. These uses don’t align with this use case, so they won’t be covered further here.
Users of CloudFront already know this is the preferred way to provide public access to private S3 data in AWS. The most important improvements over using S3 directly are secure transport using HTTPS instead of HTTP-only that comes with S3 static website hosting, and preventing direct access to the S3 bucket. This also has the additional benefit of using a company’s domain in the URL instead of an ugly randomized CloudFront URL, for example:
Set up a CloudFront distribution (including HTTPS via Amazon Certificate Manager)
Give CloudFront an Origin Access Identity (or OAI)
Point the CloudFront origin to the S3 bucket with the data
Set the backing S3 bucket policy with s3:GetObject permissions for that OAI.
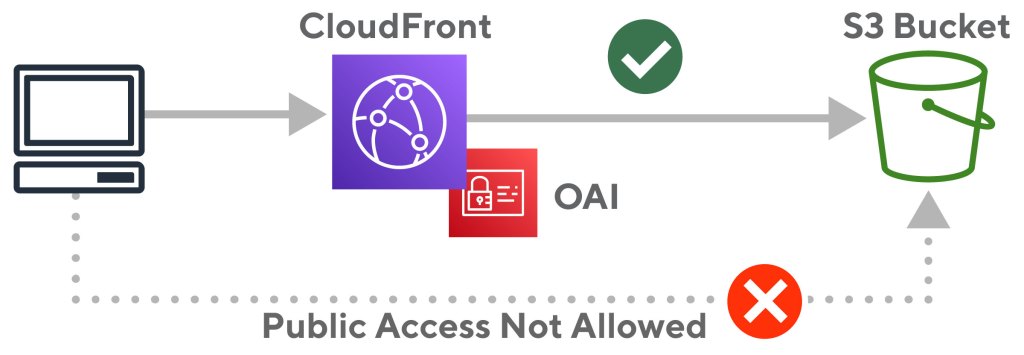
Figure 2: Access to S3 bucket only allowed through CloudFront
Figure 2 shows the resulting configuration of a locked S3 bucket that uses CloudFront to serve content publically. Next we need to enable URL signature checks so that data isn’t available to everybody. A valid signature means it has been signed by a key that CloudFront thinks is authorized for the operation and that the policy document is still valid. For example, if the document policy blocks access after a certain time, then that is what happens: access is blocked after that time.
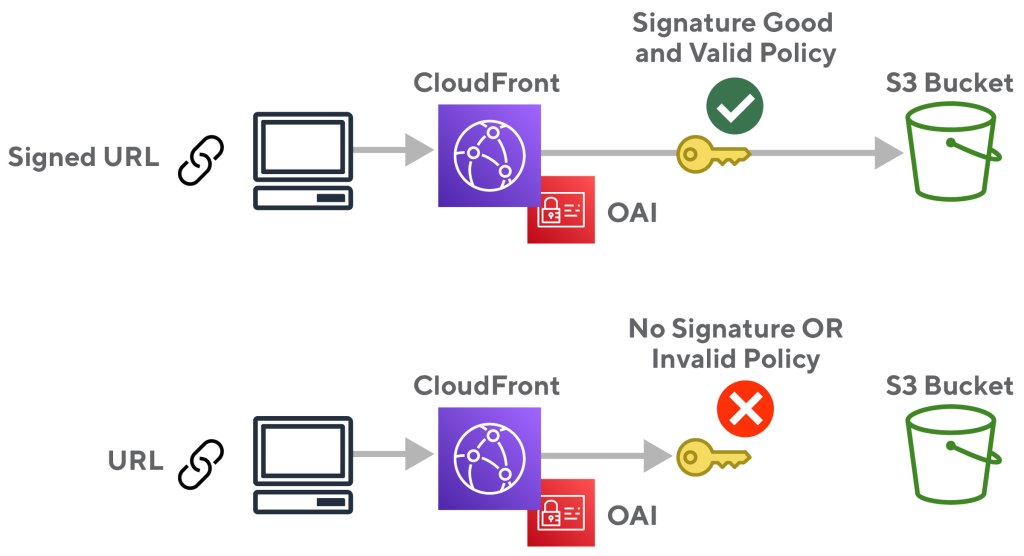
With the new key validation in place, only valid, unexpired signatures are allowed to retrieve the data from S3 as illustrated below in figure 3:
Figure 3: CloudFront checks validity of the signature and blocks access if the signature is bad or is no longer valid.
Thankfully, AWS had provided a nearly drop-in replacement for the old user experience.
Setting up your own signed CloudFront URL distribution
Here is a complete example; feel free to borrow from it liberally. The goal here is to create a cheap, public, HTTPS service that serves up files via signed URLs. There likely are numerous use cases similar to the invoicing example above that can take advantage of an AWS CloudFront distribution with signature checks.
While these infrastructure descriptions are done as Terraform code because that’s what DoorDash uses, all of this can be translated easily into other tools.
There is some hand-waving around AWS permissions to execute the Terraform or Python signing code here. A user or role must be set up within an AWS account to allow these things. Many companies already will have automated CI systems with a good amount of access, so there will not be any detail on that here. People who are just tinkering are using the AdministratorAccess policy anyway. Whole libraries of books have been written on Privilege of Least Access. In short, don’t be too liberal with IAM permissions.
Stay Informed with Weekly Updates
Subscribe to our Engineering blog to get regular updates on all the coolest projects our team is working on
Please enter a valid email address.
Thank you for Subscribing!
Step one: Create a private S3 bucket
This S3 bucket will be the backing store for our data:
Lock down that bucket so there is no way to override the “private” settings. Without this, somebody could still place public objects in the bucket. They could also inadvertently attach a policy which might allow public access. The following blocks all of that:
By default, things aren’t public in AWS, so there’s nothing special here yet.
Step two: CloudFront distribution certificate and identity
With the data publically inaccessible, begin to set up CloudFront. To secure access, start by making a certificate with AWS Certificate Manager (ACM) for the company’s domain.
# Ohio region where my bucket will be created
provider "aws" {
 region  = "us-east-2"
}


# For cloudfront certificates
provider "aws" {
 alias   = "us-east-1"
 region  = "us-east-1"
}
This test uses a domain that DoorDash owns, but users should select one of their own: documents.doordash.cloud:
resource "aws_route53_zone" "documents" {
 name    = "documents.doordash.cloud"
 comment = "Document Signing Test Domain"
}
Create the certificate in us-east-1 and tell AWS that validation of ownership will be done via a DNS record.
The certificate resource provides the validation records needed to place in Route53:
resource "aws_route53_record" "apex-certificate-validation" {
 provider = aws.us-east-1
 for_each = {
   for dvo in aws_acm_certificate.apex.domain_validation_options : dvo.domain_name => {
     name   = dvo.resource_record_name
     record = dvo.resource_record_value
     type   = dvo.resource_record_type
   }
 }

 allow_overwrite = true
 name            = each.value.name
 records         = [each.value.record]
 ttl             = 3600
 type            = each.value.type
 zone_id         = aws_route53_zone.documents.zone_id
}
Finally, this block will wait until the validation status comes back OK:
resource "aws_acm_certificate_validation" "apex-certificate" {
 provider                = aws.us-east-1
 certificate_arn         = aws_acm_certificate.apex.arn
 validation_record_fqdns = [for record in aws_route53_record.apex-certificate-validation : record.fqdn]
}
At this point the console shows an issued certificate; users may need to navigate to the us-east-1 region if that is not the currently selected region:
Identity is the final thing that needs to be created ahead of time for a CloudFront distribution. When CloudFront tries to serve up the S3 content, it will be blocked from reading S3 without the identity. There are many bad examples out there that make the bucket public and therefore accessible to CloudFront as well. This is NOT what we want. CloudFront can be given an identity — similar to how an application can be given an IAM role — called an Origin Access Identity (OAI). This is how to create one:
resource "aws_cloudfront_origin_access_identity" "documents-identity" {
 comment = "Cloudfront identity for access to S3 Bucket"
}
There’s a lot going on here, so let’s step through it:
aliases = [aws_acm_certificate.apex.domain_name]
This allows use of the documents.doordash.cloud domain in addition to the randomized cloudfront.net URL CloudFront assigns by default (in this case d3da3e8s75fqsf.cloudfront.net).
Next, define an origin — a place to fetch data — with an identifier called s3. It can be called anything; it’s just an id. This identifier points at the bucket and uses the new OAI. In a moment, S3 will be configured to allow this identity to read objects from the bucket:
The next items are relatively self-explanatory. There is no reason not to use ipv6, so we don’t disable:
 enabled         = true
 is_ipv6_enabled = true
 comment         = "Distribution of signed S3 objects"
The default_cache_behavior block defines what to do regardless of the URL path. We only have one path, but more complicated configurations might have the URL path /api point at an application while CloudFront continues to serve up static content from S3 for all other valid URL paths. Only read-only HTTP operations are allowed here. We don’t want any modifications made to S3 data via the CloudFront endpoint. Next we enable compression to allow faster data transfers to customers and lower egress data charges. Query strings are removed because S3 doesn’t care about such things. And finally, any insecure HTTP traffic is automatically redirected to its secure HTTPS equivalent:
This setting says to use minimum pricing configuration. Other examples might be serving up content across the globe, requiring a more expensive configuration:
price_class = "PriceClass_100"
To reduce bot traffic, this sets geographic restrictions to requests from the United States and Canada:
While not strictly necessary, most of the AWS console displays use the Name AWS tag to identify things. This tag will easily identify the CloudFront distribution in the AWS console:
tags = {
   Name = aws_acm_certificate.apex.domain_name
 }
Because we are using HTTPS, we have to tell CloudFront which certificate to use as well as which encryption settings are allowed. As of the time of writing, these are the newest protocols and ciphers:
Lastly, this depends_on block is a Terraform construct to tell AWS not to begin creating the distribution until the certificate has been validated. Because Terraform can run operations in parallel, it may try to create the distribution after the certificate is created but before it is validated (resulting in an error):
CloudFront has many options and can be configured in myriad ways. Refer to the full documentation for alternate approaches.
Step four: Grant CloudFront access to S3 bucket
As mentioned above, we created an identity for the CloudFront distribution and told it to use that OAI when contacting S3. Now, though, we need to change the permissions on the fully locked S3 bucket to allow that access. These bits of code attach a policy to our S3 bucket that allows the OAI to GetObject on any path of the bucket:
Create a DNS record so people will be redirected when they enter documents.doordash.cloud into their browser. Specifically, create an A and AAAA (for ipv6) record:
resource "aws_route53_record" "documents-a" {
 zone_id = aws_route53_zone.documents.zone_id
 name    = aws_acm_certificate.apex.domain_name
 type    = "A"

 alias {
   name                   = aws_cloudfront_distribution.documents.domain_name
   zone_id                = aws_cloudfront_distribution.documents.hosted_zone_id
   evaluate_target_health = true
 }
}

resource "aws_route53_record" "documents-aaaa" {
 zone_id = aws_route53_zone.documents.zone_id
 name    = aws_acm_certificate.apex.domain_name
 type    = "AAAA"

 alias {
   name                   = aws_cloudfront_distribution.documents.domain_name
   zone_id                = aws_cloudfront_distribution.documents.hosted_zone_id
   evaluate_target_health = true
 }
}
Checking the DNS resolution on my Mac, both the ipv4 and ipv6 records are visible:
$ host documents.doordash.cloud
documents.doordash.cloud has address 52.84.145.120
documents.doordash.cloud has address 52.84.145.108
documents.doordash.cloud has address 52.84.145.15
documents.doordash.cloud has address 52.84.145.105
documents.doordash.cloud has IPv6 address 2600:9000:2203:cc00:1:5de5:97c0:93a1
documents.doordash.cloud has IPv6 address 2600:9000:21ff:3e00:1:5de5:97c0:93a1
documents.doordash.cloud has IPv6 address 2600:9000:2203:2a00:1:5de5:97c0:93a1
documents.doordash.cloud has IPv6 address 2600:9000:21ff:7e00:1:5de5:97c0:93a1
documents.doordash.cloud has IPv6 address 2600:9000:2203:5c00:1:5de5:97c0:93a1
documents.doordash.cloud has IPv6 address 2600:9000:2203:1000:1:5de5:97c0:93a1
documents.doordash.cloud has IPv6 address 2600:9000:2203:3c00:1:5de5:97c0:93a1
documents.doordash.cloud has IPv6 address 2600:9000:21ff:aa00:1:5de5:97c0:93a1
Now the test file can be viewed in a browser:
At this point, the CloudFront + private S3 configuration is set up. It remains, however, 100% public. Any files dropped into the S3 bucket can be retrieved by anyone who knows the path to the file.
Step six: Generate a key pair
Signed URLs will secure our endpoint. Cryptographic signatures are usually done using a private key to “sign” some data; any holder of the public key can test if the signature is valid.
From a terminal, start by generating two keys — the key pair — using ssh-keygen. Different versions of ssh-keygen provide various formats for the resulting private key, so specificity is required to use PEM format. Save it without a passphrase because we’ll upload it to a secrets management system in a moment:
$ ssh-keygen -mPEM -t rsa -b 2048 -C "document-signing-20211004" -f document-signing-20211004 -N ""
Generating public/private rsa key pair.
Your identification has been saved in document-signing-20211004.
Your public key has been saved in document-signing-20211004.pub.
The key fingerprint is:
SHA256:+FNN7ZRQeXC/rZ1+ZQJe23hYWLfBRf67VdKfnXSU5yE document-signing-20211004
The key's randomart image is:
+---[RSA 2048]----+
|            ..++=|
|             o.**|
|            .E+*O|
|       .   o.o+=B|
|      . S ...ooOB|
|       . .  . *+#|
|        o     .O*|
|         .    . +|
|               o.|
+----[SHA256]-----+
This creates two files, document-signing-20211004 (the private key) and document-signing-20211004.pub (the public key).
The format for the public key that Terraform wants is PKCS8 so it needs to be converted:
$ ssh-keygen -f document-signing-20211004.pub -e -mPKCS8
-----BEGIN PUBLIC KEY-----
MIIBIjANBgkqhkiG9w0BAQEFAAOCAQ8AMIIBCgKCAQEArzg8E3OqdT1861qAxUcp
ipHVRCbxJxrrUUoBivEWJ9sgHU5uqhRGA3deoEFAs+fNY/npcut6Uhlmn0DjAyGy
0aCO9bjqX+AvoGSqg9UUeRmeW0gwOVtE3CKWEBiCbqkiBmeAi26GzT3Q52PfuBbD
sYeDicBMZpYfjpMnT/j5to1ALHo255ceWjh7rAHidAzEa5LvU5yxvb/NWla4wr6S
XLyf1VhuK/DudaybDxTyN6tQbamBJHdUX1Z1I+aRnN/Dr2oj+lhpwtaiQHQclURu
ASjZ+ftDrQnmIN/PLwoThyci6yDeU5vQkUsdV7dFA50pMUIvtJhf8GteWkAxAU7B
9wIDAQAB
-----END PUBLIC KEY-----
Step seven: Upload the public key to CloudFront
CloudFront keys are organized in groups that contain one or more keys; a single public key can be used in multiple groups. Here’s the Terraform code to create a single key group with our one public key. Discuss with your security team the protocols for the proper use of keys in this kind of use case. They may have requirements around key rotation that require additional modifications:
resource "aws_cloudfront_key_group" "documents-signing-key-group" {
 comment = "Valid Document Signing Keys"
 items = [
   aws_cloudfront_public_key.documents-signing-key-20211004.id
 ]
 name = "document-keys"
}

# convert public key to PKCS8 format (expected).
# Will take PEM, but stores internally differently
# resulting in a perma-diff
resource "aws_cloudfront_public_key" "documents-signing-key-20211004" {
 name        = "documents-signing-key-20211004"
 comment     = "Document Link Public Key 20211004"
 encoded_key = <<EOT
-----BEGIN PUBLIC KEY-----
MIIBIjANBgkqhkiG9w0BAQEFAAOCAQ8AMIIBCgKCAQEArzg8E3OqdT1861qAxUcp
ipHVRCbxJxrrUUoBivEWJ9sgHU5uqhRGA3deoEFAs+fNY/npcut6Uhlmn0DjAyGy
0aCO9bjqX+AvoGSqg9UUeRmeW0gwOVtE3CKWEBiCbqkiBmeAi26GzT3Q52PfuBbD
sYeDicBMZpYfjpMnT/j5to1ALHo255ceWjh7rAHidAzEa5LvU5yxvb/NWla4wr6S
XLyf1VhuK/DudaybDxTyN6tQbamBJHdUX1Z1I+aRnN/Dr2oj+lhpwtaiQHQclURu
ASjZ+ftDrQnmIN/PLwoThyci6yDeU5vQkUsdV7dFA50pMUIvtJhf8GteWkAxAU7B
9wIDAQAB
-----END PUBLIC KEY-----
EOT
}
Note the unique KeyID after uploading; it will be used later. The console now shows the key group:
The KeyID shown here — K3VH450G8BP8J — will be unique in each implementation:
Step eight: Keep secrets safe
Before deploying the key pair, set up a secret management system. Examples provided too often use private key files on local disk.
Except during the initial key creation process, keys should not be on a local disk.
Store them instead in your organization’s secret management system. There are too many to list, but common ones are HashiCorp Vault & AWS Secrets Manager.
This example uses AWS Secrets Manager and the AWS CLI to load the keys, but this can also be done through the AWS Console. While the KeyID isn’t strictly a secret, it is sensitive enough that it should also be uploaded. This also makes it easier to pull all the runtime values from the same place. Here the KeyID is stored under the secrets manager key DOCUMENT-SIGNING-KEY-ID and the private key under the secrets manager key DOCUMENT-SIGNING-PRIVATE-KEY:
$ aws secretsmanager create-secret --name DOCUMENT-SIGNING-KEY-ID --description "The key ID for signing urls" --secret-string "K3VH450G8BP8J"
{
    "ARN": "arn:aws:secretsmanager:us-east-2:123456789012:secret:DOCUMENT-SIGNING-KEY-ID-J9xLnN",
    "Name": "DOCUMENT-SIGNING-KEY-ID",
    "VersionId": "c9211ae0-c143-4a56-a936-7119332a7b50"
}

$ aws secretsmanager create-secret --name DOCUMENT-SIGNING-PRIVATE-KEY --description "Private Key for signing urls in PEM format" --secret-string file://document-signing-20211004
{
    "ARN": "arn:aws:secretsmanager:us-east-2:123456789012:secret:DOCUMENT-SIGNING-PRIVATE-KEY-oLTFc4",
    "Name": "DOCUMENT-SIGNING-PRIVATE-KEY",
    "VersionId": "dbfa5d1f-a832-44be-98a7-3a2b7b5015f3"
}
Because the Python script that follows uses the rsa library, the key in this case is stored in PEM format. That library is expecting the BEGIN RSA PRIVATE KEY header.
Those in a hurry may skip this part with the intention of doing it “later.” Attention: Either someone else will have to clean it up later or it won’t get done at all. Secure applications from the start.
Step nine: Enable trusted key group on CloudFront
Now that AWS knows about the key, tell CloudFront only to allow URLs signed with that corresponding private key. Do this by adding the trusted_key_groups attribute to the default_cache_behavior block listing the IDs of each key group (in this case, just the one).
WARNING: The data will be public if not set up properly. Check the implementation carefully!
The full default_cache_behavior block looks like this:
In the AWS console, verify this is set under “Restrict Viewer Access” under the “Behaviors” tab:
Now going to the URL in a browser should generate this MissingKey error:
Step ten: Generate a signed URL
The following is Python code which can be used as a signing utility; the same operations can be performed in an application, which is what DoorDash does. The example takes a URL argument and an optional number of days for the URL to be valid for. Note that a validity start/end time as well as IP restrictions can be encoded into your policy document, which is actually what is being signed.
Because AWS Security Manager is used here to retrieve the KeyID and private key, this script needs to be run under an AWS role that has the ability to fetch the secret’s values. Under some other mechanism, no additional AWS permissions are needed. In fact,URLs can be signed all day long without actually communicating with AWS because the signed URL is just a well understood format, like JWTs.
Here’s the full code:
import argparse
import base64
import boto3
from botocore.exceptions import ClientError
from botocore.signers import CloudFrontSigner
from datetime import datetime, timedelta, timezone
import rsa

# Secrets to fetch from AWS Security Manager
KEY_KEY_ID = 'DOCUMENT-SIGNING-KEY-ID'
KEY_PRIVATE_KEY = 'DOCUMENT-SIGNING-PRIVATE-KEY'


def get_secret(secret_key):
   # This code is straight from the AWS console code example except it returns the secret value
   session = boto3.session.Session()
   client = session.client(service_name='secretsmanager')

   try:
       get_secret_value_response = client.get_secret_value(
           SecretId=secret_key
       )
   except ClientError as e:
       if e.response['Error']['Code'] == 'DecryptionFailureException':
           # Secrets Manager can't decrypt the protected secret text using the provided KMS key.
           # Deal with the exception here, and/or rethrow at your discretion.
           raise e
       elif e.response['Error']['Code'] == 'InternalServiceErrorException':
           # An error occurred on the server side.
           # Deal with the exception here, and/or rethrow at your discretion.
           raise e
       elif e.response['Error']['Code'] == 'InvalidParameterException':
           # You provided an invalid value for a parameter.
           # Deal with the exception here, and/or rethrow at your discretion.
           raise e
       elif e.response['Error']['Code'] == 'InvalidRequestException':
           # You provided a parameter value that is not valid for the current state of the resource.
           # Deal with the exception here, and/or rethrow at your discretion.
           raise e
       elif e.response['Error']['Code'] == 'ResourceNotFoundException':
           # We can't find the resource that you asked for.
           # Deal with the exception here, and/or rethrow at your discretion.
           raise e
   else:
       # Decrypts secret using the associated KMS CMK.
       # Depending on whether the secret is a string or binary, one of these fields will be populated.
       if 'SecretString' in get_secret_value_response:
           secret = get_secret_value_response['SecretString']
       else:
           secret = base64.b64decode(
               get_secret_value_response['SecretBinary'])
       return secret


def rsa_signer(message):
   private_key = get_secret(KEY_PRIVATE_KEY)
   return rsa.sign(
       message,
       rsa.PrivateKey.load_pkcs1(private_key.encode('utf8')),
       'SHA-1')  # CloudFront requires SHA-1 hash


def sign_url(url_to_sign, days_valid):
   key_id = get_secret(KEY_KEY_ID)
   cf_signer = CloudFrontSigner(key_id, rsa_signer)
   signed_url = cf_signer.generate_presigned_url(
       url=url_to_sign, date_less_than=datetime.now(timezone.utc) + timedelta(days=days_valid))
   return signed_url


if __name__ == "__main__":
   my_parser = argparse.ArgumentParser(
       description='CloudFront URL Signing Example')
   my_parser.add_argument('URL',
                          metavar='url',
                          type=str,
                          help='url to sign')
   my_parser.add_argument('--days',
                          metavar='days',
                          nargs='?',
                          const=1,
                          type=int,
                          default=1,
                          help='number of days valid, defaults to 1 if not specified')
   args = my_parser.parse_args()
   url_to_sign = args.URL
   days_valid = args.days

   signed_url = sign_url(url_to_sign, days_valid)
   print(signed_url)
   exit(0)
Upon signing the CloudFront URL with the one-day default expiration, a very long URL is returned. The following shows the expiration time stamp, the signature, and the KeyID (so CloudFront knows which key to check against):
Access is granted when that URL is entered in a browser:
One day later, that same URL failed because the signature is outside the valid time window:
Conclusion
In this post, we’ve seen how to lock down an S3 bucket from direct public access as well as how to use it as a backing store to an HTTPS-only CloudFront distribution. We then added authenticated access by way of signed URL checks with a simple expiration time policy.
There are no servers to manage or upgrade because AWS manages all of that. Even HTTPS certificates will auto-renew as long as the DNS validation record remains untouched.
For most use cases, this should cost a lot less than running a 24/7/365 EC2 workload. The AWS Pricing Calculator page can help verify this for each situation.
When DoorDash moves from emailing invoices to retrieval via a web portal, most of this work can be reused. We will simply perform a 302 redirect to the signed URL, but make the expiration just a few seconds. We could even go back to using S3 signed URLs because we no longer have the long expiration time requirement. It might look something like figure 4:
Figure 4: Sequence diagram of optimal workflow. User gets a short-lived link to data in S3 where it is quickly retreived.
It may seem strange that everything covered in this post likely will be tossed out one day — for this particular use case anyway — but that is the nature of working in the cloud. On-demand infrastructure means there is no need to get attached to technology choices. This has certainly been my experience working with excellent engineers here at DoorDash. No decisions are sacred. If there is a better way, we should explore it — and you should too!
Keep building great things; I know we will.
We are excited to announce that DoorDash is establishing an Antipodean presence, expanding its global presence, with multiple Engineering teams in Australia. This new location allows us to tap into the abundance of local tech talent, to join us on our mission to help empower local economies and build solutions to support DoorDash’s growth Down Under, and beyond. This significant investment will establish a centre of excellence in the country with plans to hire 50 engineers across multiple cities in 2022.
We’re committed to empowering engineers to do their best work regardless of location, and the establishment of this new centre allows us to do just that. We’ll be actively hiring and expanding our local office presence in Melbourne, Sydney, and Brisbane and engaging diverse talent with flexible working arrangements across the country. Team members will have the opportunity to travel to work and collaborate in-person when comfortable and safe to do so. We know that flexibility and diverse perspectives are an advantage in a global organization and this expansion will enable this hub to come together to tackle some of DoorDash’s biggest challenges.
Building on-demand delivery in Australia
The geography and population density of Australia poses some interesting challenges for distribution and delivery. With a norm of two to three days delivery for retail purchases in metropolitan cities and closer to five days in rural areas, we are excited about transforming consumer expectations by getting items to customers’ doors in under 40 minutes from local merchants. This won’t happen overnight and will require product innovation, but the building blocks are there. The lessons we learn here will then bolster our product in other international markets as we build locally and scale globally.
A regional office to boost reliability and quality
Growing our international engineering teams is an important part of ensuring regional quality and reliability. We are expanding our coverage into a broader Pacific Time zone, with the US West Coast, Japan and Australia to ensure our local Customers, Merchants and Dashers have support where and when they need it.
Engineers are mission critical to developing and tailoring products and solutions that meet the ever evolving needs and expectations of the local market. There is no one size fits all and our team of tech experts from backend to mobile engineers are committed to ensuring the platform delivers the best quality service and experience for all.
Stay Informed with Weekly Updates
Subscribe to our Engineering blog to get regular updates on all the coolest projects our team is working on
Please enter a valid email address.
Thank you for Subscribing!
Local technical leadership is also advantageous as we build new strategic partnerships with merchants like IGA, integrate with new services like Shippit, and look for innovative ways to address Australian Dasher needs Having teams on the ground to foster these relationships will unlock new opportunities as we grow DoorDash in Australia.
Establishing an Asia-Pacific presence
We’re always looking for strategic opportunities to empower local economies with our platform. Establishing strong engineering hubs in Australia and Japan will set a strong foundation for serving new customers across the Asia-Pacific Region. We aim to be 1% better every day and we are looking forward to learning more about the rich culture and traditions of the region.
Our team is hiring and calling all passionate Engineers to come join us. Our mission to improve the customer experience for merchants, Dasher and consumers will require ranging across the vast ecosystem of applications that we have at DoorDash. Flexibility, curiosity and technical breadth is our recipe for success and we need Engineers to contribute across the stack. Engineers will be part of a growing company that is focussed on positively impacting and growing local Aussie economies.
At DoorDash, route optimization is a key component of our dispatch system, known internally as DeepRed. The routing algorithm design we chose — based on the ruin-and-recreate principle — helped us to scale to meet the increased demand caused by COVID relief efforts and the subsequent increased API requests from major partners, including Walmart, Macy’s, and United Way. First we will delve into the vehicle routing problem and how DoorDash’s Drive team managed to automate our routing algorithm to meet increased demand.
Routing algorithm design with the ruin-and-recreate principle
Route optimization is a computationally intensive process and a commonly known NP-hard problem. As such, attempting to optimize a complex route containing a number of distinct locations scales poorly if every location must be optimized synchronously. Synchronous optimization means that a large number of locations would take hours, or even days, to complete, which won’t work when route optimization must be completed in seconds.
Solving this problem for last-mile logistics introduces additional complexity because a multitude of orders must be delivered same-day under a range of constraints, including varying delivery windows, vehicle capacity, speed, and Dasher, our name for delivery drivers, availability. For this scenario, a route’s quality must be balanced against the execution time required to optimize the route — all while keeping spending on API calls to a minimum.
To address these concerns, the algorithm we wrote relies on the ruin-and-recreate principle, which is a methodology that allows us to solve an optimization problem against a set of constraints. In the context of a routing algorithm, the ruin-and-recreate principle can be applied as follows:
Input is given as a list of jobs to optimize. Think of these “jobs” as geographical locations on a route along with requested actions at each location, like “pick up” or “drop off.” We also need to consider a candidate list of drivers who can potentially fulfill each job.
A randomness factor is used to generate an initial solution involving all route points; usually, this is not the optimal solution.
In the subsequent “ruin” step, the randomized solution is split into two components. The first component is a set of jobs that a driver cannot serve, given constraints like time or vehicle speed. The second component is a partial solution containing all jobs that can be handled successfully by a driver.
The “recreate” step combines the list of “not served” jobs with the partial solution containing “served” jobs.
Ultimately, a combined solution is generated and scored. If it exceeds the quality of previous solutions, it is now considered the best solution.
These steps are repeated until termination criteria (in other words, a condition used to know when to stop running the algorithm) are met, for example a time limit or a maximum number of iterations. The final output is a list of solutions with those scoring highest at the top. For context this algorithm’s output is then used to offer Dashers deliveries in our dispatch service .
While the basic ruin-and-recreate approach creates an algorithm that generates a list of optimized routes, it would work too slowly and offers no safeguards against failure if run synchronously against a large input size — say, more than 1,000 stops.
A trivial greedy route optimization algorithm — one in which the driver’s next closest destination is always chosen, regardless of the route’s total cost — can be written as a fallback against failures — for instance, if the ruin-and-recreate algorithm encounters exceptions or timeouts. A greedy route optimization algorithm also can serve as a useful benchmark solution to ensure that the ruin-and-recreate solution is, indeed, the best possible quality.
To improve execution time for large input sizes, it can be useful to apply techniques such as multithreading that split the problem into chunks of jobs that can be optimized concurrently. Before we go into more detail on how we adapted this algorithm to DoorDash’s logistics engine, we’ll first explain why DoorDash chose to focus on improving route optimization.
DoorDash large route optimization: 2018-2019
As DoorDash pushed to grow the business in 2018 and 2019, it was constrained by a dispatch system that could only support two orders per Dasher at any given time. Such a limitation was acceptable for restaurant orders requiring tight time limits on delivery. But it was a deal breaker for retail partners using DoorDash Drive, our white-label fulfillment platform which is utilized by a number of merchants who want to offer delivery, via the dasher network, through their own order platforms. For them, store operations could be overwhelmed by too many Dashers showing up simultaneously to pick up orders. In turn, Dashers would experience long waits to fetch orders, ultimately delaying deliveries to end customers and reducing the active time Dashers could be spending earning on deliveries.
Our small operations team initially resorted to a stop-gap solution that we knew would need to be replaced with a scalable long-term solution. Each day we would compile and upload all orders that needed to be fulfilled. Our internal system would then make synchronous API calls to create deliveries and manually assign a Dasher to each order. The routing was all manual, with ops specifying a numerical order for each delivery. This synchronous solution meant we could handle only about 100 orders at a time. On top of that, time and resourcing constraints meant that the API used to create deliveries was separate from the public-facing API; insufficient validation caused confusion for team members who used incorrect file formats. Such a tool couldn’t handle any significant request volume and created maintenance overhead because of the separate delivery creation API:
Figure 1: A simplified view of the portion of the system that handled large routes as it existed in 2018-2019.
DoorDash large route optimization: Enter COVID-19
When COVID-19 was declared a pandemic in March 2020, DoorDash experienced an unprecedented spike in demand. One way this impacted DoorDash was through our fulfillment of school meals. Previously, underprivileged students enjoyed reduced-price and free meals at school. With shelter in place orders enacted, these students lacked access to this subsidized nutrition. Larger public school systems and nonprofit organizations reached out to DoorDash for help efficiently delivering these meals from the schools to local neighborhoods.
How we automated our route optimization algorithm
Fortunately, DoorDash’s team was able to quickly replace its manual, ops-driven solution with a more automated one that could handle this increased demand. To meet the sudden spike in pandemic-related demand, we had to solve the overall route optimization problem by designing and building a number of different components .
The first component needed to be able to ingest hundreds of thousands of orders daily in a matter of minutes. While most orders could simply be supplied via the merchant via API request, some partners were low-tech and lacked the ability to call our API, requiring us to build a new CSV uploader for them to use.
After orders were successfully entered into our system, we needed a second component to ensure routing was done efficiently, inexpensively, and in a way that prevented too many Dashers showing up at the same location simultaneously.
Stay Informed with Weekly Updates
Subscribe to our Engineering blog to get regular updates on all the coolest projects our team is working on
Please enter a valid email address.
Thank you for Subscribing!
To provide that first component for low-tech merchants, we used Amazon S3 to store large CSV files, an automated worker process to grab the files from S3, and applied multithreading to call our public-facing create-delivery API to ensure orders were ready for fulfillment. That API already had validation built in, making failures much more visible to any team member who uploaded a file.Using this approach, the initial upload of orders for low-tech partners remained partially manual, but the rest of the system had been fully automated. This meant that operations would first upload a CSV containing a merchant’s daily deliveries — no more restrictions on how many deliveries could appear in each file — then a worker would chunk the input into equal parts and process all parts asynchronously using RxJava. At the time, Kotlin coroutines, syntactic sugar used to manage multitasking and allowing tasks to be suspended and resumed automatically, were new and untested, so we went with the more established pattern of applying RxJava. Inside the processing step, we’d make a call to our create-delivery API to get the order queued for fulfillment. A final worker process in our fulfillment system would make an API call to a third-party route optimization API to generate optimized routes containing all of the deliveries supplied in the first step. These optimization and assignment components are depicted in Figure 2 below:
Figure 2: A simplified diagram of the improved large route ingestion pipeline, built at the beginning of COVID-19.
DoorDash large route optimization: Further improvements in 2021
While the system described above initially worked well for pandemic relief, we encountered pain points with the third-party API used for route optimization, including:
No control over making changes to the routing algorithm without asking the third-party team to make fixes; often we could see that a suboptimal route was generated, but we had no visibility into why.
Expensive billing practices meant that we couldn’t easily scale this process to the entire set of DoorDash deliveries because API request costs would spiral out of control
The rest of the company was not using this service for route optimization, so Dasher experience differed significantly across Drive and Marketplace; bug fixes applied to the rest of the system often were not backported to the above Drive system.
Expanding upon our 3rd party routing
Prompted by a request from one of our biggest partners to apply large routing at all of its stores, we worked in late 2020 and early 2021 to improve DeepRed’s routing algorithm to support a large number of orders and deprecate the third-party routing algorithm mentioned in Figure 2 above. We built our own routing algorithm for large order sizes using the ruin-and-recreate approach discussed earlier. Instead of building from scratch, we found an open source library that used the same ruin-and-recreate approach for route optimization and modified parts of it to fit DoorDash’s needs. Using some of our proprietary ML models, we built custom logic to estimate travel duration and discern which stops should be made. In the end, our system design included no third-party dependencies for route optimization.
We initially attempted synchronous route optimization. But when we ran this against a benchmark of 10,000 deliveries, we observed the execution time to be on the order of minutes — far too slow for our needs. To support DoorDash’s scale, DeepRed’s route optimization code runs in a sharded manner; we associate specific geographical regions to a shard and then optimize only within that shard while using Scala Futures to ensure processing is done asynchronously. This asynchronous approach, which behind the scenes employs a thread pool to manage simultaneous tasks, allows us to reduce execution time from several minutes to an average of a few seconds. The following is the simplified Scala code that runs inside each DeepRed node to generate a list of optimized routes for each Dasher-deliveries pair:
...
val futures = for {
 (deliveries, dashers) <- candidates
 dasher <- dashers
} yield {
 Future {
   runOptimizationAlgorithm(state, maxIterations, maxRoutesPerShiftCandidate, algorithmTimeoutTermination, numRoutesToLog, deliveries, dasher)
 }
}

val futureSequence = Future.sequence(futures)
val optimizedRoutes = try {
 recordTimeTaken(...) {
   Await.result(futureSequence, totalTimeoutDuration)
 }
} finally {
 ...
}

shiftCandidatesWithRoutes.flatten.toMap // Return results for further filtering, scoring.
The abbreviated system diagram in Figure 3 shows how our delivery creation process interacts with sharded Deep Red nodes.
Figure 3: The above is the current approach used to fulfill large routes with DeepRed. DeepRed executes in a sharded manner to make routing decisions, then a separate API call is made to assign dashers to outstanding orders.
While there are several benefits to the system depicted in figure 3, which uses geographical sharding and a custom route optimization algorithm, there are also a few drawbacks.
Pros:
In-house algorithm results in extremely low costs
Improved latency compared to third-party service
Better integration with overall DoorDash system; adherence to common interfaces yield benefits when DeepRed bugs are fixed upstream
Open source library provides ultimate flexibility to change the algorithm to produce different kinds of routes
Cons:
While the algorithm generally produces high-quality routes, timeouts do occur because of a hard time constraint required by multithreading and the intentionally limited threadpool. In the event of a timeout, the greedy algorithm results — which generally are suboptimal — are used as a fallback
This approach won’t scale to support our future vision and will need to be updated in due time
A future vision for large route optimization
Although this approach is working well for now, future demand on the routing product will lead us in several new directions:
Allow low-tech merchants to upload orders themselves. The goal is to use a merchant-facing portal instead of requiring DoorDash’s operations team to perform manual uploads on their behalf.
Support 100 or more orders for a single Dasher. Although we support tens of orders per Dasher currently, we imagine a world where a Dasher can pick up hundreds of orders to deliver across a city over the course of a day. To support this, we must run route optimization offline to better isolate this from the rest of our assignment system. We’re also considering further parallelization by applying a message queue to ensure chunks of deliveries to optimize are handled by separate containers instead of just separate threads.
Support large items with different vehicle types. Dashers primarily drive sedans today, which limits how many orders can be picked up. We’re considering opening up new opportunities for Dashers with trucks, SUVs, or vans to deliver furniture, appliances, and other oversized products. Larger vehicles could also be used as extra capacity for the 100+ orders use case.
Conclusion
By using the ruin-and-recreate principle in combination with a greedy routing algorithm while applying multithreading, we can achieve best-in-class route optimization and, consequently, an ideal delivery experience without sacrificing execution time.
If these kinds of problems excite you, we’d love you to come work with us as we build the next-generation version of our logistics engine!
There are a variety of novel challenges involved when a growing tech company wants to expand quickly and efficiently into new markets. This was very much true at DoorDash, where we spent years updating our platform to ensure a successful 2015 launch in Canada, followed by our expansion into Australia in 2019, and Japan in 2021. To reduce the time between launches, we needed to go beyond addressing each country’s specific challenges and build a platform that could make market launches more automated and faster to execute.
Here we look at some of the specific challenges we are facing and describe our general approach to building a platform that can streamline international launches. In future posts, we will review the specific solutions we are building to solve these problems.
Global expansion challenges and opportunities
Despite the challenges of moving into new markets, tech companies can capture myriad opportunities through expanding internationally. In addition to enjoying diverse markets, companies can take advantage of local labor markets to bring more top talent to the team. Primarily, of course, companies growing abroad are seeking to grow the available pool of consumers. Generally speaking, companies cater to a specific customer base, which may be in limited supply in their home country. Expanding to new markets offers opportunities to attract new customers and increase revenue.
Expanding internationally also makes it easier to attract and retain new, local talent. Because there are only so many experienced engineers in any given location, moving to a new market creates an opportunity to compete in that local hiring market and grow the team. An added advantage is that local engineers are more attuned to their home country’s unique needs.
The challenges of building an international platform
Building an international platform that will allow our team to quickly launch in a new country comes with a variety of challenges that we had to address.
Challenge: Localizing a suite of products consistently on a global platform
A central piece of the globalization challenge is localizing and translating all the products that are used on DoorDash’s global platform so that anyone can use them. Users in each market will prefer app interfaces that have a localized format, language, and numbering system. This will become more and more important as DoorDash expands into non-English speaking countries. To be successful in a market, products need to present data to all users in a format with which they are comfortable. Each data type that needs to be localized might bring its own set of challenges. One of our of previous posts elaborated on different types of data included in a localization pipeline, including:
Text: A localization pipeline requires translating all strings in the apps and making them visible to users.
Addresses: If the app is dealing with a physical address, it is important to note that different locales write addresses in different formats. Some regions start addresses with a country and then work their way down to the unit number, while other regions require the opposite order.
Correct measurement units: Different regions show measures like the weight of an item in a variety of units; the app must use what’s most common for that region.
Naming customs: The ordering of first and given name might be different in various locales. Additionally, pronouns may be used in different contexts based on the audience and how formal the language is, such as honorifics in Japanese.
Numbers: Each language has its own way of writing numbers with respect to decimal points and digit group separators.
Currency: presents two challenges, converting prices and displaying them in local currency and dealing with the different annotations in the database as a period and comma mean different things for different currencies and can be hard for the backend to determine the number of significant units in every price.
Date and time: Different regions have different conventions for showing the date. For example, showing countries where the convention is that the day is the first part of a date the month would cause confusion. Our app needs to be able to display the date differently depending on the location the app is being used.
In addition to ensuring that all of these attributes are implemented, it is important that localization efforts are standardized. Without a standard, centralized localization system, internal teams will come up with their own solutions, which won’t scale and cannot be maintained for the long term.
Another typical challenge in accomplishing these translations is the binary size of the client-side apps, which grows linearly with the number of supported locales. The growing binary size will bloat the app, making it difficult to download and use, even though each individual user might only use one locale within the app.
Solution: Build a centralized localization service and libraries to provide a consistent experience
To address the localization of all DoorDash products, we are building a service to serve all translation needs across all the apps and binaries as well as a set of static libraries that would cover localization of a subset of other data types. This will standardize across all services, simplifying system maintenance.
A key question for a good localization pipeline is what solution we would adopt for each of the data formats described in the previous section. There are two approaches we could take:
Make services that other services will call to get the localized version of the content. Although this solution will add latency and reliance on the localization service, it will ensure all localization lives in one place.
Make static libraries that services and binaries can integrate and call in their code flows. This solution offers the lowest overhead, but the least control because it would be up to the individual services and binaries to make sure they integrate with the libraries.
To take advantage of both approaches, we are adopting a hybrid solution that differs based on the data format.
The translation service we are building can serve the translated strings dynamically when requested during the runtime from our other microservices. This would help teams serve completely new strings from their databases without needing to rebuild and deploy their services. The service will also serve translations for the client-side apps that wish to compile all the translations in the app bundle.
This localization service will be completely transparent to developers and improve developer velocity because they can call the translation service rather than wait for translations to happen in the background. In addition to the translation service, we have libraries across all languages and frameworks used within DoorDash to support other data localization formats, such as date/time, currency, and number formatting. We also leverage the platform APIs as much as possible within those libraries. These tools allow teams to opt into this common tooling across the company with minimum overhead while still giving them some autonomy to choose the language and framework they want to work with.
Challenge: adapting our platform to respect local laws, regulations, and customs
For a product to be ready to launch in a new market, it needs to respect local laws, regulations, and customs. This process creates a number of action items for businesses like DoorDash because we have a lot of different touchpoints that are all built in platforms designed to cater to all our customers. If there is a major law or regulation to address, we either need to create an entirely new experience for that specific locality or alter our existing platform so that it can address the local laws in their respective locales.
Given how business processes have many layers of complexity it would be time-consuming and require duplicate efforts to sift through these processes to rewrite operational flows. Instead, we needed a way to copy the flows that still work in a new market while being able to easily swap in new ones that adhere to local laws.
Solution: Using a configuration store pattern for alternative flows
The most practical way to deal with different configurations is to build an initial step that decides which flow to use based on the region or country code of the app user. This way, the app can sort out which experiences to show, negating the need to build separate applications, which would be harder to support. Each experience can be tailored to a particular market. This lets us build separate flows to satisfy the unique requirements of each location. When each user opens the app, their experience can be directed to an app flow that conforms to local regulations.
Achieving this goal required building a set of reusable components that capture the different parts of the flow instead of creating a less-flexible monolithic application. These components are plug-and-play, allowing us to choose which to include in the pipeline via an external JSON config. Taking advantage of the reusable components, we can easily customize the flow for each market so the app automatically shows the correct model for that market.
Figure 1. Instead of having three different Dasher user journeys — one each for the US, Canada, and Japan — we built one Dasher onboarding platform with three different user flows based on the user’s location and its specific laws, regulations, and offerings. This means one app can cover all our locations and easily be reused when we have to onboard a new process.
Challenge: How to integrate with local partners in each market
Integrating with local partners also is key to a successful launch. Local partnerships contribute to the company’s success in a region by integrating with a product for more seamless usage and faster adoption. Of course, different businesses have varying integration points and APIs because each was designed independently. When there are no accepted open source standards or working groups standardizing API rules and formats in a particular domain, integration becomes a scalability problem; each new partner requires developing a new integration from scratch.
As a company’s number of partners grows, so does the breadth of its APIs. Without the right strategy in place, the effort required to onboard new partners and integrate with their APIs will grow linearly with the number of partners. This can be a cumbersome challenge that would not scale for any company that seeks to capture the long tail of small partners across the globe.
One example of the effort involved has been our integration with local banks to integrate their payment system in DashPass. Because we didn’t have these APIs and templated integration points, we had to invest a good deal of resources to deliver that product.
Solution: Build a library for all third-party APIs
The best way to tackle third-party integrations is to provide clear and understandable APIs for third-party developers to allow anyone to use our standards, rather than cater to every partner’s unique system. As we launch in different countries, we integrate with local partners in a variety of spaces such as local grocery stores and banks. To be able to generalize our system, we need to formalize the APIs of different products to allow any third party to integrate with them. By formalizing our APIs, we can solve the problem of integrating third parties through publishing our patterns and providing integration guides to third party developers.
A good set of APIs needs to be consistent across the board to minimize the integration effort. These were our guiding best practices:
Consistency across the API surface: If there is a common field expected in different endpoints, all of them will expect them in the same way. For example, passing the developer key, which is the most common field in all the APIs, needs to be consistent. Differing APIs would make it harder for other parties to integrate with them.
Adaptable APIs: Creating APIs so that callers can adapt them with queries allows them to receive the desired response in the right format such as xml or json.
Backward compatibility and future evolution: Even as the API evolves and adds more functionality, it’s important that these changes do not break any existing integrations.
A consistent set of APIs allows us to capture the long tail of small partners that would be impossible to accommodate on a case-by-case basis.
To optimize this process of generalizing our API patterns, we are making big investments in Drive and DashPass to make it easy for banks and other retailers to integrate with them. This will allow us to expand our reach much faster and enable third parties to easily take advantage of our APIs.
Challenge: Keeping services running across all time zones
As a product launches in new countries and time zones, it will create market-specific issues that need to be addressed around the clock, without an undue burden on the supporting engineering teams. There is usually a user traffic pattern that changes based on the day of the week or time of day within each market. For example, the number of food delivery orders is higher during the day than at night. As such, different issues may have varying impacts based on where they occur.
The primary concern is getting the fastest response on important issues and outages while minimizing the number of people involved to avoid redundant noise. There might be employees in the affected time zone who can look into the issue during their working hours. That might give us the fastest response time but might not give us the most relevant expertise related to the outage. On the other hand, always alerting the owner team might get us optimal expertise but can cost precious time if the engineer called on must wake up in the middle of the night and get in a good state of mind to manage the issue.
Solution: Ensure system health with an effective on-call strategy
A multilayered on-call system would be able to give us the best of both worlds in terms of optimizing expertise and efficiency. As DoorDash moves into new regions, it will expand its engineering footprint in each country. Over the course of building collaboration between these offices and establishing a good knowledge transfer path, we will assign each region’s engineers for that area’s on-call support. For example, we will assign the APAC engineers for the APAC on-calls and EMEA engineers for EMEA on-calls.
Figure 2: Visualization of the regions we use to organize our global teams.
This strategy ensures that each issue is directed to regional experts. The other positive note for this strategy is that, because of the day/night user traffic pattern, when traffic is high in a region the designated on-call engineer who is in the same time zone is less likely to be asleep, generating faster response times. If further assistance is needed from other teams, the regional on-call can escalate the issue to the domain team if necessary. In that case, the domain teams will only need to be involved if the issue was not resolvable immediately by the regional on-call or for the follow-up long-term fixes that are not as urgent as the original issue or outage.
Conclusion
As more companies move overseas and enterprises continue to embrace remote work, these challenges will be felt even more intensely across the industry. Developing best practices helps all companies grow faster and more efficiently.
We have built a dedicated organization to provide support to other DoorDash teams in solving some of these challenges. This organization is heavily involved in launching DoorDash in new countries and allows DoorDash to innovate horizontally while core teams innovate vertically on other products. If you are interested in being apart of this engineering effort consider joining our international platform team by checking out open opportunities here.