Skip to content

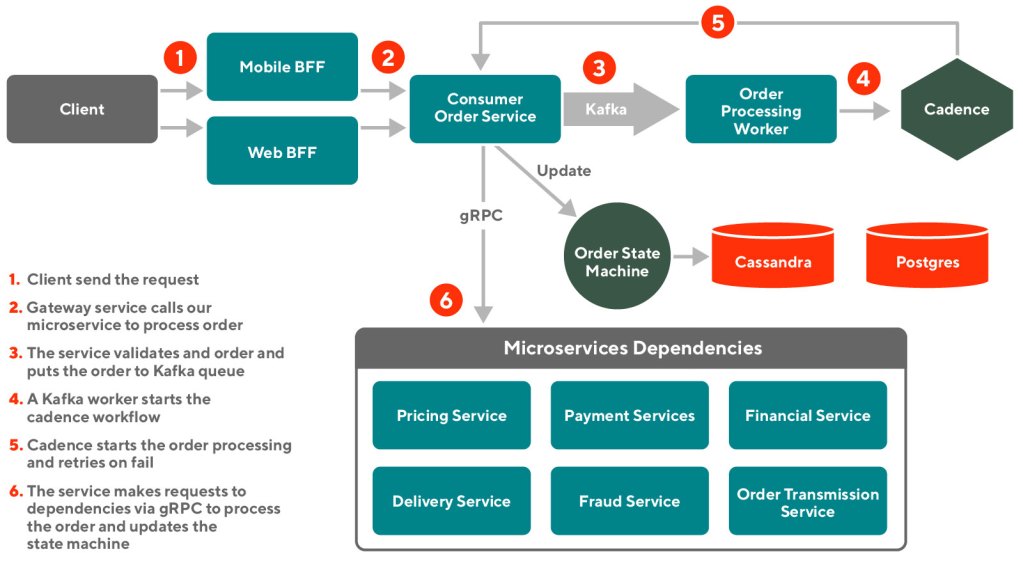
Running experiments on marketing channels involves many challenges, yet at DoorDash, we found a number of ways to optimize our marketing with rigorous testing on our digital ad platforms. While data scientists frequently run experiments, such as A/B tests, on new features, the methodology and results may not seem so clear when applied to digital marketing.

When using digital marketing channels it can be difficult to set up a scientific experiment in a fully transparent manner, which makes it hard to accept testing output without a high degree of skepticism. Specifically, these digital marketing channels have:

  • Fundamental limitations for testing tools and infrastructure
  • A disconnect between the publisher data and our own internal data
  • A lack of control and visibility into the lowest level of detail 

Despite these challenges, we found ways of creating rigorous scientific experiments with digital ad platforms. Leveraging the campaign drafts and experiments feature of the Google Adwords platform, we can set up A/B tests. Through these tests, we can determine the incrementality between a new channel bidding algorithm and our existing search engine marketing (SEM) bidding strategy on Google. 

This experimentation strategy helps us optimize our marketing budget, by ensuring our campaigns reduce spending while delivering better results.

Challenges of experimenting on digital marketing channels

Digital marketing channels typically have several characteristics that make it hard to conduct the kinds of scientific experiments which would prove the value of optimizations within a single marketing channel, also called intra-channel optimization. In general there are three main issues we’ve seen: 

  • No A/B testing framework, just pre-post analysis 
  • No ability to connect upstream data, such as ad spend and impressions, with downstream attribution data (events recorded on the DoorDash side)
  • No easy way to get user-level data from the digital marketing channel, even when there are basic needs to understand ad demographics 

No A/B testing framework 

As the standard for running scientific experiments, we rely on different variants of A/B tests everyday. A/B results, if the experiment is set up correctly, won’t be biased by when the experiment was run, which is the primary limitation with pre-post analysis. Digital marketing campaigns perform differently depending on the seasonality, competitors’ bidding strategy, one-time events, and other external factors that we may not be able to control for.  This is even more true for high growth companies like DoorDash, where the business can surge in a relatively short period of time. Since a pre-post analysis will always be biased based on the time of year the experiment was run, we seek A/B tests that run experiment variants concurrently.

No ability to connect upstream data with downstream attribution  

Experimentation for digital marketing is all about figuring out the most efficient and effective ways to run marketing campaigns on a digital channel. Tantamount to this understanding is the ability to attribute results to specific campaigns and creatives. Even if we can attribute a single channel to a conversion, we aren’t able to attribute the full conversion journey as it’s not uncommon for a user to see an ad and then engage later on a different platform. Because digital ad platforms provide only click data, we miss possible first-touch attribution from an impression on another platform. Additionally, we cannot easily link data across marketing touchpoints to utilize our own in-house attribution data. Ideally, we’d be able to build a conversion funnel across different touchpoints, which would help link the business results we see to the combination of marketing channels that the consumer uses.   

No easy way to get user-level data

Most digital platforms aren’t able to provide user-level data, which means it’s not possible to tell which user or device is assigned to control or treatment groups and views the ads. Additionally, we don’t know how much spend is allocated to that user or device. Instead, the platform can only provide the summarized data at the campaign level. This means that marketers like DoorDash are not able to get the spend, impressions, or final conversions at the user level. These realities of working with digital advertising platforms mean that it’s very hard to understand the entire conversion funnel at the user level. 

What the ideal digital marketing testing platform looks like

In a perfect world, marketers who use digital advertising platforms would have full control over the randomization of a customized defined audience, and full access to upstream (spend, impressions, clicks, etc.) and downstream data at the user level. While marketing channels currently provide some of these things, there is no ideal marketing channel that provides such testing platforms yet. For this reason we had to find a marketing platform that would be as close as possible to our experiment requirements so that we could conduct meaningful scientific experiments and improve our marketing performance and budget optimization. After assessing the existing platforms, we found that the Google Adwords Testing Platform was one of the best to facilitate the need.

How Google Adwords permits some scientific experimentation 

Google’s paid search testing platform, which is called campaign drafts and experiments, is one of the most advanced testing frameworks available to digital marketers, since it can be configured to set up scientific experiments. Even though it can’t provide spend or impression data at the user level, it does a good job of randomizing users at the auction level, which is the process where Google Search decides which ads will show and their order on the page. Google Adwords also allows marketers to connect the publisher’s click data with their downstream data, to confirm users placed orders. In our case, we want to know if a user clicked a paid search ad then performed any actions on DoorDash’s platform. 

Using the draft experiment feature 

Let’s take the draft experiment feature and demonstrate how it can be used to set up a scientific experiment comparing our existing bidding strategy with a new algorithm. Google Adwords allows marketers to set up experiments via the draft experiment tool for their search or display campaigns. Google offers step-by-step instructions on how to set up an experiment with this tool. The draft feature enables marketers to test one or multiple variants to a campaign in a scientific way. If the changes make an impact they can be incorporated into the campaign or used for further experimentation.

When we set up the experiment, we can specify how long we’d like it to run, how much of our control campaign’s traffic we’d like it to use, and the budget amount in total for both control and treatment groups. When a potential customer performs a search on Google or a search partner website, either the control or the treatment campaign is randomly activated for the auction, depending on how we’ve split the traffic share between the campaign and the experiment. 

Marketers are able to add tracking parameters to each click so as to connect the downstream performance data with the control or treatment groups. This allows marketers to understand the user journey and measure performance of the treatment and control groups. This tracking is very important because it helps us confirm our conversions so as to minimize the gap between data passback issues and post-conversion changes, such as if customers cancel or partially refund their orders, which might impact the test outcome.

Marketers can use the Google testing framework to help improve campaign performance, which includes but is not limited to the:

  • Bidding strategy (type or value)
  • Creative optimization (ad copy or images)
  • Keyword selection
  • Audience targeting (demographics)

Creating Google Adwords experiments at DoorDash 

In order to spend our marketing budget more optimally, we conducted an A/B experiment to compare the performance between a new bidding algorithm and an existing bidding strategy in DoorDash’s paid search ads on Google. To carry out this experiment, we first identified the key performance metrics we needed to hit in order to be sure that the new bidding algorithm was an improvement. Next, we determined the correct sample size that would yield results that were statistically significant. Lastly, we measured the results to ensure everything was recorded as intended. 

Determining success metrics

When determining our success metrics we come up with a target cost-per-acquisition (CPA) that would improve our campaign efficiency at scale. CPA is our north star metric for marketing channel performance, as it best describes the efficiency of our investment. In general, for a mature marketing paid search channel without dramatic structure changes, it is relatively easy to get a cheaper CPA when the budget is low, as the ads acquire customers with high intent quickly. However, it becomes more and more expensive to acquire customers who have lower intent, meaning they need convincing rather than just being pointed in the right direction. 

As ad spending increases, it hits diminishing returns at some point with a very high CPA. Therefore, we need to ensure that whatever CPA target we set still performs well at the spend level we need. Since our experiments are not run at scale we need to ensure that the results are not just a factor of smaller sample sizes having more variation. Overall, we are looking to compare the legacy campaign’s CPA with the treatment campaign’s CPA, where both groups have similar spending levels, to determine a winner.

A graph showing how CPA increases the more customers are acquired
Figure 1: Typically, CPA surges exponentially as marketing spend increases because it takes more and more resources to reach new customers.

Sample size calculation

An accurate sample size enables us to make a robust inference, and get confidence in our testing outcome. Generally, the sample size for any study depends on the: 

  • Acceptable significance level 
  • Statistical power 
  • Expected effect size 
  • Standard deviation in the population

Significance level is the probability of our study rejecting null hypothesis. In our case, the null hypothesis states there is no CPA lift between the treatment and control group. While the null hypothesis is assumed to be true, usually we accept a p < 0.05 as the significant level to reject it. Statistical power is another factor that is easily neglected by marketers, it describes the probability of making a correct decision (to reject the null hypothesis) when the null hypothesis is false. We decided to use 80% power, which is common in the industry. In addition, the expected effect size plays an important role and has a negative correlation with sample size. Basically, we would need a large sample size to detect a small lift, while only a small sample size would be needed to detect a large lift. We made an estimation of the expected effect size based on our historical experiments. Finally, the biggest challenge left is to calculate the standard deviation of the CPA that will prove we actually got an improved CPA with 95% confidence intervals. 

In general, we can calculate the standard deviation for any metrics if we know the distribution it forms. For example, conversion rates form a binomial distribution, and the number of new conversions, form a normal distribution. With the formula of each distribution we can easily calculate the standard deviation of those metrics. However, CPA is a rate metric which doesn’t form any known distribution, so we are not able to calculate the standard deviation of the campaign’s CPA with any known formula. Therefore, we need some method which can measure the standard deviation in an empirical way given any form of distribution.

The other difficulty we face is the limitation of treating time periods as the experiment units. Experiment unit is the smallest division of the experiment so that two experiment units can receive different treatments. For example, in an experiment that shows two versions of an app to our customers, the experiment unit is each customer who visited the app. 

In general, we can treat user ID/device ID/cookie as experiment units, which gives us tons of data points depending on our customer population. However, we can’t use user as our experiment unit since we don’t know how much spend would be allocated to each user. Therefore, we have to use time periods instead, e.g., daily, weekly, or monthly CPA, etc. Since CPA varies by day of week, we tend to use weekly CPA. However, this will dramatically decrease the historical data points we can use. 

Assuming we need the historical performance of 100 experiment units for standard deviation calculation, it’s much easier to get 100 consumer data vs 100 weekly spend data in the past, and obviously we can’t wait two years to start our test. In addition, CPA is heavily affected by the spending level (higher spend incurs higher CPA) and seasonality. It turned out that we had very limited weeks that have stable spending and CPA trends prior to when the experiment started. 

Based on the two challenges listed above, we need a method that can measure the standard deviation in an empirical way and enlarge our dataset (limited weekly cohorts) at the same time. 

Therefore, we decided to go with bootstrapping, which enlarges our dataset using random sampling with replacement. At the same time, bootstrapping’s biggest advantage is that it allows estimation of sample distributions of any statistics (applicable to CPA, which has unknown distribution), and helps calculating standard deviation empirically. Here is the bootstrapping process we implemented to enlarge our data set:

  • Step 1: Randomly pick a weekday out of total weekly cohorts 
  • Step 2: Repeat step one for seven times to formalize a new week
  • Step 3: Repeat step two 10,000 times and receive 10,000 new weeks
  • Step 4: Measure the standard deviation of those 10,000 weeks

Code for bootstrapping:

```{r}
set.seed(1)
samples_Spend <- c()
samples_Cx <- c()
samples_CPA <- c()
df <- data.frame()
wk <- floor(nrow(df_cx) / 7) - 1 # bootsttrapping 1 less week than the total full week we can get

# Bootstrap & stratified sampling
  
for (i in 1:10000){ # boostatrpping 10000 times
    
      samples <- df_cx %>%
              group_by(wod) %>%
              sample_n(wk) # stratified sampling to have each day of week
      
      # statistics for each bootstrap
      samples_Spend[i] <- sum(samples$SPEND) 
      samples_Cx[i] <-  sum(samples$CX)
      samples_CPA[i] <- sum(samples$SPEND) / sum(samples$CX)
      
      # append result for all bootstraps
      df_sample <- data.frame(Spend = samples_Spend,
                              Cx = samples_Cx,
                              CPA = samples_CPA) 
      
  }
  
# append result for all periods
df <- rbind(df,df_sample)
```

Now we have all four factors needed. We finalized the sample size and estimated the experiment periods. Let’s start our test!

A/A test:

When setting up a new campaign at Google Adwords, it usually takes days for it to stabilize in terms of spending and CPA. That’s why we set a two week A/A test before monitoring the result. This warm-up period allows campaigns to stabilize and also ensures there is no statistically significant difference between treatment and control group before the test starts. 

In Figure 2, below, we can see there is no significant difference between control and test during the A/A test period (Day 10 to Day 34), which means the campaign is stabilized and ready to go.

Graph showing experiments going from A/A to
Figure 2: Since the CPA maintains a similar level across the control and treatment groups after the launch of A/A testing at Day 10, we know the experiment is ready to launch.

Monitoring the experiment: 

Similar to all other experiments, we should start monitoring as soon as possible to ensure our experiment was set up correctly. In addition to general checks, such as randomization, metrics level, and bucket shares, we also need to ensure that the upstream data aligns with the Adwords UI, and downstream data captures all the conversions from the testing campaigns. More importantly, we need to make sure the spend maintains a similar level across test and control groups, otherwise it is meaningless to compare CPA between test and control groups.

Finally, we leave one to two weeks for a cool-down period after the experiment ends, ensuring we don’t miss any consumers who convert after seeing our ads (lagging effect). The length of the cool-down period is decided based on the attribution model used.

Conclusion

For many data-driven companies, digital ad platforms can be a source of frustration when attempting to conduct scientific experiments to optimize campaign performance and return results. While none of the available digital ad platforms offer the ideal set of tools and insights needed to perform some scientific experiments, it is possible to use what’s there to set up tests with meaningful results. Google Adwords, Facebook, Snapchat and some other publishers do have their own experimentation platforms for marketers to conduct all sorts of tests.

Meanwhile, we demonstrated a real case in DoorDash with the following learnings:

  • Define the success metrics. For marketing specifically, no matter if it’s CPA or return on ad spend (ROAS), measure that at the desired spending level. 
  • Due to the seasonality and marketing fluctuation from markers’ business or the competitors’, utilizing bootstrapping methods can amplify existing data points and calculate the standard deviation empirically. 

Acknowledgments

Thanks to Ezra Berger, Wayne Cunningham, Robert Kaspar, Jessica Lachs, and Gunnard Johnson for their careful review of this article. We also thank the cross functional marketing experimentation team that helped us develop the article’s content including Robert Kaspar, Saurabh Basantani, Kate McGrath, Justin Neustadter, Julianna Simon, Josh Li, Kevin Chen, Aman Dhesi.

Photo by Joshua Sortino on Unsplash

In 2020, DoorDash engineers extracted the consumer order checkout flow out of our monolithic service and reimplemented it in a new Kotlin microservice service. This effort, part of our migration from a monolithic codebase to a microservices architecture, increases our platform’s performance, reliability, and scalability.

The consumer checkout flow is one of the most critical flows on the DoorDash food ordering platform. The flow is responsible for submitting consumers’ order carts, processing payments, and connecting the order to our logistics system. Our legacy consumer checkout flow was built in 2016 in our monolithic service. 

To improve the system, we re-engineered the consumer checkout flow. The new consumer checkout flow is implemented in a Kotlin microservice and utilizes a newer tech stack based on technologies such as Apache Cassandra, Apache Kafka, Cadence, and gRPC.  

The new architecture has proven its reliability and scalability allowing DoorDash to ensure a smooth ordering experience to more and more users. 

Our motivation for building a new checkout flow

The migration to a microservices architecture gave us the opportunity to improve our new flow, including getting better:

  • Performance: Faster consumer checkout 
  • Scalability: Being able to process more orders concurrently
  • Reliability: Avoiding orders getting lost or stuck in the middle of processing
  • Development productivity: Adding features to the flow more quickly and efficiently

Performance

Our legacy checkout flow was not performant and was frequently criticized by users. The legacy consumer checkout flow was written in Python. Tasks in the flow were executed sequentially and there was no parallelism between tasks. In addition, the database access pattern consisted of performing reads and writes without caching results. This degraded performance since each query usually would take 10 to 100 milliseconds to execute. 

Scalability

The database was preventing the scalability of our legacy checkout flow. The order data was stored in a Postgres database that lacked any sharding mechanism. Though there were read replicas to offload the read load, database writes were always forwarded to the single primary database, which cannot be easily scaled horizontally. This issue was amplified further when the legacy consumer checkout flow updated the database too frequently.

Reliability

There were some reliability issues in the legacy checkout flow where an order could be lost during the order processing. The consumer checkout flow contains many steps. Ideally, those steps should run in a transaction to ensure either all of these steps or none are executed, so there are no orphaned parts of the process. 

For example, if a customer’s order fails to create a new delivery in our logistics systems then we won’t be able to assign a Dasher, our name for delivery drivers. A failure like this should cause the whole consumer checkout to fail and every operation we have already completed in the process would need to be reversed. In this case, we would need to refund the consumer the amount that was charged, because their order failed. 

Unfortunately, the legacy consumer checkout flow didn’t handle the failure process properly. If the order fails in the middle of the process, the order is left in limbo and usually needs some human intervention to fix it. This type of manual intervention is not scalable or efficient. 

Iteration velocity

We also wanted to improve the development velocity of the consumer checkout flow so that we can iterate faster.

DoorDash built its legacy platform with a monolithic codebase, where the legacy consumer checkout lived. This codebase helped DoorDash move fast in its early stages. But as the codebase and our business grew, more issues emerged:

Slow deployments: Deployments were only operated by the site reliability engineering (SRE) team. This meant individual teams didn’t have the flexibility to deploy their changes. The deployment process took quite a bit of effort and time since it impacted everything in the monolithic codebase. If there was a failure, the whole release would need to be rolled back, which would delay engineers working on other features by at least one day.

Lack of ownership: Many legacy features and business logics were implemented many years ago. Components in the monolithic codebase sometimes don’t have a clear ownership. Many flows were lacking documentation and were not well monitored. Not having clear ownership and knowledge of the system had negative consequences. Some flows were disrupted by accident when new features were added to the consumer checkout flow. These issues were hard to detect. Sometimes we only discovered them when consumers reported issues or our core business metrics were degraded.  

Inefficient testing: The monolithic codebase lacked an efficient way to test code changes because the unit tests run on the staging environment instead of the production environment.

These issues made the iteration speed really slow. Sometimes making a tiny change in production could take a week or longer.

Checkout process architecture 

Given the issues we mentioned above, we decided to rewrite the checkout flow using a new tech stack.

Diagram depicting the architecture our checkout microservice
Figure 1: Our re-engineered checkout flow takes advantage of our new microservice architecture’s components. Cassandra, a distributed database, has replaced Postgres, and become our primary data storage. Kafka is used to decouple the complex workflow. Cadence helps us build fault-oblivious business logic.

The lifecycle of the new consumer checkout flow is the following:

  1. The clients (web/mobile) send requests to our gateway microservice to checkout an order.
  2. The gateway microservice calls the newly built order service.
  3. The order service fetches data associated with the order and validates the item, merchant, and delivery availability. Then it materializes the order into a Cassandra database and drops off a Kafka message in the queue, indicating the order has been submitted.
  4. The Kafka consumers poll order submission events and create a Cadence workflow to initialize the order processing. 
  5. Cadence calls an order service endpoint to start the order processing.
  6. The consumer order service starts its state machine to process the order. In each state machine step, such as performing a payment or creating a delivery within our logistics systems, the consumer order service interacts with a related microservice using gRPC and updates the order we stored in the Cassandra database.    
  7. The client checks the order processing state using a pull model. The client polls an endpoint on the order service, which looks up the order state in the Cassandra table and returns a success if the order processing has finished all of the state machine’s steps. If the order processing fails, Cadence retries it. 

The technologies we used to ensure reliability 

We want to avoid losing orders or leaving them in a limbo state during the checkout process and we consider this as the most important reliability feature we need to support in the consumer checkout flow. This essentially requires us to be able to:

  1. Retry and resume the processing on recoverable failures (e.g. when dependencies are temporarily unavailable)
  2. Cancel the side effects created during processing on non-retryable failures (e.g. when a consumer’s credit card was declined by their bank)

We reviewed the dependencies of order processing and divided them into retryable idempotent steps. Then we designed an order state machine based off of these steps. We persist and update the state machine state into the Cassandra database whenever the state machine finishes an individual step. If the order processing fails, Cadence calls our microservice again to retry the order processing. The order state machine can restore all the order data needed from Cassandra and resume the processing. When the order state machine encounters fatal errors, it cancels side effects to bring the order into a “clean failed state”. 

Cassandra: We use Cassandra as our primary data storage to persist order-related data. To maintain backward compatibility, data is also written back to the Postgres database. Cassandra’s high availability, scalability, and multiple-AZ replication empower us to scale horizontally. The support of the KV model allows persisting order data in a more efficient and flexible way.

Cadence: We use Cadence for fault-tolerant workflow management. Cadence provides the resilient retry mechanism on order processing failures. The order information won’t be lost when our microservice is down because Cadence will retry once this microservice is healthy again. 

State machine: We developed a state machine backed by Cassandra and Cadence. The state machine is resilient to failures and handles errors in an elegant way. The order processing contains many state machine steps, such as fraud check, payments, delivery creation, and sending orders to merchants. If any step fails and the order is unable to submit, we need to revert all the state machine steps completed so far to eliminate any negative side effects. The state machine develops that in sync with the Cassandra state and Cadence retries, providing this state reversal out-of-the-box. 

How our new checkout process boosted performance

We improved the performance of the checkout flow by writing concurrent code and caching database results.

Coroutines improve concurrency

In a consumer checkout flow, we need to fetch a lot of data from either multiple databases or other microservices. We did this sequentially in the legacy flow, which was very inefficient. To address this problem, we developed a Kotlin coroutine-based workflow utility to maximize task concurrency. The workflow utility can identify and execute an optimal execution plan given each task’s dependency relationship. Such concurrency tripled our performance in executing these tasks.

Caching database results reduces unnecessary queries

The new flow also achieved performance improvements by reducing unnecessary queries. In the legacy flow, database reads and writes were made whenever the flow needed to access the data. In the new flow, we run all of the queries in parallel at the beginning of the flow and cache the data in memory, so that most of the database reads are cut off. In addition, we maintain an in-memory order model and only do one flush into the database at the end of the flow. 

Sandbox testing enables faster changes 

We also introduced sandbox testing, a mechanism that allows developers to test their changes easily in production environments. 

When working with microservices, testing is easier said than done. Microservices usually interact with many databases and other microservices. Local testing cannot replicate the production environment, while testing in production usually requires a service deployment. Neither testing approach is efficient enough for developers to iterate with agility.

To address this issue, we created production sandboxes for our microservices. These sandboxes are a list of special production pods which do not accept regular production traffic. We set up a routing logic in the upstream services of our microservice, based on certain routing rules defined in our configuration files. To test this testing solution we deployed the build to a sandbox and changed the configuration files to route certain requests (usually based on the consumer ID) to the sandbox and test the change. This has improved the development efficiency greatly and ensures that we never deploy a full outage to production for all consumers.

Results

After we launched the new checkout flow, engineers worked with data scientists to analyze the impact of the extraction and found many positive improvements in some of the key business metrics.

Improved latency

We define the checkout flow latency to be the time it takes after the consumer clicks the place order button until they are navigated to the order tracking page. The new flow is faster than the old flow. The average checkout flow p95 latency decreased by 48%, from 13.5 to 7 seconds

Conversion rate

In the new consumer checkout flow, we display a more friendly error message to consumers. Consumers can take better actions correspondingly to unblock themselves in the checkout process, for example, switching to a different credit card if the first one was declined, or  removing an unavailable item from the cart. With the help of this improvement, we’ve observed a significant conversion rate improvement on mobile and on web.

Fewer order cancellations

The legacy flow had no retry mechanism for downstream failures. Any database or downstream service blip could cause order processing to fail and the whole order to be canceled. In the new flow, failures are handled more gracefully with retries and default fallbacks. As a result, around 1% of the orders are saved daily on average.

Database load reduction

The old flow reads from the primary database deliberately throughout the checkout flow to ensure consistency. Some tables were read and updated multiple times in one request. The new flow loads data once into memory and flushes the data into the database at the end of the checkout flow. 

As a result, the Postgres database primary reads on order related tables, in queries per second (QPS) were reduced by 96%, while the write QPS was reduced by 44%. The overall database primary QPS reduced was 20%.

Conclusion

To summarize, a Kotlin and gRPC microservice architecture with a tech stack consisting of Cassandra, Kafka, and Cadence can help improve the reliability, performance, and scalability of the checkout flow.   

Any company growing out of their monolith and facing similar problems with checkout or similar flows should consider the results shown by our migration.

Photo by Ramiro Mendes on Unsplash

The complexity of a microservice architecture requires fine-grained observability to spot impending service and infrastructure failures, and quickly mitigate them. Recognizing this need at DoorDash, we developed Infra Prober, a new tool to help us maintain the reliability of our platform.

Our earlier observability system monitored the performance of our services and infrastructure independently. However, the failures of one infrastructure component can impact multiple services and may even affect other infrastructure components. With this strategy, we could not always identify an originating issue among those that followed. To improve our reliability and reach our goals, we needed an approach to identify the health and reliability of infrastructure components directly with a higher signal-to-noise ratio (SNR).

In 2019, we began work on a blackbox probe, a technique that mimics user behavior to find faults in a system. If, for example, a cluster in our caching system that enables services to get/set keys was degraded, a blackbox probe would attempt to do the get/set operations to the cluster, just as the services depending on the caching system would.

We built our new Infra Prober tool around Cloudprober, an observability tool developed by Google and released as open source under the Apache 2.0 license. Cloudprober does an excellent job running probes to determine the health of a system. To suit our purposes, we built a number of components to extend Cloudprober to monitor our infrastructure components.

With its reports delivered through Prometheus, another open source project released under the Apache 2.0 license, we’ve reduced our time to detect critical incidents by 82.5% since 2019.

Original microservices-based monitoring strategy

DoorDash’s microservice architecture consists of multiple loosely coupled, collaborating services managed by service teams and a set of API-driven, self-service infrastructure components maintained by infrastructure teams. The service teams and the infrastructure teams each support two parts of the monitoring system independently, as shown in Figure 1, below:

Diagram showing DoorDash's original alerting strategy
Figure 1: Under our original monitoring strategy, services and infrastructure components independently report their own performance metrics.

Each service provides service-level metrics that indicate its health. If the service performance degrades, the related service team receives an alert.

Each infrastructure component provides system-level metrics measuring its own performance. The service team and/or the related infrastructure team is notified if the infrastructure component becomes unhealthy.

Deficiencies with this strategy

Although the two types of monitoring defined above are essential, we found that significant incidents often resulted in cascading failures causing many metrics-based alerts to fire. Multiple alerts made it difficult to find the root cause failure quickly.

Diagram showing service and infrastructure alerting structures
Figure 2: Under our previous monitoring system, a Redis cluster failure may cause multiple alerts to fire, making it difficult to find the root cause.

For example, if an unexpected failover occurred with the caching system due to a bad infrastructure change, the related services may see higher response latency and error rates. At the same time, the infrastructure team may see higher I/O rates and CPU usage of the associated database and more messages queued, as shown in Figure 2, above. In this case, engineers would have a difficult time identifying the root cause unless someone manually checks the status and events of the caching system.

Due to these deficiencies, we found it crucial to have an additional monitoring approach that could provide a fast and reliable signal to identify the health and reliability of infrastructure components directly.

Designing Infra Prober to monitor infrastructure components

We believe the health and reliability of a system is best measured from an external users’ point of view, which can be established by blackbox probing. This technique monitors the behavior of a system similar to how external users would see it. Blackbox probing can provide a high SNR by focusing on what really matters to the external users.

To accomplish this goal, we developed Infra Prober, a new tool that actively probes our infrastructure components by executing small checks that mimic basic client behavior. We purposefully selected basic operations and small checks to make sure the actions provide very reliable signals when they succeed or fail, rather than alerts based on the probe operation steps themselves, as with our earlier alerting strategy.

If the caching system is inaccessible, Infra Prober can detect the failures immediately and fire off an alert ahead of the original teams’ alerts. Based on the alerts timeline, the root cause becomes much easier to detect.

Diagram showing alerting structure
Figure 3: In this example, Infra Prober detects the get/set failures on the Redis cluster and fires its alerts ahead of the other teams’ alerts.

Key components

Rather than reinvent the wheel, we used the open source Cloudprober as the core of Infra Prober. From there, we added components to connect Cloudprober to our infrastructure components. We also found a need for a cleanup component in the system. 

diagram showing Infra Prober architecture
Figure 4: The Infra Prober architecture includes the open source Cloudprober project, along with components to connect our infrastructure and do garbage cleanup.

Cloudprober and probes

Cloudprober makes it very easy to monitor availability and performance of various components of the system. Employing an active monitoring model, Cloudprober’s main task is to run probes. A probe executes a time-bound check against the system’s components to verify that they are working as expected from a users’ point of view, at a configured interval, and exports results as a set of metrics. Cloudprober has multiple built-in probes for the most common types of checks, such as ping. It allows using external probes to customize checks as well.

Infrastructure configurations

Infrastructure configurations, stored in configuration files, define the probes’ details, including type, name, interval, timeout, and target. To maintain the configuration files, we added components around Cloudprober to support a more dynamic configuration.

Infrastructure Collector

Our dynamic infrastructure and varying list of clusters makes the configurations difficult to maintain statically. We designed the Infrastructure Collector to automatically discover the latest states of infrastructure components and update the configuration file.

Allowlist and blocklist

Specifying the allowlists and blocklists in a dynamic configuration system lets engineers update the configurations on the fly without restarting the probe service when it needs a quick or urgent configuration change.

Observability

Cloudprober exports probe results as a set of Prometheus metrics. All types of probes collect the following metrics at a minimum, which are, in turn, used for alerting:

MetricTypeDescription
TotalCounterTotal number of probes.
SuccessCounterNumber of successful probes. Deficit between total and success indicates failures.
LatencyCounterCumulative probe latency. By default it’s just the sum of the latencies observed so far. Average latency can be computed using rate(latency)/rate(success).

Cleanup 

Some probes modify the state of the target system, such as inserting and deleting a record. When such a probe fails, it may leave that record in the system. In time, those records build up as garbage (memory or storage level) and impact the system performance. The cleanup process is responsible for garbage collection and cleanup. 

Key challenges we resolved

Monitoring systems generally use system resources. With Infra Prober, one key challenge was to limit the overhead, which we managed through probe design and controlling the number of connections. We also needed to tune the system to optimize alert sensitivity and time-to-detection of issues.

Designing a reasonable workflow for each probe

Infra Prober needs to run its probes repeatedly to continually monitor our services and infrastructure. To keep resource usage low, we designed the probe workflow to be simple and lightweight. We focused on the most basic client behaviors for each infrastructure component. For example, the basic client behaviors for a Redis cluster are to set and get a key, so a SET and a GET are the only two checks in a Redis probe workflow.

The key difference between probe checks and normal service behaviors on the infrastructure components is the frequency. When designing the workflow of a probe, another important metric to think about is the time to live (TTL). In the case of a Redis probe, if the Redis cluster is tiny and the probe is using the default TTL set for a standard service, it has a higher risk of overloading the cluster memory, which can cause issues.

Detecting issues quickly while maintaining a high SNR

One goal of Infra Prober is to reduce the detection time when any infrastructure component is down. To achieve this goal, we needed to improve the metrics precision and alerts sensitivity.

  • To improve the metrics precision, we wanted to make the probes’ intervals as short as possible to get more samples. However, shorter intervals increase the concurrent processes of probes and consume more system resources.
  • To improve the alert sensitivity, we wanted to fire the alerts as soon as possible after the service-level objective (SLO) was impacted. However, more sensitivity means more noise.

To balance the issue detection time and SNR while making the Infra Prober alerts more reliable, we took the following actions:

  • Conducted multiple experiments and monitored the metrics for multiple months to find the best probe intervals and alert thresholds for different infrastructure components.
  • Eliminated the noise during Infra Prober server warmup by automatically creating maintenance windows to mute the alerts.
  • Reduced the noise due to metrics lags by adding additional checks to the alert conditions. For example, one alert condition checks if metrics have missing data or an abnormal data volume before firing the alerts.
  • Clarified the ownership of each infrastructure component and forwarded high urgency alerts directly to the owners to reduce the incident response time.
  • Provided detailed documentation to teams and enabled them to modify alert sensitivity to their needs.

These efforts make Infra Prober able to detect real issues and fire reliable alerts in two minutes with an extremely high SNR.

Managing the number of connections when probe frequency is high

By default, Cloudprober forks out a new probe process for every probe cycle, which can become resource intensive if the probe frequency is high and the process is big. If each probe cycle creates a new connection to the infrastructure cluster, the cluster may become overloaded and unavailable. 

Diagram showing Cloudprober server communication
Figure 5: Cloudprober’s server mode runs its probes in the background as daemons, communicating over stdout and stdin.

To solve this problem, we use Cloudprober’s server mode in Infra Prober, which provides a way to run the probe process in the background, as a daemon. In server mode, Cloudprober communicates with this process over standard output (stdout) and standard input (stdin).

Results and impact

We launched Infra Prober in October 2019 and it now actively probes nine of our critical infrastructure components with over 160 infrastructure clusters. More infrastructure components will be covered in the future.

Infra Prober helps oncall engineers quickly identify infrastructure failures and adds extra context to solving ongoing issues. 

Compared with the second and third quarters of 2019, before we launched Infra Prober, the mean time-to-detection for critical incidents was reduced by 82.5%, and the growth rate of system uptime was increased by about three times. Infra Prober contributed greatly to this big win.

Graph showing time to detect
Figure 6: Since Infra Prober’s launch, our mean time to detect critical incidents decreased by 82.5%.
Graph showing system uptime growth rate
Figure 7: With the help of Infra Prober, we tripled the system’s uptime growth rate.

Looking to the future

In the future, we will keep reducing the issue detection time and increasing the SNR of Infra Prober. There will be multiple Cloudprober instances running together with a rolling update strategy to minimize the impacts from feature and code rollouts and server warmup processes.

In the long term, Infra Prober metrics will set a baseline as our service level indicators (SLIs). After establishing this standard, we will be able to hold ourselves to uptime SLOs and use the results to prioritize our infrastructure investment.

Moreover, as our infrastructure matures, we will use the health signals provided by Infra Prober as indicators that a specific availability zone or region is unhealthy and should be drained of traffic.

Acknowledgments

Kudos to Luigi Tagliamonte, Luke Christopherson, Qixuan Wang, Rabun Kosar, and Sebastian Yates for contributing to this project. Big thanks to Alessandro Salvatori, Robert Treat, Sean Chittenden, Stephen Chu, and Wuang Qin for helping maintain this project. Also, special thanks to Manu Garg and other contributors of the Cloudprober open source project.


Header photo by Lianhao Qu on Unsplash.

Modern machine learning (ML) teams have found great success in combining multiple ML models and rule-based models as ensembles for better predictive performance, but it can be a challenge to productionize them. For real-time production systems, models are usually trained with Python for fast development, serialized to a model store, and evaluated with C++ during model serving for efficiency. 

However, rule-based models and models trained using multiple ML frameworks can’t be serialized into a single combined model as each framework has its own serialization format and runtime prediction library. 

DoorDash’s ML Platform team wanted to enable ML engineers and data scientists to easily develop such models with seamless production integration. We used a computational graph approach via a domain-specific language (DSL) to allow teams to use multiple frameworks at once in a single combined model, while meeting development speed and prediction performance requirements. 

Our data scientists and engineers have been using this new capability of our ML platform to develop and improve models that better serve our customers, for example, providing personalized food recommendations, improving delivery efficiency, and giving more accurate estimations for delivery time.

The need for flexible ensemble models

In a general machine learning pipeline, models are developed inside a Python notebook (i.e. Jupyter), checked into Git source control, and then trained inside some computational cluster. Trained models are uploaded to a model artifact store and loaded inside a prediction cluster in production, which may run performant C++ code to serve real-time prediction requests from other business services, as shown in Figure 1 below:

Diagram showing a typical machine learning development and production pipeline
Figure 1: In a simple ML pipeline, data scientists develop a model in a Python notebook and check it into a Git repository, after which it is trained on a computation cluster. The model is served by a prediction service in a production system.

At DoorDash, the machine learning platform provides this whole infrastructure so that machine learning engineers and data scientists can focus on model development. Currently, most of the online machine learning problems at DoorDash could be solved with a decision tree-based model using LightGBM or neural networks with PyTorch (See DoorDash’s ML Platform – The Beginning). However, there are many use cases that require more complex models to achieve better business outcomes:

Rule-based models

Rule-based models are an easy way to initially tackle many problems and we would like to support them with the ML framework. 

For example, when a consumer places a food order through our platform, we need to offer a nearby Dasher, our term for a delivery driver, the chance to make the delivery. To estimate the best time to send the offer to the Dasher, we initially used a model that tries three features sequentially and uses the first available one. The features are historical average food preparation time estimates at individual stores, historical average food preparation time estimates across all stores, and a default numerical value. In addition, some models may require combining the predictions from multiple ML models through a simple heuristics and return the aggregated results. 

Pre-processing and guardrails

Feature preprocessing and value guardrails are often needed for model inputs like linear transformations and embedding averaging. It’s true that preprocessing on features could be handled as part of an ETL pipeline and stored into the feature store. However, for large scale features, it is very resource-intensive to precompute and store transformed data, especially for the features requiring exhaustive cartesian products between two features (i.e. cosine similarities between store and consumer embeddings). We’d like to support these “feature engineering on-the-fly“ scenarios to increase flexibility and efficient resource usage. 

For example, we only store features for aggregated historical non-overlapping data over a 30 minute time window inside the feature store. For a model that runs every minute to predict the ratio of outstanding orders to available Dashers for the next 30 minute period, we need to use weighted average features from these historical aggregated non-overlapping data sets. If we compute and store these transformed data sets in the feature store, we will have to store these weighted averages over one minute windows instead of the 30 minute window. A one minute window would require 30 times the storage space of the original data for this single model, resulting in high resource usage and scalability problems for the feature store. 

Post-processing and guardrails

Another use case for ensemble models is having guardrails and post-processing for custom adjustments on model outputs. In some cases, we have seen better results when fitting models on the relative change instead of the absolute value, especially when there is significant growth. It is better to support these as part of the model framework instead of having the business applications to handle it. 

When predicting merchant onsite preparation time, the LightGBM submodel prediction is compared against the merchant-provided estimated time. If the difference is significant, we will adjust the prediction result based on predefined rules. Our data scientists are also exploring stacking models using linear models (i.e linear regression) to capture major linearity between features and nonlinear models like LightGBM to model the residuals for better model performance and interpretability.

The challenge of supporting ensemble models 

The machine learning platform needs to support developing and training models with these scenarios inside Python, and transforming the processing logic to C++ for each model to ensure that it is fast and scalable in production. However, not only do models from different frameworks each have their own C++ library, but the custom rules and processings defined in Python also need to be implemented for each model. We should not burden data scientists and machine learning engineers with writing their own C++ production optimizations for every model. We need a generic solution to enable easy model development and fast production performance for ensemble models.

Computational graph solution

DoorDash ML Platform team has developed an in-house generic solution using a computational graph to handle transformations and models from different frameworks. From a user’s perspective, developing such an ensemble model only requires they:

  1. Define a static computation graph with Python DSL
  2. Call helper function to upload to a model store, which serializes the graph in JSON and models in native format (text for LightGBM and TorchScript bytes for Pytorch)

This computational graph solution with Python DSL significantly simplifies the effort needed from data scientists and ML engineers to create a model and meanwhile ensures performance as serialized model artifacts are loaded inside the Sibyl Prediction Service to serve real-time prediction requests with C++. We will explain the computational graph structure, the Python DSL, and real-time model serving in detail below.

Detailing the graph structure

The structure of ensemble models can be thought of as a directed acyclic computational graph with two types of nodes:

  • Input nodes
    Features that will go into the ensemble model. Each node has a Name and Dimension. 
  • Computation nodes
    Derived values. Each node has a Name and Operation. The Operation defines the dependencies and transformations on dependencies to derive the node’s value. An Operation could be another node, supported arithmetic and function computation between nodes, or a ML model. An Operation can also optionally define a condition to support if/elif/else evaluations. 

Computation nodes are evaluated in the exact order that appears in the configuration file. Writes to the computation node are done only if the current value in the computation node’s target is NaN to support if/elif/else use cases. The computed value will be NaN if the condition on the computation node is false. Note that this is different from usual last write wins semantics in imperative languages.

We use JSON as the serialization format so that the model is still readable to human eyes. Here is an example of a simple model that subtracts 30 from the input feature:

{
  "numerical_features": [
    {
      "name": "feature_1"
    },
  ],
  "compute_nodes": [
    {
      "target_name": "result",
      "operation": {
        "type": "expr",
        "expr": {
          "operator": "subtract",
          "operand1": "feature_1",
          "operand2": 30
        }
      }
    }
  ]
}

Python DSL for easy development

We implemented a Python library so that users could easily write Python code to define an ensemble model, without worrying about details of the computational graph structure. 

We will walk through the steps needed to create an ensemble model with Python DSL, starting with defining the pytorch sub-model.

class ToyModel(nn.Module):
  def __init__(self):
    super(Model, self).__init__()
    ...

  def forward(self, numerical_features, categorical_feature, embedding_features):
    ...
torch_model = ToyModel()

Next, the input nodes are declared. The node’s name is optional and will be extracted from the Python variable name via inspect if possible, otherwise a unique name will be generated by the library.

feature_1 = NumericalInputVariable()
feature_2 = NumericalInputVariable(target_name="num_feature_2")
feature_3 = NumericalInputVariable()
cat_feature = CategoricalInputVariable()
emb_feature = EmbeddingInputVariable(dimension=2)

Pre-processing and guardrails on features can be performed with Python operators and custom classes. Computations between nodes are captured by operator overloading on the node classes. The ConditionalChain defines if/elif/else conditional statements. 

feature_sum = feature_1 + feature_2
input_val = ConditionalChain(
  nodes=[
    ExpressionNode(condition=feature_1 < 0, expression=0),
    ExpressionNode(condition=feature_1 >= 0,expression=feature_1),
    ExpressionNode(expression=feature_sum)
  ]
)

Lastly, post-processing and guardrails on the model prediction result can be done similarly. The result node already captured all the dependencies and transformations. The model serializer uses the result node to generate and serialize the computation graph.

torch_node = PytorchNode(
  model=torch_model,
  numerical_features=[input_val],
  categorical_features=[cat_feature],
  embedding_features=[emb_feature],
)

result = ConditionalChain(
  nodes=[
    ExpressionNode(condition=feature_2 <= 0, expression=feature_3),
    ExpressionNode(condition=torch_node > 0, expression=torch_node * feature_3),
    ExpressionNode(expression=feature_1)
  ]
)

With support from Python operators, the Python DSL makes it significantly easier to define the computational graph and also makes the logic more readable to users for future reference or modifications. 

Model serving in production with efficient C++

Our Sibyl prediction service, a gRPC Kubernetes microservice, serves real-time models in production. The main logic to serve requests and fetch features is written in Kotlin. It uses JNI bindings to invoke C++ implementations for all model computations. A JNI model class is initialized once with its model path and implements a function taking in features and returning prediction results. Inside this function, the native C++ library (c_api for LightGBM and libtorch for PyTorch) is invoked to compute model results for single models while our computational graph implementation handles ensemble models. The language and components are illustrated in Figure 2, below. The final prediction result is passed back to Kotlin and returned to the client in real-time. 

diagram showing JNI bindings linking Kotlin and C++ services
Figure 2: JNI Bindings serve as the interface between Kotlin and C++ for predictions.

The computational graph, with all the input and computation nodes, is initialized from a serialized model JSON file during class initialization. We use the xtensor matrix to store and perform computations for all the features as well as intermediate nodes. The library handles transformations against data easily and efficiently without copying data. The computation nodes are iterated sequentially, performing computations and storing each nodes’ value inside the matrix. If a node contains an ML sub-model, its native C++ library is used again to compute the node’s value. After passing through all computation nodes, the matrix is filled with values including the prediction results. 

Performance metrics

We tested the time taken to compute 10,000 predictions against the model for estimating the ratio of outstanding orders to available Dashers described above, and compared the performance between Python code and our computational graph. This model uses a total of 37 features and a LightGBM submodel. The model involves pre-processing to compute the weighted average from historical aggregated data for 13 features, post-processing to adjust prediction against the current ratio, and a guardrail to enforce the model output range. 

We wrote Python code for the logic described above, using Python-API for the LightGBM submodel. The code loads all the feature data into Pandas DataFrame, loads the LightGBM model, and then starts to measure the time to iteratively make 10,000 predictions. Feature transformations and guardrails are handled inside each prediction with Python code to simulate production scenarios. The workflow for C++ is similar, except that features data are loaded into xtensor and then passed to our generic computation graph class. Both are run inside a Docker container with one CPU since we run production code in containers inside a Kubernetes cluster. This table shows the performance data:

Prediction TimeTotal Memory FootprintData + Model Memory
Python270s120MB21MB
C++20s75MB17MB

In terms of code complexity, the custom code we wrote above to handle everything in Python takes about 20 Python statements. Our serialized computational graph contains 75 nodes and is a JSON file with 800 lines. However, using the Python DSL we created to define the model computational graph, it only takes about 20 Python statements to generate the entire computational graph. 

Conclusion

We can see that the computational graph with C++ reduces CPU time by more than a factor of 12. Given a peak QPS of three million predictions per second (though not all of them are complex ensemble models), this significantly reduces the number of nodes needed for model serving and thus infrastructure usage. On the other hand, the Python DSL could notably help boost model development speed by reducing a complex and error-prone model definition from 800 lines of JSON down to 20 lines of Python code, similar to writing native Python. Our solution empowers the data science and machine learning teams at DoorDash to enjoy easy model development with Python and fast production performance with C++ at the same time. 

For a team or company that implements dedicated model-serving pipelines for similar high QPS and low latency models, the gains from implementing C++ computational graphs to support flexible ensemble models could be significant. However, for models that are of smaller scale or where latency is not a concern, the engineering effort to develop and maintain such a solution should be seriously considered against the alternative to sacrifice performance and/or to handle the ensemble logic on the client side. 

Future Work

We are essentially implementing a custom computational graph with the Python SDK and C++ computation. Although this method provides fast predictions and easy model composition, it also has some drawbacks, such as consistency between Python and C++ as well as resource use to support custom and new functions.

When we first started on this work, there was limited support in PyTorch for serializing computation graphs with Python dependency, requiring that we implement an efficient in-house solution to support our business needs. We have seen recent development and better support in TorchScript with Python operations. We did a proof of concept using TorchScript custom C++ class wrappers against LightGBM c_api to achieve similar functionalities as our computational graph approach. While TorchScript actually achieves similar performance, it also requires significant effort to set up due to some bugs and incomplete documentation. Seldon core also supports model ensembling via Inference Graph from a service level and a custom inference server could potentially support the transformations. 

We will continue exploring with open source frameworks for opportunities to adopt and contribute to them. 

Acknowledgements

Many thanks to Ezra Berger and Wayne Cunningham for the continuous support, review, and editing on this article. Thanks to Chi Zhang, Santhosh Hari, and Xiaochang Miao for sharing their insights from the data science and machine learning perspective. And thanks to Kornel Csernai, Kunal Shah, and Swaroop Chitlur from our ML Platform team for support and review throughout the course of this work. Last but not least, thanks to the mentorship of Hien Luu on making this and many other projects for our ML Platform a success!

When trying to scale a distributed system a common obstacle is not that there aren’t enough resources available, it’s that they are not being used efficiently.

At DoorDash we found a similar opportunity when working to scale our point-of-sale system (POS). We were experiencing outages because our POS system could not scale to meet peak demand. The problem was not a lack of resources, but that our resources were not being utilized efficiently. 

DoorDash’ POS system collects new orders and sends them to merchants’ POS systems via their APIs. However, due to typical network and system latency, the time it took for the merchant’s endpoints to respond to the order creation requests was small but significant. Since the legacy system would wait for the merchant’s POS system to respond, our resource utilization efficiency was severely limited. 

Our solution involved moving from a synchronous to an asynchronous input/output (I/O) model, which enabled our resources to be better utilized, scaled out our order capacity by 10x, and prevented additional outages. 

The lifecycle of an order

DoorDash’s backend consists of several microservices which communicate via REST APIs or gRPC. Our POS microservice forwards orders to merchants.

a flowchart of how the DoorDash POS system communicates with the backend and Merchant systems.
Figure 1: On DoorDash’s platform, the web backend sends a consumer’s requested order to the POS, where it is processed, and the POS forwards the order to the merchant for fulfillment.

After the user finishes the check out process, either on the DoorDash mobile app or the web site, the order is sent to the POS microservice. At this point the POS system forwards the order to the right merchant via a series of API calls.

Since sending the order to the merchant can take several seconds, the communication with POS is asynchronous and accomplished using Celery, a Python library that provides an RPC layer over different brokers, in our case RabbitMQ. The request for an order will then be picked up by one of the POS Kubernetes workers, processed, and forwarded to the merchant.

How we configured Celery

Celery is a distributed Python framework designed to manage asynchronous tasks. Each POS Kubernetes pod runs four Celery processes. Each process waits for a new task to be available, fetches it, and executes the Python callback to contact the merchant and create a new order. This process is synchronous and no new tasks can be executed by the Celery process until the current task has been completed.

The problems with the legacy approach

This legacy approach presents quite a few issues. First of all, resources are underutilized. When the order rate is high, most of the CPU time is spent waiting for merchant endpoints to respond. This time spent waiting for the merchant’s side to respond, along with the low number of Celery processes we configured, results in an average CPU usage below 5%. The overall effect of our legacy approach is that we end up requiring significantly more resources than needed, which limits how much the system can scale.

The second issue is that an increased latency in one merchant API can use up all the Celery tasks and cause requests to other (healthy) merchant APIs to pile up in RabbitMQ. When this pileup happened in the past it caused a significant order loss, which hurt the business and user confidence.

It was clear that increasing the number of Celery processes would have only slightly improved this situation since each process requires a significant amount of memory to run, limiting the maximum concurrency achievable.

The solutions we considered 

To solve this POS problem we considered three options: 

  • Using a Python thread pool
  • Taking advantage of Python 3’s AsyncIO feature
  • Utilizing an asynchronous I/O library such as Gevent

Thread pool

A possible solution would be to move to a model with a single process and have a Python thread pool executor execute the tasks. Since the memory footprint of a thread is significantly lower than the one in the legacy process, this would have allowed us to significantly increase our level of concurrency, going from four Celery processes per pod to a single process with 50 to 100 threads.

The disadvantages of this thread pool approach are that, since Celery does not natively support multiple threads, we would have to write the logic to forward the tasks to the thread pool and we would have to manage concurrency, resulting in a significant increase in the code complexity.

AsyncIO

Python 3’s AsyncIO feature would have allowed us to have high concurrency without having to worry about synchronization since the context is switched only at well-defined points.

Unfortunately, when we considered using AsyncIO to solve this problem, the current Celery 4 was not supporting AsyncIO natively, making a potential implementation on our side significantly less straightforward.

Also, all the input/output libraries we use would need to support AsyncIO in order for this strategy to work properly with the rest of the code. This would have required us to replace some of the libraries we were using, such as HTTP, with other AsyncIO compatible libraries, resulting in potentially significant code changes.

Gevent

Eventually we decided to use Gevent, a Python library that wraps Python greenlets. Gevent works similarly to AsyncIO: when there is an operation that requires I/O, the execution context is switched to another part of the code that already had its previous I/O request fulfilled and therefore is ready to be executed. This method is similar to using Linux’s select() function, but is transparently handled by Gevent instead.

Another advantage of Gevent is that Celery natively supports it, only requiring a change to the concurrency model. This support makes it easy to set up Gevent with existing tools. 

Overall, using Gevent would solve the problem DoorDash faced by letting us increase the number of Celery tasks by two orders of magnitude.

Monkey patch everything!

One wrinkle in adopting Gevent is that not all of our I/O libraries could release the execution context to be taken up by another part of the code. The creators of Gevent came up with a clever solution for this problem.

Gevent includes Gevent-aware versions of the most common I/O low level libraries, such as socket, and offers a method to make the other existing libraries use the Gevent ones. As indicated by the code sample below, this method is referred to as monkey patching. While this method might seem like a hack, it has been used in production by large tech companies, including Pinterest and Lyft.

> from gevent import monkey
> monkey.patch_all()

Adding the two lines above at the beginning of the application’s code makes Gevent automatically overwrite all the subsequent imported modules and use Gevent’s I/O libraries instead.

Implementing Gevent on our POS system

Instead of directly introducing the Gevent changes in the existing POS service, we created a new parallel application that had the patches related to Gevent, and gradually diverted traffic to it. This implementation strategy gave us the ability to switch back to the old non-Gevent application if anything went wrong.

Implementing the new Gevent application required the following changes:

Step 1: Install the following Python package

pip install gevent

Step 2: Monkey patch Celery

The non-Gevent application had the following code, in the celery.py file, to start up Celery:

from celery import Celery
from app import rabbitmq_url

main_app = Celery('app', broker=rabbitmq_url)

@app.task
def hello():
    return 'hello world'

The Gevent application included the below file, gcelery.py, along with the celery.py file.

from gevent import monkey
monkey.patch_all(httplib=False)


import app.celery
from app.celery import main_app

We used the code monkey.patch_all(httplib=False) to carefully patch all the portions of the libraries with Gevent-friendly functions that behave the same way as the original functions. This patching is performed early in the lifecycle of the application, before the Celery startup, as shown in celery.py.

Step 3: Bootstrap the Celery worker.

The non-Gevent application bootstraps Celery worker as follows:

exec celery -A app worker --concurrency=3 --loglevel=info --without-mingle 

The Gevent application bootstraps Celery worker as follows:

exec celery -A app.gcelery worker --concurrency=200 --pool gevent --loglevel=info --without-mingle

The following things changed when we implemented the Gevent application:

  • The –A command line argument determines the application to be run. 
  • In the non-Gevent application, we directly bootstrap celery.py.
  • In the Gevent application, app.gcelery is run. The gcelery.py file first monkey patches all the underlying libraries before calling the application celery.py.

The — concurrency command line argument determines the number of processes/threads. In the non-Gevent application, we have spawned only three processes. In the Gevent application, we have spawned only two hundred green threads.

The — pool command line allows us to choose between processes or threads. In the Gevent application, we select Gevent since our tasks are more I/O bound.

Results

After rolling out the new POS application that used Gevent in production, we obtained excellent results. First of all, we were able to reduce our Kubernetes pods by a factor of 10, in turn reducing the amount of CPU we utilized by 90%. Despite this reduction, our order processing capacity increased by 600%.

Additionally, the CPU utilization of each pod went from less than 5% to roughly 30%.

A Graph showing the effects of implementing Gevent
Figure 2: After implementing Gevent, we saw our orders-per-hour processed by each Kubernetes pod go from 450 to 6,000, indicating a huge efficiency gain.

Our new system could also handle a much higher rate of requests, since we significantly reduced the number of outages due to misbehaving merchant APIs eating up most of our Celery tasks.

Conclusions  

Gevent helped DoorDash improve the scalability and reliability of our services. It also enabled DoorDash to efficiently use resources during I/O operations by using event-based, asynchronous I/O thus reducing our resource usage.

Many companies develop Python-based microservices that are synchronous during I/O operations with other services, databases, caches, and message brokers. These companies can have a similar opportunity as DoorDash in improving scalability, reliability, and efficiency of their services by making use of this solution.

When interviewing candidates for Data Science roles at DoorDash, we look for a quality of entrepreneurship as a key indicator of future success. When training in Data Science, the technical demands of the field require a focus on modeling and algorithms. The many applications for modeling in the real world justify this focus, but when it comes down to the needs of a business, we want to see practitioners who understand the real business impact of their models.

Last year I wrote Organizing Machine Learning: Every Flavor Welcome!, an article describing the values of DoorDash’s Data Science team. Since then we have hired over 20 data scientists to build data-driven products for advanced measurement and optimization. While many of these hires have machine-learning (ML) backgrounds, every single one of them has a strong entrepreneurial streak. By ‘entrepreneurial’ I mean that they take initiative in finding the highest impact data projects to work on, rather than expecting to be told what to work on.

Most technology companies prioritize technical ability during their data science interview process, but at DoorDash, we assess for both technical ability and business intuition. In this article I share why and what we are looking for in these interviews.

Entrepreneurism first, machine learning second

In previous places I have worked, both in finance and technology, I have seen data scientists make the same mistake over and over again: they skip the “why” and go straight to the “what” and “how”. Good entrepreneurs strive to understand the “why” and “so what” before diving into execution. We look for data scientists that take the latter approach.

To illustrate this distinction, here is an example conversation that I have seen take place between an internal business partner and a data scientist:

graphic of business partner talking to data scientist

Business partner (BP): Hi DS, can you please build a model that can predict what food items should be recommended to a new user when they land on DoorDash’s website for the first time?

Data scientist (DS): Hi BP, I can build a personalization model using deep learning with 1,000 features.

BP: Thanks, let me know when it’s ready.

[One month later]

DS: The model is built.

BP: Great! Let’s run an A/B experiment.

[Two weeks later, after the experiment concludes]

DS: Hmm, looks like new-user conversion is not statistically significant in treatment versus control.

BP: That’s strange. Do you know why? Did the ML model not work?

DS: Not sure just yet, I’ll take a look at the data.

Let’s walk through everything that went wrong in this example:

  1. Goal alignment: Every product and team needs to begin with a clear goal, which is typically a target value for a clearly defined metric. In this example, it was not clear what the team was ultimately trying to optimize. Was it the new-user conversion rate? Was it the total number of sales? Was it total revenue? Something else?
  2. Opportunity sizing: Before working on a project, the team needs to estimate its potential impact. In this example, why build a new-user recommendation model for the web site if, suppose, 98% of new users experience DoorDash via a mobile app?
  3. Exploratory data analysis: Before building a model, we need to interrogate the data to see if there is any predictive power in the feature set. For example, if we know nothing about a new visitor to a website, how are we going to be able to do any personalization? A simple matrix of scatter plots to assess correlation of variables with the target or a linear regression could determine if there is any predictive juice in the available data before committing to a full-blown ML model.
  4. Prioritization: In a lean and efficient team, there should always be the need for prioritization to make sure each team member is working on the highest value project to advance the mission of the company. In the above example, there was no conversation about why this is important and merits pushing another project deadline to take this new work on.
  5. A quick MVP: For any product it is best to get a minimum viable product (MVP) built quickly and cheaply to validate the hypothesis, before committing extensive time and resources. In this example, it is much preferable to build a toy model in one week and test it, before committing a whole month to build a complicated model with hundreds of features (none of which might be predictive).
  6. Interpretability for sanity check: Whatever toy model is built, it should always be possible to extract the top one or two drivers (i.e. features) of the model performance. We can then check if the toy model’s results make some intuitive sense in the business context.
  7. Experiment metrics: When designing an experiment, we should have more than one metric to look at when an experiment concludes. We should be able to look at different steps in the funnel, different slices and dices, and different cohorts, among many other potential metrics. In this example, the business partner and data scientist should have been able to identify that maybe the predictions were all the same, or not many users saw the new experience, or something else.
  8. Regular check-ins: Rather than meeting at the start and end of a model build, it is better to check-in frequently (e.g. once or twice a week) to discuss latest findings and align on if any course corrections are necessary. In this example, maybe after one week, if we knew the backtest showed little up lift then the project could have been scrapped earlier.

Revisiting the example conversation from above, here’s how it might work out if the data scientist considered the both the business implications and the technical problem at hand:

graphic of business partner talking to data scientist

BP: Hi DS, can you please build a model that can predict what food items should be recommended to a new user when they land on DoorDash’s website for the first time?

DS: Thanks BP. Can you give me more context please? What is the goal of this recommendation model? What is the proposed metric for measuring success? What is the precise hypothesis?

BP: Good questions, thank you for asking. We are trying to maximize new-user conversion rates. We think that a better web onboarding experience will increase new-user engagement and thus increase the chance of an initial conversion . Here are some background documents to learn more.

DS: Interesting, let me take a look at the documents and dig into the data a bit and get back to you.

[The next day]

DS: Hi BP, I looked at the data. The metric makes sense to me but I have low confidence in the currently proposed hypothesis. I don’t think developing this model is a good idea. Most new users go straight to the mobile app rather than our web site. Also, there is no useful information we have on new users when they land on the web site, so there’s no predictive power to capture via an ML model. The best thing to do is probably some high level rule to show whatever items are trending this week.

BP: Oh, that’s a shame. Oh well, thanks for looking into it.

DS: However, I did find something else that could help with new-user conversion. It looks like a lot of new users download the mobile app and then start filling out the sign-up page but don’t get to the end. Maybe we should introduce the sign-up page later, once they have engaged with the mobile app a bit more. For an MVP we could just delay it by a minute and run an experiment later. And later, if successful, we could build an ML model to find the earliest time to introduce each user to the sign-up page, based on their early engagement.

BP: Nice find! Interesting idea, let’s regroup with the broader team and prioritize this hypothesis.

What it means to be business owner

When people join our Data Science team, they are signing up for doing whatever they can in the business environment to help the company achieve (and even surpass) its goals. Typically, a company cares about the top line (growth) and the bottom line (profitability), and everything else ladders up towards these metrics. Obsessing over customer satisfaction, both when building external-facing products and internal tools, workflows, and management structures, is a precursor for ensuring growth and profitability.

On DoorDash’s Data Science team, in everything we do, we are focused on improving the customer experience (consumer, Dasher, merchant, or others who use our services) because we know this drives long-term growth and profitability. Each data scientist at DoorDash is accountable for how they spend their time and the impact they drive. They must be collaborative but still focus on the highest impact projects.

At the start of every year I challenge each data scientist to find and work on projects that deliver $10m of annualized incremental gross variable profit. This challenge helps the data scientist to filter their set of projects to only the highest value initiatives for the business. It also means that if there is nothing impactful enough to work on in their vertical, the data scientist should move to a different area of the business.

Data science principles

To help guide data scientists on how to build their models, we drew up a charter of principles. These principles help data scientists make prioritization and design decisions and will provide guardrails to our strategy over the coming years.

Principles (in priority order):

  1. Impact: Model solutions should drive business metrics.
  2. Expertise: We are industry leaders in measurement and optimization.
  3. Platformization: Build generalizable models which can be new businesses lines.
  4. Accountability: Ensure model decisions are fair, transparent, and interpretable.
  5. Reliability: Models should have few outages and safe failovers.
  6. Efficiency: Model outputs are fast and as cost-effective as possible.

What we look for in interviews

Throughout the data science interview process we are mostly trying to get signals on a candidate’s potential for Impact and Expertise, principles 1 and 2 above. The remaining principles, 3 through 6, are important but we believe they can be learnt on the job.

Most other data science interview processes only assess for expertise which, in our view, misses the more important attribute of being impact-driven. We see lots of candidates who are technically very capable but are more interested in building a model than solving a business problem, or who are not able to effectively operate under ambiguity, which is common in a fast paced environment.

At DoorDash, we first and foremost recognize data scientists for the impact they have on the business, regardless of whether they used complex ML to do so. However, over the course of a year we see, on average, about 70% of the impact of a data scientist comes from building new and more accurate ML models. But the model itself is not the goal, improving the business metrics with the model  is the goal, and ML is just one tool to achieve this — a tool that the data scientist is an expert in.

Our interview process

Our interview process is straight-forward and consists of three stages:

  1. Résumé screen: We review résumés for appropriate education and work experience.
  2. Homework challenge: We share a dataset and set of tasks which include building a predictive model and writing a summary report.
  3. One-one interviews: We schedule five interviews to assess business, technical, and values fit.

Our one-one interviews are different from most other data science interview processes in two respects:

  1. We do not have a coding challenge. We believe that the homework challenge is a better representation of the type of work you will be doing here and gives us all the signal we need.
  2. We have multiple consulting and analytics business case study interviews. Unlike other companies, we require our data scientists to have strong business intuition and the ability to operate under ambiguity.

Many candidates do well in the homework and technical one-one interviews and then poorly in the business case studies. We recognize that we are looking for a specific type of candidate, who are technically brilliant but also very business savvy. However, these candidates do exist and we will continue to keep the bar high to find these people.

Top 10 tips and tricks in the interviews

Finally, here are some ways to prepare for the one-one interviews and perform well in them:

  1. Read data science articles from marketplace companies like ourselves to understand marketplace dynamics and experimentation. A lot of the techniques and customer considerations are similar across businesses.
  2. When thinking through business problems and tradeoffs, consider the experience from all sides of the marketplace.
  3. Do not be afraid to ask clarifying questions — this demonstrates engagement and ownership. Candidates will not be docked points for doing so, quite the opposite.
  4. Candidates should feel free to take a moment to pause and structure their thoughts. The brief silence may feel awkward, but again it demonstrates good self-organization.
  5. Try to think from first principles rather than shoe-horning the problem asked into a framework you are more familiar with. It may sometimes be appropriate but usually it can give you tunnel vision versus thinking more creatively.
  6. Where possible, offer well-structured answers. This demonstrates clear communication and methodical thinking.
  7. Be concise; it is better if candidates communicate an answer in one sentence versus several sentences. This again demonstrates clear thinking. It also gives more time to answer more questions to further impress.
  8. Be specific in answers. For example, if listing a rate of conversion, state explicitly what the numerator and denominator are. Avoid providing vague examples of experiences.
  9. Demonstrate a bias to action. It is ok to ask for more time and data, but if asked to make a call then make the best call given the existing information.
  10. Be positive and try to enjoy the day. We are all aligned on candidates being successful and we will not try to trip them up. We will ask clarifying questions or try to steer candidates towards something else to maximize their chance of impressing!

There are more great pieces of advice in a previous article, The Undervalued Skills Candidates Need to Succeed in Data Science Interviews.

Conclusion

Our Data Science team at DoorDash is unique because of the emphasis we place on business impact and entrepreneurship, as well as technical brilliance. We know we are asking a lot of any single individual, but it makes for a more exciting and impactful Data Science team.

We are still a relatively nascent Data Science team and are looking to double our size in 2021. We are looking to add more data scientists to Dispatch, Dasher Engagement, Pricing, Ranking, Forecasting, Merchant Lead Scoring, and Fraud teams, as well as introduce data scientists to new areas of the company such as Merchant Services, Customer Support, Grocery, Dasher Positioning, and more! If you are technically brilliant but want to drive business impact above all else, then please apply to our team to join like-minded data science entrepreneurs!

Header photo by Dan Meyers on Unsplash.

In a microservice architecture, cross-service communication happens under a set of global rules that are hard to effectively enforce across all services without standardizing client-service communication. Relying on individual service client implementations to adhere to these rules means a lot of additional repeated work on individual teams, which has a negative impact on developer velocity. Furthermore, when an individual implementation strays from a rule by mistake, the effect is often severely adverse on overall reliability. 

In this article we will explain how DoorDash elevated developer velocity and cross-service reliability through standardizing client-service communication, by specifying a set of gRPC client requirements, and building them into Hermes, our new standard gRPC client library.

The challenge of managing a highly distributed architecture

Modern microservice architectures have some advantages over monolithic architectures in terms of improved separation of concerns, scalability, and developer velocity. However, one of the greatest challenges that comes with a microservices architecture is  maintaining a homogeneous set of standards that transcends service boundaries. Such standards are usually not about how services are implemented, but more about how they communicate with each other. Such standards include:

  • Service discovery and load balancing: It is important for all services to agree on how they will discover each other’s addresses and balance the load among these addresses. For instance, a rule stating that service discovery is DNS-based, and load-balancing happens on the client side, eliminates the server-side load balancer bottlenecks, but the rule needs to be enforced.
  • Enforcement of reliability guardrails: A service should have the right to dictate how it wants its clients to behave in terms of timeouts, retries, and circuit breaking criteria. These guardrails ensure that outages are isolated, and that recovery is fast.
  • Cross-service context propagation: A user request usually comes with headers that carry important information and should be visible to all services involved in fulfilling that request. Headers with global semantics are assumed to be propagated by all clients to their outgoing requests to other services.
  • Service-to-service authentication: All clients across all services are assumed to comply with a global standard in terms of how to authenticate to their dependency services. This global standard is usually ratified by a security team, and its automation mitigates security breaches.
  • Observability of communication: All clients are assumed to instrument the same metrics and log the same information about outgoing requests and their responses.

How can client-service communication standards be enforced?

One way to try to enforce these standards is to document them well and rely on engineers to implement them in the services they own, and to verify them in code reviews. However, engineers make mistakes, which can cause severe consequences. Additionally, relying primarily on teams to enforce standards is not practical when teams should be focused on building new features. 

Another way to enforce these standards is to bake them right into the protocol client library. This dramatically decreases the cognitive load needed for service owners to integrate their services, virtually eliminating the odds of making mistakes, which adds a huge boost to reliability and developer velocity.

Enforcing reliability guardrails in the client library

After a number of outages and service failures, DoorDash turned its focus to cross-service reliability guardrails. These past outages were either caused or amplified by service clients behaving inappropriately during an incident. Examples include:

  • A client has a request timeout set arbitrarily long, causing client thread saturation when the service is going through an incident.
  • A client persistently retries failing requests when it should back off, overwhelming the service when it is trying to recover.
  • A client keeps on sending requests when the service is evidently failing across the board, instead of breaking the circuit and failing fast, causing cascading failures.

The ideal solution is to build a client library that seamlessly enforces client-service reliability guardrails. This library must give services the ability to define the reliability behavior of the clients that call them. This is done by configuring the parameters of the clients’ timeouts, retry strategy, and circuit breakers.

  • If set correctly, timeouts are the first line of defense for reliability. If set too long, client threads can be easily saturated in an outage. If set too short, requests are abandoned prematurely. Services should own the timeout values used by the calling clients, since it is tightly related to the service latency.
  • Seamless retries with exponential backoff and jitter is the next line of defense. It ensures that transient errors have limited effect. How long the client should wait between retries, how many attempts should be made, and which error codes are retriable, all depend on the service implementation. Therefore services should also control this aspect of client behavior.
  • Circuit breaking is the last line of defense. If an outage happens and the service failure rate spikes, it makes sense for the client to detect the spike, skip outgoing requests altogether, and simply fail fast for a while. This allows the service a chance to recover without a long request queue. What constitutes a break-level failure rate depends on the service, and that is why clients’ circuit breaking configurations should also be dictated by it.

Most of the involved standards are well-defined industry concepts. Therefore, rather than implement these concepts from scratch, which would take months of effort, it is better if we can rely on a mature open source base library and modify it to our needs. This will allow us to solve the problem in a much shorter time frame since we can build features on top of the library rather than start from scratch.

Client behavior as a part of the service contract

At DoorDash, we rely on gRPC as the standard protocol for communication among our microservices. To build the solution described above, we designed and implemented a standard gRPC client library, which we call Hermes internally. In Greek mythology, Hermes (Pronounced “hermeez”) is the god of boundaries, communication, and travel. He is the messenger of the gods. He is able to move quickly and freely between the worlds of the mortal and the divine, aided by his winged sandals.

Our first step was to find a good way to enable services to set client parameter values for timeouts, retry, and circuit breaking, and make this step a core part of setting up the connection.

An option we found was to rely on the standard gRPC service config. This meant we needed to implement a thicker DNS that would allow services to register these values, and would add the service configuration as part of its query responses. We decided this change would consume too many resources to implement, and we wanted to avoid it if possible.

Our next thought was that, as we were already using protocol buffers (protobuf) to represent the service interface, perhaps we should extend its use to define other aspects of the service contract, such as these reliability parameter values. After some research, we shaped an elegant solution using protobuf custom options. We decided to define these parameters as a common protobuf extension for protobuf services.

package service_client;
message ServiceClientConfig {
  int64 response_timeout_millis = 1;
  ...
}
extend google.protobuf.ServiceOptions {
  service_client.ServiceClientConfig client_config = 999999;
}

Any service can use this extension, enabling it to annotate the service with protobuf options that declare values for these parameters.

import "service_client_config.proto";
service GreetingService {
  option (service_client.client_config).response_timeout_millis = 800;
  ...
  rpc hello(HelloRequest) returns (HelloResponse);
  ...
}

These custom options have standard semantics, and the client library can pull their values from the service descriptor at connection establishment time using reflection.

fun getServiceTimeout(serviceDescriptor: ServiceDescriptor) =
  serviceDescriptor
    .options
    .getExtension(ServiceClientConfigProto.clientConfig)
    .responseTimeoutMillis;

This way, service owners can add these simple options as annotations to their service definition, and our standard client library would be able to seamlessly enforce them.

Searching for the perfect open source base library

Next we set out to find the best open source library that would cover most of our following requirements:

DNS-based service discovery and client-side load balancing. We had already decided that server-side load balancers constitute bottlenecks, and had started moving away from them. Some services had already implemented client-side load balancing by relying on the server-side load balancer merely to establish a long-lived connection pool, and rotating among these connections. This solution had the downside of being complicated to manage, since established connections need to be kept in sync with the server’s changing horizontal scale

To ensure the clients refresh the connections when the service’s horizontal scale changes, the server used to periodically close all the client connections, so that clients would reestablish them with the new scale. This pattern led to a fuzzy, uneven load distribution, which hurts capacity planning. Figure 1, below, shows an example of load distribution under this arrangement.

graph of client service connections
Figure 1: Because client-server connections were periodically closed and reopened, load distribution among server pods was uneven.

Therefore, the new requirement is that clients should be able to seamlessly rely on a DNS for service discovery, and that they should do client-side load balancing while automatically honoring the DNS TTL to periodically refresh the connection pool.

Configurable reliability APIs. The base library must have mature, configurable, ready-to-use implementations for retries and circuit breakers, as these concepts are too complicated and too widely used to implement from scratch.

Extensibility. The base library must be highly extensible, so that we can easily add DoorDash’s specific requirements involving standards described above, like observability, context propagation, and service-to-service authorization, with minimum friction.

After some research we decided on Armeria as our top candidate. Armeria, built by LINE Corporation and released as open source under the Apache 2.0 license, is a microservice framework powered by a very strong open-source community. It is built in Java, which fits very nicely in our Kotlin environment. It covers all the required features: DNS service discovery and client-side load balancing, along with native timeouts, retries, and circuit breakers. It is also highly extensible through the use of an elegant decorator pattern, which allows us to add all of our custom aspects to all outgoing requests. Figure 2, below, depicts the architecture of our standard gRPC client.

reference architecture of Hermes
Figure 2: A GrpcClientBuilder fetches client configuration from the service protobuf definition, discovers the service addresses via DNS, and uses them to build a client. The client executes middleware decorators on each request, while load-balancing requests among the service connections.

Filling the gaps through open source contributions

A problem we faced fitting our requirements through Armeria is that we wanted services to be able to vary parameter values across methods within the same service. Armeria APIs for retries and circuit breaking only provided the means to set these parameter values at the level of the whole service, not at the level of the method. We contributed these features to Armeria by submitting pull requests that add them to retries and circuit breaking. Our collaboration experience with the Armeria core team was extremely pleasant. We added features to vary retry config and circuit breaking config by gRPC method, which came out with Armeria 1.3.

Results

Our initial results showed better load distribution and tail latency. Relying on DNS for service discovery directly resulted in even load distribution, which is great for effective capacity planning. Load distribution becomes even because DNS records come with a short TTL, after which the client gracefully refreshes the list of connections by redoing the DNS query, eliminating the need to periodically force connections to close based on their age. Figure 3, below, shows an example load distribution under this arrangement.

DNS graph
Figure 3: Refreshing DNS lookup based on TTL eliminates the need to periodically close connections, which leads to uniform load distribution among server pods. Compare this result to the uneven load distribution shown in Figure 1.

Like load distribution, tail latency also got better. The periodic connection reestablishment used to come in sync with a slight periodic increase in tail latency. This periodic increase disappeared once we shifted to DNS-based service discovery, because connections are no longer terminated based on their age. Figure 4, below, shows a tail-latency comparison between the old client and our new Hermes-based client.

latency graph
Figure 4: The periodic spike (green) in tail latency that used to happen due to periodic connection reset disappeared after shifting to DNS-based service discovery (blue).

Other than performance improvements, the new standard gRPC client now gives several benefits:

  1. We gain more clarity and consistency about the client behavior in outage situations. Since all reliability configurations are centralized in the service definition, the odds of client misbehavior due to wrong configuration are minimal, and there is no confusion about how the client is reacting to failures, making it easier to reason whether or not it’s contributing to the problem.
  2. Cross-service features that are context-dependent became a lot easier to roll out. Since Hermes hides context headers propagation from the developers, a new context header does not need to be individually implemented in each service contributing to the feature.
  3. Consistent standard observability among all services means that virtually any backend developer can understand logs and metrics from any service.
  4. Packing the library with all the standard features like standard timeouts, automated retries, circuit breaking, logging and metrics, context propagation, and service-to-service authentication, relieves the service developers from implementing them everywhere, which allows them to move faster.

In general, the grand result is better service reliability and higher developer velocity.

Conclusion

In any environment which employs a microservice architecture, having a consistent service client standard is key to elevating overall reliability and developer velocity. By implementing the standard as a part of the service contract, with the help of Armeria as a base library, we were able to release a gRPC client library in a very short time, seamlessly enforcing a standard behavior, allowing client developers to write less code and make less mistakes, and allowing service owners to consistently control the reliability parameters of all their clients. This helps us decrease outage frequency due to human error and decrease our mean time to recovery, in addition to allowing developers to move much faster. For any organization that relies on gRPC microservices, this process can help achieve better reliability and developer velocity.

As DoorDash migrated from a monolithic codebase to a microservices architecture, we found an opportunity to refine our API design. Beyond simple functionality, we determined best practices in making APIs that help our applications load quickly, use minimal storage, and, most importantly, avoid failures.

APIs, the connective tissue of a software platform, can offer performance improvements when properly designed. At DoorDash, the APIs relay frontend client requests to backend services and provide the information that users see in our apps, such as the estimated time when a food order will be delivered. If the APIs perform at maximum efficiency, client requests and responses all process more quickly.

The migration to a microservice architecture gave DoorDash the opportunity to revisit our API design, specifically determining how to optimize the information flows. We came up with best practices around targeted endpoint requests, resulting in significantly reduced latency and errors.

Building orchestrated APIs using domain-specific services

DoorDash’s previous platform, a monolithic codebase combined with a single database, made constructing queries very easy. However, a lack of clear boundaries contributed to errors and inefficiencies. Engineers could code anything they wanted into their API responses, drawing from any part of the monolith, raising the potential for an API to deliver a hodgepodge of information in an overly large response.

For example, consider a simplified version of a request to retrieve consumer order details, as shown in Figure 1, below. When the request server processes the request, it queries a series of tables in the database and returns a large response including the order and delivery details, store information, and promotions, which are not all needed after the order has been placed.  

Diagram showing DoorDash's previous monolith architecture
Figure 1: An API requesting order details in DoorDash’s monolithic codebase might return information from multiple tables, some of which won’t be necessary for the immediate task.

Also, business needs, such as new end-user features, may require that engineers add more functionalities to the API to support new types of interactions over time. Eventually the API loses its generality and becomes difficult to maintain.

In our new architecture, we introduced a backend-for-frontend (BFF), an application connecting the consumer-facing client and the services providing general purpose APIs. Client requests go to the BFF, which then orchestrates the aggregation of information needed by the client. 

As shown in Figure 2, below, when the BFF receives the order details request, it orchestrates the calls to the consumer service, order service, and delivery service, ultimately assembling the response details into a consolidated order detail response. Building APIs using domain-specific services, orchestrated by the BFF, makes it easier to understand which RPCs are called and how they are executed.  

diagram of DoorDash's BFF platform
Figure 2: In our microservices architecture, APIs orchestrated by a BFF are targeted towards specific services, making it easier to design precise calls and appropriate execution.

The need to standardize hard and soft dependencies in a microservice architecture adds complexity versus a monolithic codebase. However, we can set our call to the services’ endpoints to Fail Open to some dependencies so that if the dependencies fail, the endpoint will continue to serve successfully. In our monolith, a database issue may bring down the endpoint easily regardless of soft or hard dependencies, causing more widespread failure.

Stay Informed with Weekly Updates

Subscribe to our Engineering blog to get regular updates on all the coolest projects our team is working on

Last but not least, implementing APIs in the above manner allows for quick troubleshooting when the endpoint suffers performance degradation, as we can isolate which service is causing the issue. Once we understand the problem, we can be more responsive in taking remedial actions.  

Focus on what the API needs to provide

Orienting services around domains helps provide guidance for the boundaries along which APIs should operate. The BFF orchestrates the interaction between backend APIs to render responses that meet the needs of clients, but in this framework we should be careful about mixing different APIs from different scopes. The most important thing to determine during design is the API’s role. 

At DoorDash, our APIs primarily support information on food orders, whether that’s an order placed by a consumer and sent to a restaurant, a delivery request sent to a Dasher, or a Dasher’s progress in bringing a food order to a consumer. For example, two main endpoints, order detail and order delivery status, populate our order tracking page, shown in Figure 3, below:

Figure 3: Our order tracking page lets consumers know the order detail and track when to expect their food delivery. This page is populated by two endpoints, order details and order status.

In our previous monolithic codebase, the order detail API provided all the data when loading the order tracking page, including the order items, order delivery address, order processing status, ETA, and the map. The client, web or mobile, uses the data from this order detail endpoint to render the page and then polls the order delivery status to update the order processing status, ETA, and map. We can find that both the order detail endpoint and the order status endpoint interact with the services providing order tracking information.

The order tracking page needs to show two types of data: static data about what was ordered and dynamic data about the order’s status. Even though we consider the order live when it shows up on the order tracking page, there is no need to include the order tracking detail in the order detail API since there is an order status endpoint to serve it. Clients can make the two requests in parallel when loading the page. Also, once the order is completed, we still need to show the order details to, for example, let consumers see their order histories. However, order tracking data becomes unnecessary after the order has been delivered, at least in this order history use case. 

Given the use case above, it makes sense to separate the endpoints that provide static data and dynamic information. Order detail endpoints don’t need to integrate delivery status, ETA, and map data. The client only relies on the order status endpoint to render and refresh the page’s dynamic area. In redesigning our APIs, we remove the order processing status, ETA, and map response from the order detail endpoint. Creating APIs with well-defined functionality makes dependencies clear, testing easy, and users’ logic behavior consistent. 

An API needs to answer the most important question posed by the workflow. We need to understand the user scenarios, identify the data characteristics, and comprehend the business logic behind it. We should always think twice about an API’s role when designing a system.

Simplified and optimized request flows

Every request sent from consumers contains meaningful information. Analyzing the flows between the client and backend lets us determine what can be optimized when migrating the endpoints. Can we optimize to eliminate unnecessary requests? Can we empower client API requests to execute on the page in parallel instead of serially?

Take our Reorder flow as an example. The Reorder feature lets consumers place the same order from their order history with a simple click. In this flow, the GET order cart detail is called, followed by a POST reorder to create a cart using the existing order content, where we return a new order cart to the client, as shown in Figure 4, below: 

Diagram of DoorDash's previous API flow
Figure 4: In our original Reorder feature flow, which lets a consumer place an order based on a previously ordered delivery, GET order cart detail returns the contents of a previously placed order. Once selected, the flow creates a new cart using the old order, ultimately showing that order on the client.

When we redesigned the Reorder endpoint, we wrote the Reorder API so it would read the order information it needs to create the new cart instead of passing the large order data over the network to create the new cart, as shown in Figure 5, below:  

Diagram of DoorDash's improved API flow
Figure 5: In our redesigned order flow, we reduce network traffic by writing the Reorder API so that it reads the order detail and creates the new cart, simplifying its role.

The client only needs metadata for the new cart from the Reorder endpoint, so we only return a cart summary response to the client instead of the whole cart. Compared to the previous flow, shown in Figure 4, we not only eliminate the request to call GET order cart from the client, but also make both the request and response very light.

Results

Redesigning our APIs to focus on their specific roles yielded significantly reduced latency and error rates. For the use cases cited above, both the order detail endpoint and order history endpoint process a high volume of traffic. Our API improvements show that: 

  • For the order detail endpoint, we reduced endpoint latency by over 90%, a 30 times improvement. For P99, as shown in Figure 6, the latency has been reduced from greater than 2,000ms to less than 100ms. In terms of error rate, shown in Figure 7, we achieved a 60 times improvement, going from 0.3% on average to 0.005% (actually, the new endpoint often shows 0% error). 
order detail latency chart
Figure 6: Redesigning our order detail API to better focus on its role led to a 30 times reduction in latency.
order detail error rate chart
Figure 7: The order detail error rate went down significantly with the redesigned API, and it frequently runs flawlessly.
  • For the order history endpoint, we achieved a 10 times reduction in endpoint latency, as shown in Figure 8, and an error rate for the new API of 0% for almost all the time, as shown in Figure 9.
chart showing order history latency
Figure 8: The order history endpoint shows a 10 times reduction in latency with our new design.
chart showing order history error rate
Figure 9: Metrics for the redesigned order history API rarely show any errors.

These API improvements led to a perceivable improvement on the client side. When we place a test order with a couple of items the response size of the old API was 72kb (71.4kb exactly), while it is 1kb (1.1kb exactly) using the new API, as shown in Figure 10: 

Response and request resultsResponse and request results
Figure 10: Redesigned APIs led to a greatly reduced response size, going from 72kb to 1kb, which improves the client performance.

When viewing actual client response on our consumer app, the loading experience runs much more smoothly when using the new APIs, as Figure 11 shows:

animated gif of DoorDash appanimated gif of DoorDash app
Figure 11: The animation on the left shows our app running using our previous API, while the one on the right, using our newly designed API, loads more quickly and smoothly.

Conclusion

From database infrastructure to app programming, there are many ways technology companies can improve the customer experience. Good, targeted API design might be one that falls under the radar, yet can deliver significant improvements.

In our case, we were given the opportunity to redesign our APIs during a migration from a monolithic codebase to a microservices architecture. However, any technology company, especially those with a great amount of legacy code in their platform, might find it useful to assess their APIs. There might be opportunities to reposition the APIs, removing overly large requests and reducing load on networks, while making clients run more quickly and becoming less error-prone, ultimately delivering a better customer experience.

Acknowledgements

Big thanks to my awesome teammates, Tao Xia (backend), Byran Yang (Android), Donovan Simpson (iOS), and Thuy-Vy Do (web), for working with me on this project. Also, many thanks to David Shih, Irene Lee, Alejandro Valerio, Cesare Celozzi, Amiraj Dhawan, Yimin Wei, Zhengli Sun, and Jimmy Zhou for their support.


Header photo by ???? ??? on Unsplash.

As technology companies race to release their next features, any delay in productivity can be extremely detrimental, making an efficient development build process essential. 

Companies that use Kubernetes and Docker in production environments most likely use Docker for local development. Docker-compose, a tool for defining and running multi-container Docker applications, ensures consistent local development processes, which makes handling application dependencies easier. Docker-compose lets engineers choose the specific versions of dependencies to be run alongside the application container—as opposed to having each engineer install dependencies manually on their machine. Having consistent versions of dependencies is crucial for a fast development cycle as there is little chance of having compatibility issues due to incorrect versions of the dependencies. 

DoorDash faced a similar problem when our team had been dealing with a slow build time in our local environment, which had slowed the development process significantly. Whenever any engineer added new code to the codebase, the build integration process would take four to five minutes to finish. It didn’t matter if we were changing 20 files or just adding one line of code to create a quick log, it would still take roughly five minutes to complete the build. Every engineer knows that it’s hard to remain focused and productive if any part of the development cycle pauses their thought process. 

The problem with our build process

We use Gradle to compile our application then use Docker to run it and its dependencies. However, due to the lack of a uniform build process for local development, we were unable to achieve efficient development.

One problem was that the Dockerfile our team was using was the exact replica of the production Dockerfile. Our production Dockerfile is meant to compile the application from scratch as we’re not using the Gradle build cache in production. By using the production Dockerfile locally, we were not taking advantage of the Gradle cache and we were also downloading dependencies that are not needed in our local environment. Figure 1, below, is a representation of the Dockerfile that was causing delays:

Our local development dockerfile prior to optimization
Figure 1: This Dockerfile has many extra components meant for production that are not needed in local development. The lack of reliance on the Gradle build cache meant each build required downloading an application’s dependencies from scratch, which was not ideal for local development.

Another issue was that the team was using the following Makefile target to run our build process, in which we actually compile our application using a local Gradle instance before we execute the Docker build:

.PHONY: build
build:
 git submodule update --init --recursive --remote
 ./gradlew clean installDist
 docker-compose build

The idea was to use the Gradle cache before we build the entire image for faster build time. However, this part of the process became a waste of effort as we were executing the same command inside the Dockerfile, as shown in Figure 1, above. Basically, our Dockerfile used to have this command:

RUN ./gradlew clean installDist test ktlintCheck --no-daemon && \
    mv build/install/* /home/ && \
    rm -r build

Not only was this command similar to what we just executed outside the Dockerfile, but it also included a test and format check along with the build. The worst part was that it didn’t use the cache from the local machine so it had to re-download all the dependencies of our application.

Solution: Update our build scripts and Dockerfile 

We resolved the build time issue by examining our build script and Dockerfile and reorganizing the way we built our application and its dependencies.

How we updated our Dockerfile for local development

  • We removed all unnecessary third party applications that we don’t use locally. For example, we removed the New Relic agent that we definitely need in production but is not needed in a local environment.
  • We removed the Gradle installation. To use Gradle cache properly, we used the Gradle installation in our local machine and built the application outside our docker build.
  • Since we’re not compiling the application inside the Dockerfile anymore, we had to copy the files from the build context to the appropriate directory inside our image.

Separating build and unit test executions

In our Makefile, we separated our build and test executions to give us more flexibility. The team constantly writes and runs unit tests via IDE during development so there’s no need to rerun them for every local build. Also, running every unit test for each local build is not practical, especially if the change in the code is minimal. Of course, every member of the team still runs the complete build—which runs all the tests, checks the format, and builds before committing the changes to our repository.

Made sure that we’re using the Gradle cache properly

We enabled the Gradle cache by putting org.gradle.caching=true in our gradle.properties. Since we don’t have complex tasks in our build.gradle, this was all we needed to do to efficiently use the Gradle cache. For complex tasks in build.gradle, such as constantly copying or moving files around, optimizing those tasks can help gain the greatest benefit from the Gradle cache.

Results 

As shown in Figure 2, below, our Dockerfile is leaner than the previous version (Figure 1). By making these changes, we cut our build time from roughly five minutes to an average of 45 seconds, roughly an 85% decrease.

our optimized dockerfile
Figure 2. The Improved Dockerfile representation is much more optimized and performs faster for the development team. Removing unnecessary dependencies and moving out the application’s compile process significantly decreased build time.

Considering we execute build commands a couple of times a day, this improvement is a huge win for the team, since it saves us a lot of time and keeps everyone focused on the tasks at hand. 

This kind of issue can happen to any team that’s new to containerization or to microservices. If managing a Dockerfile, it is always a good idea to revisit it every now and then to look for potential improvements. Dockerfile best practices  and Gradle build cache are excellent documentations to gain a better understanding of specific build issues.

As a college senior graduating with a computer science degree, the most daunting decision I faced was which company to join. Although I’ll probably end up working for several companies throughout my career, this first step into the real world will have an outsized impact on my career.

Ultimately, after many interviews and a few offers, I chose DoorDash. Influencing my decision was the fact that I liked DoorDash’s consumer-facing services and had used them myself. I also felt that the fast-paced engineering organization would help me make an impact.

After a smooth onboarding process, I found a few key differences between my college experience and the day-to-day work on my team. For example, unlike most of my college class assignments, not only were my projects at DoorDash much more complex, but they typically have involved multiple team members and at times have been a cross-team effort.  

Hopefully by the end of this article, you’ll have a better understanding about why I chose DoorDash, my experience working here, and why it would be a great fit for any new grad interested in software engineering! 

Choosing DoorDash

Although I started working at DoorDash in the second half of 2019, the entire process of applying, interviewing, and onboarding began almost a year in advance. 

Going back to October of 2018, I was a typical senior studying Computer Science at Purdue University looking for a full-time software engineering role. One of the things I really looked for in a company was a product or service I use myself, and being an avid DoorDash customer, I was intrigued by the possibility of working there. I researched DoorDash and learned of the company’s rapid growth in 2018. Taking part in that sort of hyper-growth seemed like it would be a really cool experience. 

I contacted a recruiter to express my interest in DoorDash and scheduled a quick call so I could learn more about their new grad software engineering opportunities and to go over the interview process. The interview process included an initial HackerRank coding challenge followed by technical interviews with DoorDash engineers, and then a final round which consisted of another technical interview as well as a cultural fit interview with an engineering manager. 

Each of my technical interviews were an hour long session with an engineer, with every engineer being from a different team at DoorDash. All the technical interviews consisted of solving a coding question in my preferred programming language. The interviewers were really helpful throughout the interviews and always made sure to answer any questions I had about the coding problem. At the end of the interviews, I was able to ask the engineers a few questions about DoorDash such as what team they work on, what they like about working at DoorDash, and what’s been the most challenging or interesting project they’ve worked on so far. Throughout the interview process, I learned a lot more about DoorDash as a company, the workplace, and the various engineering teams.

A short time after my final interviews, I got a call from the recruiter letting me know they wanted to move forward with an offer. At that time I also had an offer from a much larger tech company, so I was faced with an important decision. After putting in a lot of thought and research as well as getting advice from friends and family, I accepted DoorDash’s offer because the company checked off all the boxes for what I wanted in a full-time software engineering role. Most importantly, I wanted to work on an interesting consumer-facing product in a fast-paced environment while making a meaningful impact.

Onboarding and Dashing

On August 5th, 2019, a date I will never forget, I officially began my professional career as a software engineer at DoorDash. My first week was filled with nervousness, excitement, and just a ton of information as DoorDash did an amazing job in educating new hires all about the company, the various engineering teams, and what it’s like to be a Dasher, the drivers who use our platform to make food deliveries. As part of our company culture, DoorDash highly encourages engineers to make actual food deliveries using the platform; by doing so, we can help to discover friction points or opportunities to improve how deliveries are made. 

On my second day of orientation, all the new hires were put into groups and got to spend an hour Dashing around San Francisco at lunch time. My group and I drove around the city as we tried to hit as many hot-spots, areas with a high order frequency, as possible. We were able to get a better understanding of what it’s like to be a Dasher as we got to experience the differences in picking up an order from a small, local restaurant where we had to wait in line and place the order ourselves versus picking up something from a large chain, which had the food already prepared and on a table waiting to be picked up by us. 

Life and work at DoorDash

For over a year now I’ve been working as an iOS engineer on DoorDash’s Affordability team, a sub-team under Consumer. We implement business initiatives and incentives that can make DoorDash deliveries more affordable for end users. For example, our team performed the software work that lets consumers sign up for DashPass, our monthly subscription service. Similarly, we recently implemented the DashPass and Chase partnership, an incentive that rewards certain Chase credit card customers.

DoorDash team dinner
Before the Covid-19 pandemic forced us to work remotely, we had team dinners and other activities.

One thing I really appreciate about the engineering culture at DoorDash is that, even though I joined right after earning my degree, I’ve been able to work on meaningful projects and deploy new features. While I worked on a number of cool projects during my studies at Purdue, there’s something remarkable in knowing that the code I write finds its way into the hands of millions of people. And even though I joined DoorDash fresh from college, I’ve been given the same opportunities to work on meaningful projects and make an impact as any other engineer. 

At DoorDash, the projects that I’ve worked on have always involved working with several teammates or people across different teams, whether they are engineers, designers, or product managers. This wasn’t always the case for my projects assigned in college, which for the most part were assignments that were meant to be completed individually by students. I really believe that the emphasis on teamwork at DoorDash has allowed me to grow as an engineer, as I’ve been able to learn something new from each person that I’ve worked with. 

Lastly, one of the best aspects about DoorDash’s engineering culture is the freedom we are given. Software engineers at DoorDash are given full ownership of the features that we work on, and we are able to come up with implementation plans as we best see fit as well as suggest modifications to the overall feature during meetings with product managers and designers. This workflow is vastly different from what I’ve experienced in college classes, where we were usually just told to do assignments which had to be done in a specific way.

Conclusion

My first year at DoorDash has been an exciting journey, and I can’t imagine starting my professional career any other way. While we may have been all working remotely for the past nine months, one thing that hasn’t changed has been the amount of opportunities I’ve been presented with to make an impact. Whether it’s getting to work on new features for DashPass or helping out the University Recruiting team by interviewing interns and new grad candidates, there’s never been a dull moment. That said, I can’t wait to get back in the office sometime next year and see everyone again! If you’re like me and are looking for a place where you can learn and grow a ton as a software engineer in your first job out of college, DoorDash is definitely the place to be! 

Interested in finding your place at DoorDash? Take the first step and apply for a new grad role, an internship, or any of our other open roles


Header photo by Markus Spiske on Unsplash.