

While S3 has traditionally been a valuable resource for sharing documents its removal of V2 signatures has forced many companies to scramble for an alternative. Here at DoorDash, the majority of our infrastructure is hosted on AWS. One of the oldest and most reliable services in the AWS fleet is S3, an object store which is a generic term for a place to put files but not modify them like in a file system. S3 claims its durability has an impressive 11 nines — that’s 99.999999999% — meaning that it's more likely that the planet will likely explode before AWS will lose a file. Durability is not to be confused with availability — a customer’s ability to access files — which comes with a more standard 99.99% guarantee. Coupled with IAM (the AWS Identity and Authorization Module) for data permissions, S3 has become the most common and generally cost-effective way to share files within AWS. Using S3 does not require servers to run, so there are no expensive EC2 compute costs for idle servers when the files are just sitting there. Instead, there is a small monthly charge of 2.3 cents or less per gigabyte.
Before DoorDash was the large international company it is now — the company needed a cheap and easy way to provide invoices to the merchants on the DoorDash platform. Given its high durability, low expense and easy sharing capabilities S3 was the logical choice!
The history of our invoice generation service
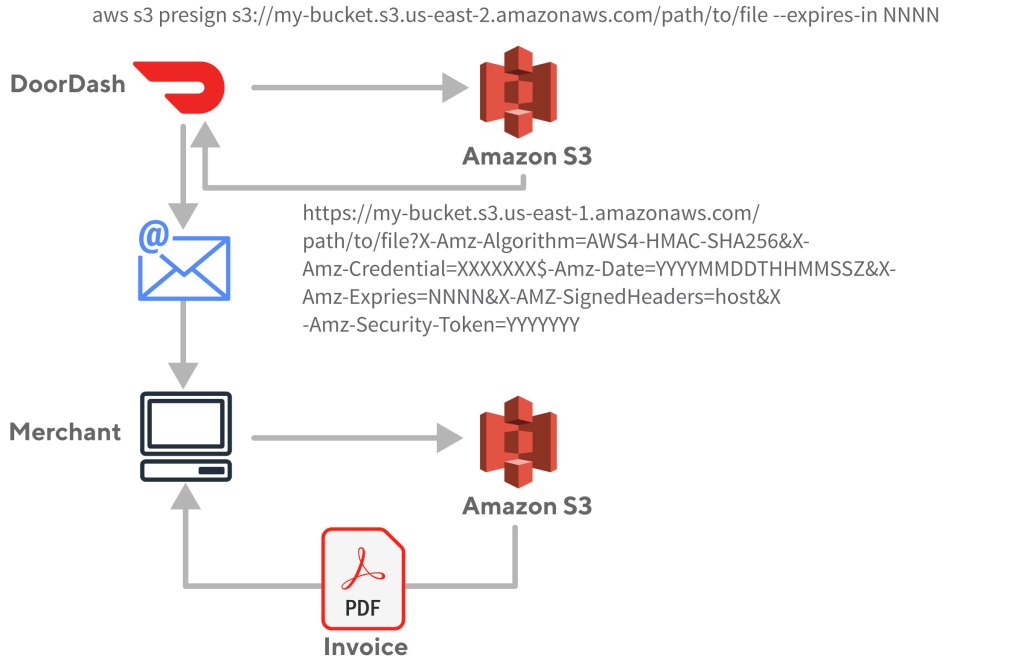
To better automate our back office functions DoorDash built an invoice generation system which places invoices into an S3 bucket, and then sends an email to the merchant with a link to download the actual invoice. While this was maybe not the best solution, it solved the problem quickly and allowed us to pivot back to the product work that was actively growing the business. This link needed to authorize only the merchant for which it was intended, requiring some security. This is where S3 signatures came into play. With no servers to manage, S3 provided an easy place to put the invoices and had a feature that allows signing URLs with IAM credentials to block general public access, but still allow access to those with the link. At that time, the expiration timeout for a signature could be quite long — even years, which allowed merchants to access an invoice even after some time had passed. The emails were sent out with very long expiration links and the accounting solution was complete.
The workflow had two steps. First the DoorDash application would place the object, in this case an invoice, in S3. Then the workflow would request a signed URL from S3 and email to the customer. When the customer clicked on the link, the signature would be validated and the invoice document returned directly from S3 to the customer.
How the move to V4 signatures compromised our invoice engine
This mechanism worked great but, in June 2018, AWS announced that S3 support for V2 signatures would be phased out over the next year and replaced with V4 signatures. At the time, DoorDash didn’t think much about this because we were busy building and growing. Besides, an announcement like that wasn’t exactly front page news and there were no public post references to it. As the June 2019 deadline approached we did not realize that our merchants would no longer be able to access their invoices. The problem was also more complex since simply upgrading to V4 wasn’t going to help because AWS had never intended for URL signing to be used in our use-case. When V4 signatures were introduced, AWS imposed a much shorter time limit on their validity than before. This was because in an age of replay attacks and bot armies trying to compromise data centers 24/7/365, it seemed a sensible precaution to limit signature validity times. The new limit was seven days, which meant we could no longer use this method to provide long-term access to old invoices. But we were unaware that all of this was coming at us.
Ten days before the deprecation deadline, AWS announced a one-year extension to June 2020 for any new S3 buckets; all existing buckets would continue to support the old signatures, which gave customers more time to migrate their code. Because our invoice bucket predated the new limits, once again we unknowingly dodged another bullet.
In late 2020, one of our security engineers picked up on the shorter time limits with V4 signatures and realized that we were headed for trouble. Work began to figure out how to stop using V2 signatures. Around the same time, DoorDash passed its one-billion-order milestone — with half of those being recorded in just the previous six months. Six months after that, DoorDash hit the two-billion-order mark. To say we were busy building and growing is an understatement.
One idea considered was to integrate access to the older invoices via the merchant web portal. The merchant would log in, which would allow us to provide the right invoice to the right merchant without compromising security. But this solution would take some effort and there were many other things going on. Expansion into Japan, convenience and grocery via DashMart, and many other company goals were fighting for engineering time, so we looked for other options to maintain access to invoices with minimal engineering time until a high-quality portal solution could be prioritized.
As luck would have it, a workaround solution arrived from another part of AWS just in time.
AWS releases a better way to sign URLs
In October 2020, AWS announced support for public-key-signed URLs via Cloudfront. This meant that we could sign a CloudFront URL to an invoice with a private key that we held, while giving CloudFront the corresponding public key to validate the signature. Cloudfront would hold a list of public keys to identify authorized signers; each corresponding private key would be tucked away in our secrets management infrastructure to allow applications to generate signed URLs as needed.
Furthermore, these signed URLs could contain custom policies, including such things as valid date ranges or required retrieval from specific IPs or networks. Only the starting time is required as shown here in the documentation:
{
    "Statement": [
        {
            "Resource": "URL or stream name of the file",
            "Condition": {
                "DateLessThan": {
                    "AWS:EpochTime": required ending date and time in Unix time format and UTC
                },
                "DateGreaterThan": {
                    "AWS:EpochTime": optional beginning date and time in Unix time format and UTC
                },
                "IpAddress": {
                    "AWS:SourceIp": "optional IP address"
                }
            }
        }
    ]
}
Constructing the JSON directly is unlikely. Instead, one of the SDK’s helpers can be used, as shown in the full example below.
Alternatively, signed cookies also are supported for authentication. This mechanism could be used to grant limited access to a CloudFront website for select users — for instance during a beta period — or as a gatekeeper for subscriptions, with the signature expiring at the end of a paid subscription. These uses don’t align with this use case, so they won’t be covered further here.
Users of CloudFront already know this is the preferred way to provide public access to private S3 data in AWS. The most important improvements over using S3 directly are secure transport using HTTPS instead of HTTP-only that comes with S3 static website hosting, and preventing direct access to the S3 bucket. This also has the additional benefit of using a company’s domain in the URL instead of an ugly randomized CloudFront URL, for example:
https://d3da3e8s75fqsf.cloudfront.net/
The steps to hiding a S3 bucket behind Cloudfront. are relatively straightforward:
- Set up a CloudFront distribution (including HTTPS via Amazon Certificate Manager)
- Give CloudFront an Origin Access Identity (or OAI)
- Point the CloudFront origin to the S3 bucket with the data
- Set the backing S3 bucket policy with
s3:GetObjectpermissions for that OAI.
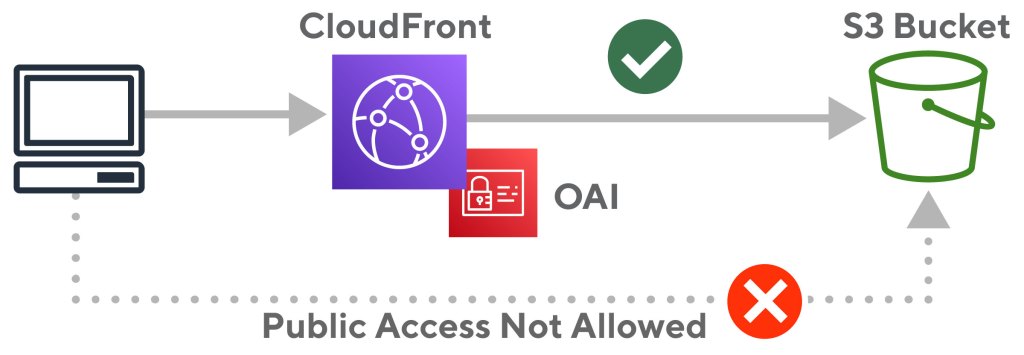
Figure 2 shows the resulting configuration of a locked S3 bucket that uses CloudFront to serve content publically. Next we need to enable URL signature checks so that data isn’t available to everybody. A valid signature means it has been signed by a key that CloudFront thinks is authorized for the operation and that the policy document is still valid. For example, if the document policy blocks access after a certain time, then that is what happens: access is blocked after that time.
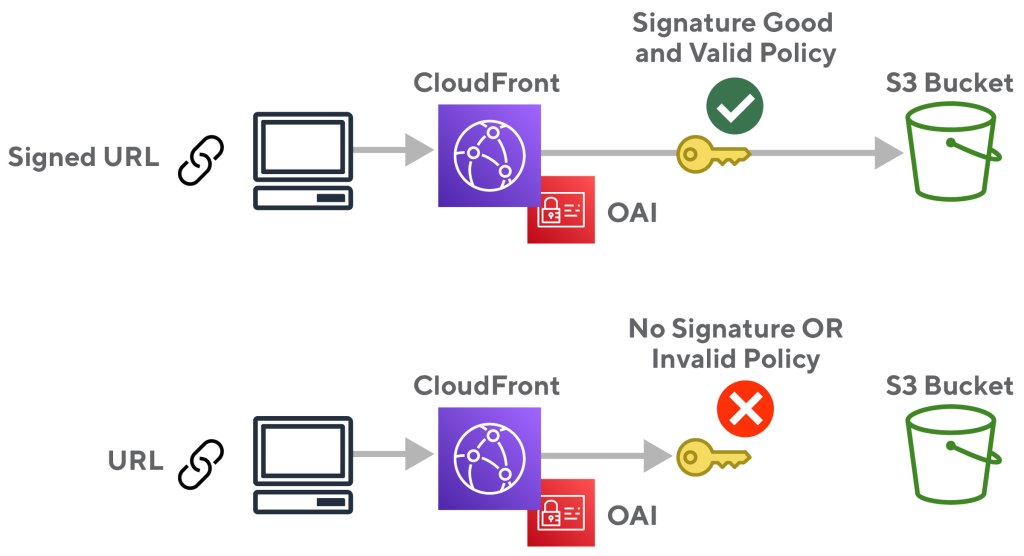
With the new key validation in place, only valid, unexpired signatures are allowed to retrieve the data from S3 as illustrated below in figure 3:
Thankfully, AWS had provided a nearly drop-in replacement for the old user experience.
Setting up your own signed CloudFront URL distribution
Here is a complete example; feel free to borrow from it liberally. The goal here is to create a cheap, public, HTTPS service that serves up files via signed URLs. There likely are numerous use cases similar to the invoicing example above that can take advantage of an AWS CloudFront distribution with signature checks.
While these infrastructure descriptions are done as Terraform code because that’s what DoorDash uses, all of this can be translated easily into other tools.
There is some hand-waving around AWS permissions to execute the Terraform or Python signing code here. A user or role must be set up within an AWS account to allow these things. Many companies already will have automated CI systems with a good amount of access, so there will not be any detail on that here. People who are just tinkering are using the AdministratorAccess policy anyway. Whole libraries of books have been written on Privilege of Least Access. In short, don’t be too liberal with IAM permissions.
Stay Informed with Weekly Updates
Subscribe to our Engineering blog to get regular updates on all the coolest projects our team is working on
Please enter a valid email address.
Thank you for Subscribing!
Step one: Create a private S3 bucket
This S3 bucket will be the backing store for our data:
resource "aws_s3_bucket" "documents" {
  bucket = "my-private-document-bucket"
  acl    = "private"
}
Lock down that bucket so there is no way to override the “private” settings. Without this, somebody could still place public objects in the bucket. They could also inadvertently attach a policy which might allow public access. The following blocks all of that:
resource "aws_s3_bucket_public_access_block" "documents" {
  bucket = aws_s3_bucket.documents.id

  block_public_acls       = true
  block_public_policy     = true
  ignore_public_acls      = true
  restrict_public_buckets = true
}
The AWS console now will show something like this:

You can also set these locks at the account level rather than per-bucket; set it and forget it!
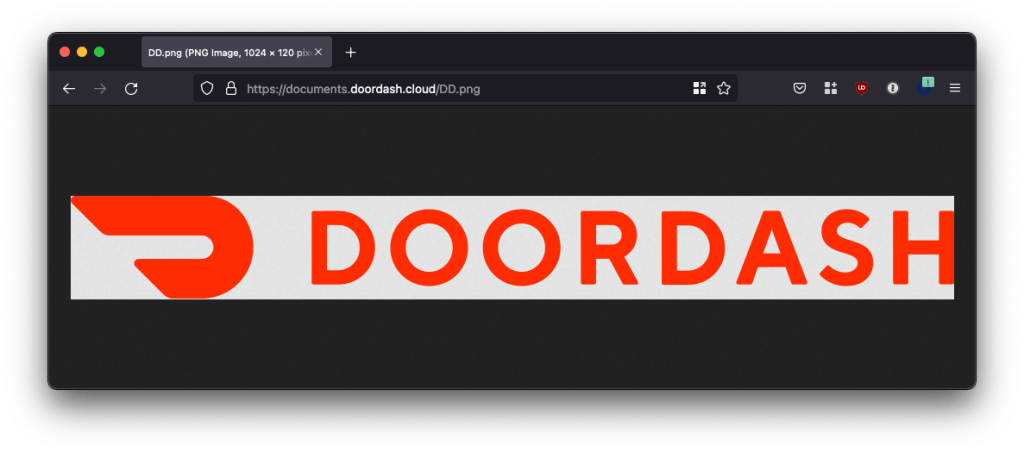
Place a test object in the bucket using the AWS CLI or the AWS console to upload:
$ aws s3 cp ./DD.png s3://my-private-document-bucket/DD.png
upload: ./DD.png to s3://my-private-document-bucket/DD.png
$ aws s3 ls s3://my-private-document-bucket/
2021-10-04 11:55:54      17056 DD.png
The test file appears below:

Attempts to fetch this using the S3 endpoint directly should now be blocked:
$ curl https://my-private-document-bucket.s3.us-east-2.amazonaws.com/DD.png
<?xml version="1.0" encoding="UTF-8"?>
<Error><Code>AccessDenied</Code><Message>Access Denied</Message><RequestId>2JETES96R764TZK4</RequestId><HostId>GzxvFQ6FQ/DhZarm8h3dKKG8JfBfI2rCyj9Ud+GHxDghmuxMijKksmNwo1XyfxJnG7pt418HJcs=</HostId></Error>
This can also be seen in a web browser:

By default, things aren’t public in AWS, so there’s nothing special here yet.
Step two: CloudFront distribution certificate and identity
With the data publically inaccessible, begin to set up CloudFront. To secure access, start by making a certificate with AWS Certificate Manager (ACM) for the company’s domain.
Here, the bucket is deployed to the us-east-2, or Ohio, region. ACM certificates used by CloudFront are required to be in us-east-1. This Terraform setup will have a second provider for that region:
# Ohio region where my bucket will be created
provider "aws" {
 region  = "us-east-2"
}


# For cloudfront certificates
provider "aws" {
 alias   = "us-east-1"
 region  = "us-east-1"
}
This test uses a domain that DoorDash owns, but users should select one of their own: documents.doordash.cloud:
resource "aws_route53_zone" "documents" {
 name    = "documents.doordash.cloud"
 comment = "Document Signing Test Domain"
}
Create the certificate in us-east-1 and tell AWS that validation of ownership will be done via a DNS record.
resource "aws_acm_certificate" "apex" {
 provider          = aws.us-east-1
 domain_name       = aws_route53_zone.documents.name
 validation_method = "DNS"

 lifecycle {
   create_before_destroy = true
 }
}
The certificate resource provides the validation records needed to place in Route53:
resource "aws_route53_record" "apex-certificate-validation" {
 provider = aws.us-east-1
 for_each = {
   for dvo in aws_acm_certificate.apex.domain_validation_options : dvo.domain_name => {
     name   = dvo.resource_record_name
     record = dvo.resource_record_value
     type   = dvo.resource_record_type
   }
 }

 allow_overwrite = true
 name            = each.value.name
 records         = [each.value.record]
 ttl             = 3600
 type            = each.value.type
 zone_id         = aws_route53_zone.documents.zone_id
}
Finally, this block will wait until the validation status comes back OK:
resource "aws_acm_certificate_validation" "apex-certificate" {
 provider                = aws.us-east-1
 certificate_arn         = aws_acm_certificate.apex.arn
 validation_record_fqdns = [for record in aws_route53_record.apex-certificate-validation : record.fqdn]
}
At this point the console shows an issued certificate; users may need to navigate to the us-east-1 region if that is not the currently selected region:

Identity is the final thing that needs to be created ahead of time for a CloudFront distribution. When CloudFront tries to serve up the S3 content, it will be blocked from reading S3 without the identity. There are many bad examples out there that make the bucket public and therefore accessible to CloudFront as well. This is NOT what we want. CloudFront can be given an identity — similar to how an application can be given an IAM role — called an Origin Access Identity (OAI). This is how to create one:
resource "aws_cloudfront_origin_access_identity" "documents-identity" {
 comment = "Cloudfront identity for access to S3 Bucket"
}
Step three: Create CloudFront distribution
Finally, set up the CloudFront distribution:
resource "aws_cloudfront_distribution" "documents" {
 aliases = [aws_acm_certificate.apex.domain_name]
 origin {
   domain_name = aws_s3_bucket.documents.bucket_regional_domain_name
   origin_id   = "s3"

   s3_origin_config {
     origin_access_identity = aws_cloudfront_origin_access_identity.documents-identity.cloudfront_access_identity_path
   }
 }

 enabled         = true
 is_ipv6_enabled = true
 comment         = "Distribution of signed S3 objects"

 default_cache_behavior {
   allowed_methods  = ["GET", "HEAD", "OPTIONS"] # reads only
   cached_methods   = ["GET", "HEAD"]
   target_origin_id = "s3"
   compress         = true

   forwarded_values {
     query_string = false

     cookies {
       forward = "none"
     }
   }

   viewer_protocol_policy = "redirect-to-https"
   min_ttl                = 0
   default_ttl            = 3600
   max_ttl                = 86400
 }

 price_class = "PriceClass_100"

 restrictions {
   geo_restriction {
     restriction_type = "whitelist"
     locations        = ["US", "CA"]
   }
 }

 tags = {
   Name = aws_acm_certificate.apex.domain_name # So it looks nice in the console
 }

 # https://docs.aws.amazon.com/AmazonCloudFront/latest/DeveloperGuide/secure-connections-supported-viewer-protocols-ciphers.html
 viewer_certificate {
   acm_certificate_arn      = aws_acm_certificate.apex.arn
   ssl_support_method       = "sni-only"
   minimum_protocol_version = "TLSv1.2_2021"
 }

 depends_on = [
   aws_acm_certificate_validation.apex-certificate
 ]
}
There’s a lot going on here, so let’s step through it:
aliases = [aws_acm_certificate.apex.domain_name]This allows use of the documents.doordash.cloud domain in addition to the randomized cloudfront.net URL CloudFront assigns by default (in this case d3da3e8s75fqsf.cloudfront.net).
Next, define an origin — a place to fetch data — with an identifier called s3. It can be called anything; it’s just an id. This identifier points at the bucket and uses the new OAI. In a moment, S3 will be configured to allow this identity to read objects from the bucket:
origin {
   domain_name = aws_s3_bucket.documents.bucket_regional_domain_name
   origin_id   = "s3"

   s3_origin_config {
     origin_access_identity = aws_cloudfront_origin_access_identity.documents-identity.cloudfront_access_identity_path
   }
 }
The next items are relatively self-explanatory. There is no reason not to use ipv6, so we don’t disable:
 enabled         = true
 is_ipv6_enabled = true
 comment         = "Distribution of signed S3 objects"
The default_cache_behavior block defines what to do regardless of the URL path. We only have one path, but more complicated configurations might have the URL path /api point at an application while CloudFront continues to serve up static content from S3 for all other valid URL paths. Only read-only HTTP operations are allowed here. We don’t want any modifications made to S3 data via the CloudFront endpoint. Next we enable compression to allow faster data transfers to customers and lower egress data charges. Query strings are removed because S3 doesn’t care about such things. And finally, any insecure HTTP traffic is automatically redirected to its secure HTTPS equivalent:
default_cache_behavior {
   allowed_methods  = ["GET", "HEAD", "OPTIONS"] # reads only
   cached_methods   = ["GET", "HEAD"]
   target_origin_id = "s3"
   compress         = true

   forwarded_values {
     query_string = false

     cookies {
       forward = "none"
     }
   }

   viewer_protocol_policy = "redirect-to-https"
   min_ttl                = 0
   default_ttl            = 3600
   max_ttl                = 86400
 }
This setting says to use minimum pricing configuration. Other examples might be serving up content across the globe, requiring a more expensive configuration:
price_class = "PriceClass_100"To reduce bot traffic, this sets geographic restrictions to requests from the United States and Canada:
restrictions {
   geo_restriction {
     restriction_type = "whitelist"
     locations        = ["US", "CA"]
   }
 }
While not strictly necessary, most of the AWS console displays use the Name AWS tag to identify things. This tag will easily identify the CloudFront distribution in the AWS console:
tags = {
   Name = aws_acm_certificate.apex.domain_name
 }
Because we are using HTTPS, we have to tell CloudFront which certificate to use as well as which encryption settings are allowed. As of the time of writing, these are the newest protocols and ciphers:
# https://docs.aws.amazon.com/AmazonCloudFront/latest/DeveloperGuide/secure-connections-supported-viewer-protocols-ciphers.html
 viewer_certificate {
   acm_certificate_arn      = aws_acm_certificate.apex.arn
   ssl_support_method       = "sni-only"
   minimum_protocol_version = "TLSv1.2_2021"
 }
Lastly, this depends_on block is a Terraform construct to tell AWS not to begin creating the distribution until the certificate has been validated. Because Terraform can run operations in parallel, it may try to create the distribution after the certificate is created but before it is validated (resulting in an error):
depends_on = [
   aws_acm_certificate_validation.apex-certificate
 ]
CloudFront has many options and can be configured in myriad ways. Refer to the full documentation for alternate approaches.
Step four: Grant CloudFront access to S3 bucket
As mentioned above, we created an identity for the CloudFront distribution and told it to use that OAI when contacting S3. Now, though, we need to change the permissions on the fully locked S3 bucket to allow that access. These bits of code attach a policy to our S3 bucket that allows the OAI to GetObject on any path of the bucket:
resource "aws_s3_bucket_policy" "documents" {
 bucket = aws_s3_bucket.documents.id
 policy = data.aws_iam_policy_document.documents-cloudfront-policy.json
}
data "aws_iam_policy_document" "documents-cloudfront-policy" {
 statement {
   effect = "Allow"
   principals {
     type        = "AWS"
     identifiers = [aws_cloudfront_origin_access_identity.documents-identity.iam_arn]
   }
   actions = [
     "s3:GetObject",
   ]
   resources = [
     "${aws_s3_bucket.documents.arn}/*",
   ]
 }
}
The AWS console confirms the policy:

Step five: Set up the DNS for CloudFront
Create a DNS record so people will be redirected when they enter documents.doordash.cloud into their browser. Specifically, create an A and AAAA (for ipv6) record:
resource "aws_route53_record" "documents-a" {
 zone_id = aws_route53_zone.documents.zone_id
 name    = aws_acm_certificate.apex.domain_name
 type    = "A"

 alias {
   name                   = aws_cloudfront_distribution.documents.domain_name
   zone_id                = aws_cloudfront_distribution.documents.hosted_zone_id
   evaluate_target_health = true
 }
}

resource "aws_route53_record" "documents-aaaa" {
 zone_id = aws_route53_zone.documents.zone_id
 name    = aws_acm_certificate.apex.domain_name
 type    = "AAAA"

 alias {
   name                   = aws_cloudfront_distribution.documents.domain_name
   zone_id                = aws_cloudfront_distribution.documents.hosted_zone_id
   evaluate_target_health = true
 }
}
Checking the DNS resolution on my Mac, both the ipv4 and ipv6 records are visible:
$ host documents.doordash.cloud
documents.doordash.cloud has address 52.84.145.120
documents.doordash.cloud has address 52.84.145.108
documents.doordash.cloud has address 52.84.145.15
documents.doordash.cloud has address 52.84.145.105
documents.doordash.cloud has IPv6 address 2600:9000:2203:cc00:1:5de5:97c0:93a1
documents.doordash.cloud has IPv6 address 2600:9000:21ff:3e00:1:5de5:97c0:93a1
documents.doordash.cloud has IPv6 address 2600:9000:2203:2a00:1:5de5:97c0:93a1
documents.doordash.cloud has IPv6 address 2600:9000:21ff:7e00:1:5de5:97c0:93a1
documents.doordash.cloud has IPv6 address 2600:9000:2203:5c00:1:5de5:97c0:93a1
documents.doordash.cloud has IPv6 address 2600:9000:2203:1000:1:5de5:97c0:93a1
documents.doordash.cloud has IPv6 address 2600:9000:2203:3c00:1:5de5:97c0:93a1
documents.doordash.cloud has IPv6 address 2600:9000:21ff:aa00:1:5de5:97c0:93a1
Now the test file can be viewed in a browser:
At this point, the CloudFront + private S3 configuration is set up. It remains, however, 100% public. Any files dropped into the S3 bucket can be retrieved by anyone who knows the path to the file.
Step six: Generate a key pair
Signed URLs will secure our endpoint. Cryptographic signatures are usually done using a private key to “sign” some data; any holder of the public key can test if the signature is valid.
From a terminal, start by generating two keys — the key pair — using ssh-keygen. Different versions of ssh-keygen provide various formats for the resulting private key, so specificity is required to use PEM format. Save it without a passphrase because we’ll upload it to a secrets management system in a moment:
$ ssh-keygen -mPEM -t rsa -b 2048 -C "document-signing-20211004" -f document-signing-20211004 -N ""
Generating public/private rsa key pair.
Your identification has been saved in document-signing-20211004.
Your public key has been saved in document-signing-20211004.pub.
The key fingerprint is:
SHA256:+FNN7ZRQeXC/rZ1+ZQJe23hYWLfBRf67VdKfnXSU5yE document-signing-20211004
The key's randomart image is:
+---[RSA 2048]----+
|            ..++=|
|             o.**|
|            .E+*O|
|       .   o.o+=B|
|      . S ...ooOB|
|       . .  . *+#|
|        o     .O*|
|         .    . +|
|               o.|
+----[SHA256]-----+
This creates two files, document-signing-20211004 (the private key) and document-signing-20211004.pub (the public key).
Here is our public key:
$ cat document-signing-20211004.pub
ssh-rsa AAAAB3NzaC1yc2EAAAADAQABAAABAQCvODwTc6p1PXzrWoDFRymKkdVEJvEnGutRSgGK8RYn2yAdTm6qFEYDd16gQUCz581j+ely63pSGWafQOMDIbLRoI71uOpf4C+gZKqD1RR5GZ5bSDA5W0TcIpYQGIJuqSIGZ4CLbobNPdDnY9+4FsOxh4OJwExmlh+OkydP+Pm2jUAsejbnlx5aOHusAeJ0DMRrku9TnLG9v81aVrjCvpJcvJ/VWG4r8O51rJsPFPI3q1BtqYEkd1RfVnUj5pGc38OvaiP6WGnC1qJAdByVRG4BKNn5+0OtCeYg388vChOHJyLrIN5Tm9CRSx1Xt0UDnSkxQi+0mF/wa15aQDEBTsH3 document-signing-20211004
The format for the public key that Terraform wants is PKCS8 so it needs to be converted:
$ ssh-keygen -f document-signing-20211004.pub -e -mPKCS8
-----BEGIN PUBLIC KEY-----
MIIBIjANBgkqhkiG9w0BAQEFAAOCAQ8AMIIBCgKCAQEArzg8E3OqdT1861qAxUcp
ipHVRCbxJxrrUUoBivEWJ9sgHU5uqhRGA3deoEFAs+fNY/npcut6Uhlmn0DjAyGy
0aCO9bjqX+AvoGSqg9UUeRmeW0gwOVtE3CKWEBiCbqkiBmeAi26GzT3Q52PfuBbD
sYeDicBMZpYfjpMnT/j5to1ALHo255ceWjh7rAHidAzEa5LvU5yxvb/NWla4wr6S
XLyf1VhuK/DudaybDxTyN6tQbamBJHdUX1Z1I+aRnN/Dr2oj+lhpwtaiQHQclURu
ASjZ+ftDrQnmIN/PLwoThyci6yDeU5vQkUsdV7dFA50pMUIvtJhf8GteWkAxAU7B
9wIDAQAB
-----END PUBLIC KEY-----
Step seven: Upload the public key to CloudFront
CloudFront keys are organized in groups that contain one or more keys; a single public key can be used in multiple groups. Here’s the Terraform code to create a single key group with our one public key. Discuss with your security team the protocols for the proper use of keys in this kind of use case. They may have requirements around key rotation that require additional modifications:
resource "aws_cloudfront_key_group" "documents-signing-key-group" {
 comment = "Valid Document Signing Keys"
 items = [
   aws_cloudfront_public_key.documents-signing-key-20211004.id
 ]
 name = "document-keys"
}

# convert public key to PKCS8 format (expected).
# Will take PEM, but stores internally differently
# resulting in a perma-diff
resource "aws_cloudfront_public_key" "documents-signing-key-20211004" {
 name        = "documents-signing-key-20211004"
 comment     = "Document Link Public Key 20211004"
 encoded_key = <<EOT
-----BEGIN PUBLIC KEY-----
MIIBIjANBgkqhkiG9w0BAQEFAAOCAQ8AMIIBCgKCAQEArzg8E3OqdT1861qAxUcp
ipHVRCbxJxrrUUoBivEWJ9sgHU5uqhRGA3deoEFAs+fNY/npcut6Uhlmn0DjAyGy
0aCO9bjqX+AvoGSqg9UUeRmeW0gwOVtE3CKWEBiCbqkiBmeAi26GzT3Q52PfuBbD
sYeDicBMZpYfjpMnT/j5to1ALHo255ceWjh7rAHidAzEa5LvU5yxvb/NWla4wr6S
XLyf1VhuK/DudaybDxTyN6tQbamBJHdUX1Z1I+aRnN/Dr2oj+lhpwtaiQHQclURu
ASjZ+ftDrQnmIN/PLwoThyci6yDeU5vQkUsdV7dFA50pMUIvtJhf8GteWkAxAU7B
9wIDAQAB
-----END PUBLIC KEY-----
EOT
}
Note the unique KeyID after uploading; it will be used later. The console now shows the key group:

The KeyID shown here — K3VH450G8BP8J — will be unique in each implementation:

Step eight: Keep secrets safe
Before deploying the key pair, set up a secret management system. Examples provided too often use private key files on local disk.
Except during the initial key creation process, keys should not be on a local disk.
Store them instead in your organization’s secret management system. There are too many to list, but common ones are HashiCorp Vault & AWS Secrets Manager.
This example uses AWS Secrets Manager and the AWS CLI to load the keys, but this can also be done through the AWS Console. While the KeyID isn’t strictly a secret, it is sensitive enough that it should also be uploaded. This also makes it easier to pull all the runtime values from the same place. Here the KeyID is stored under the secrets manager key DOCUMENT-SIGNING-KEY-ID and the private key under the secrets manager key DOCUMENT-SIGNING-PRIVATE-KEY:
$ aws secretsmanager create-secret --name DOCUMENT-SIGNING-KEY-ID --description "The key ID for signing urls" --secret-string "K3VH450G8BP8J"
{
    "ARN": "arn:aws:secretsmanager:us-east-2:123456789012:secret:DOCUMENT-SIGNING-KEY-ID-J9xLnN",
    "Name": "DOCUMENT-SIGNING-KEY-ID",
    "VersionId": "c9211ae0-c143-4a56-a936-7119332a7b50"
}

$ aws secretsmanager create-secret --name DOCUMENT-SIGNING-PRIVATE-KEY --description "Private Key for signing urls in PEM format" --secret-string file://document-signing-20211004
{
    "ARN": "arn:aws:secretsmanager:us-east-2:123456789012:secret:DOCUMENT-SIGNING-PRIVATE-KEY-oLTFc4",
    "Name": "DOCUMENT-SIGNING-PRIVATE-KEY",
    "VersionId": "dbfa5d1f-a832-44be-98a7-3a2b7b5015f3"
}
Key values also can be verified with the CLI:
$ aws secretsmanager get-secret-value --secret-id DOCUMENT-SIGNING-KEY-ID --query 'SecretString' --output text
K3VH450G8BP8J

$ aws secretsmanager get-secret-value --secret-id DOCUMENT-SIGNING-PRIVATE-KEY --query 'SecretString' --output text
-----BEGIN RSA PRIVATE KEY-----
******** REDACTED ********
-----END RSA PRIVATE KEY-----
Because the Python script that follows uses the rsa library, the key in this case is stored in PEM format. That library is expecting the BEGIN RSA PRIVATE KEY header.
Those in a hurry may skip this part with the intention of doing it “later.” Attention: Either someone else will have to clean it up later or it won’t get done at all. Secure applications from the start.
Step nine: Enable trusted key group on CloudFront
Now that AWS knows about the key, tell CloudFront only to allow URLs signed with that corresponding private key. Do this by adding the trusted_key_groups attribute to the default_cache_behavior block listing the IDs of each key group (in this case, just the one).
WARNING: The data will be public if not set up properly. Check the implementation carefully!
The full default_cache_behavior block looks like this:
default_cache_behavior {
   allowed_methods  = ["GET", "HEAD", "OPTIONS"] # reads only
   cached_methods   = ["GET", "HEAD"]
   target_origin_id = "s3"
   compress         = true

   trusted_key_groups = [
     aws_cloudfront_key_group.documents-signing-key-group.id
   ]

   forwarded_values {
     query_string = false

     cookies {
       forward = "none"
     }
   }

   viewer_protocol_policy = "redirect-to-https"
   min_ttl                = 0
   default_ttl            = 3600
   max_ttl                = 86400
 }
In the AWS console, verify this is set under “Restrict Viewer Access” under the “Behaviors” tab:

Now going to the URL in a browser should generate this MissingKey error:

Step ten: Generate a signed URL
The following is Python code which can be used as a signing utility; the same operations can be performed in an application, which is what DoorDash does. The example takes a URL argument and an optional number of days for the URL to be valid for. Note that a validity start/end time as well as IP restrictions can be encoded into your policy document, which is actually what is being signed.
Because AWS Security Manager is used here to retrieve the KeyID and private key, this script needs to be run under an AWS role that has the ability to fetch the secret’s values. Under some other mechanism, no additional AWS permissions are needed. In fact,URLs can be signed all day long without actually communicating with AWS because the signed URL is just a well understood format, like JWTs.
Here’s the full code:
import argparse
import base64
import boto3
from botocore.exceptions import ClientError
from botocore.signers import CloudFrontSigner
from datetime import datetime, timedelta, timezone
import rsa

# Secrets to fetch from AWS Security Manager
KEY_KEY_ID = 'DOCUMENT-SIGNING-KEY-ID'
KEY_PRIVATE_KEY = 'DOCUMENT-SIGNING-PRIVATE-KEY'


def get_secret(secret_key):
   # This code is straight from the AWS console code example except it returns the secret value
   session = boto3.session.Session()
   client = session.client(service_name='secretsmanager')

   try:
       get_secret_value_response = client.get_secret_value(
           SecretId=secret_key
       )
   except ClientError as e:
       if e.response['Error']['Code'] == 'DecryptionFailureException':
           # Secrets Manager can't decrypt the protected secret text using the provided KMS key.
           # Deal with the exception here, and/or rethrow at your discretion.
           raise e
       elif e.response['Error']['Code'] == 'InternalServiceErrorException':
           # An error occurred on the server side.
           # Deal with the exception here, and/or rethrow at your discretion.
           raise e
       elif e.response['Error']['Code'] == 'InvalidParameterException':
           # You provided an invalid value for a parameter.
           # Deal with the exception here, and/or rethrow at your discretion.
           raise e
       elif e.response['Error']['Code'] == 'InvalidRequestException':
           # You provided a parameter value that is not valid for the current state of the resource.
           # Deal with the exception here, and/or rethrow at your discretion.
           raise e
       elif e.response['Error']['Code'] == 'ResourceNotFoundException':
           # We can't find the resource that you asked for.
           # Deal with the exception here, and/or rethrow at your discretion.
           raise e
   else:
       # Decrypts secret using the associated KMS CMK.
       # Depending on whether the secret is a string or binary, one of these fields will be populated.
       if 'SecretString' in get_secret_value_response:
           secret = get_secret_value_response['SecretString']
       else:
           secret = base64.b64decode(
               get_secret_value_response['SecretBinary'])
       return secret


def rsa_signer(message):
   private_key = get_secret(KEY_PRIVATE_KEY)
   return rsa.sign(
       message,
       rsa.PrivateKey.load_pkcs1(private_key.encode('utf8')),
       'SHA-1')  # CloudFront requires SHA-1 hash


def sign_url(url_to_sign, days_valid):
   key_id = get_secret(KEY_KEY_ID)
   cf_signer = CloudFrontSigner(key_id, rsa_signer)
   signed_url = cf_signer.generate_presigned_url(
       url=url_to_sign, date_less_than=datetime.now(timezone.utc) + timedelta(days=days_valid))
   return signed_url


if __name__ == "__main__":
   my_parser = argparse.ArgumentParser(
       description='CloudFront URL Signing Example')
   my_parser.add_argument('URL',
                          metavar='url',
                          type=str,
                          help='url to sign')
   my_parser.add_argument('--days',
                          metavar='days',
                          nargs='?',
                          const=1,
                          type=int,
                          default=1,
                          help='number of days valid, defaults to 1 if not specified')
   args = my_parser.parse_args()
   url_to_sign = args.URL
   days_valid = args.days

   signed_url = sign_url(url_to_sign, days_valid)
   print(signed_url)
   exit(0)
Upon signing the CloudFront URL with the one-day default expiration, a very long URL is returned. The following shows the expiration time stamp, the signature, and the KeyID (so CloudFront knows which key to check against):
$ python ./sign.py https://documents.doordash.cloud/DD.png
https://documents.doordash.cloud/DD.png?Expires=1633557474&Signature=qRZYPCG-eCoymeqamWYfKewkdJBcv79De0UPHVvCYbnM5BcBvZZm~nBPZxTZFG~CllRzeN~nN9UaIRcug1HXAyao1UJk~5S9MNhCbwczfH7FaWOuyUxoXsx2e7dE1RXswB-k2gXbhUU4AbfzECek1WYh8LYkl4E1TCE-ZdnJeDVfLPNMO67ERy5GLaFPgYb0DvkERQpVdOgfhe5z32GhSHwrQLZUV0cQ0DWiflc-I102jb4Mf~-NExvZlnnPi6NEKLrKEHrWCoFLBSL0B2mqsRlLjWz5Y5IZEzOBkEvjMb2yhiI-SxmhvYofNv5RWceVrcChb8Q7F4qeAKablABIBQ__&Key-Pair-Id=K3VH450G8BP8J
Access is granted when that URL is entered in a browser:

One day later, that same URL failed because the signature is outside the valid time window:

Conclusion
In this post, we’ve seen how to lock down an S3 bucket from direct public access as well as how to use it as a backing store to an HTTPS-only CloudFront distribution. We then added authenticated access by way of signed URL checks with a simple expiration time policy.
There are no servers to manage or upgrade because AWS manages all of that. Even HTTPS certificates will auto-renew as long as the DNS validation record remains untouched.
Additionally, all the other features of CloudFront remain available, including WAF integration and geographic allow/deny lists.
For most use cases, this should cost a lot less than running a 24/7/365 EC2 workload. The AWS Pricing Calculator page can help verify this for each situation.
When DoorDash moves from emailing invoices to retrieval via a web portal, most of this work can be reused. We will simply perform a 302 redirect to the signed URL, but make the expiration just a few seconds. We could even go back to using S3 signed URLs because we no longer have the long expiration time requirement. It might look something like figure 4:

It may seem strange that everything covered in this post likely will be tossed out one day — for this particular use case anyway — but that is the nature of working in the cloud. On-demand infrastructure means there is no need to get attached to technology choices. This has certainly been my experience working with excellent engineers here at DoorDash. No decisions are sacred. If there is a better way, we should explore it — and you should too!
Keep building great things; I know we will.