

While UIKit has been the go-to framework for iOS engineers to build user interfaces in their applications over the years, SwiftUI has been steadily gaining traction as an alternative framework that rectifies many downsides of UIKit. For example, SwiftUI requires much less code to build the same UI, and always produces a valid layout. Developers no longer need to spend hours debugging auto layout issues. In this article, we will first compare UIKit’s event-driven approach to SwiftUI’s data-driven one, then we will deep dive into the SwiftUI view cycle, identity, and rendering process to better understand how to write performant code in SwiftUI.
How an event-driven framework operates
UIKit provides an event-driven user interface by nature, where views are created through a sequence of events that perform operations and eventually come together to form what is seen on the screen. In an event-driven framework, there needs to be a controller that glues together the view and the events. This glue is called the view controller.
How the view controller works
The view controller is essentially a control center that decides what happens given particular events. For example, if some content needs to be shown on the screen when a page loads, the view controller listens to the page load event and performs the necessary business logic to load and show the content. Let’s take a look at a more specific example:
Say there is a button that, when clicked, shows an image of a random type of fruit on the screen. After each new button click, a new kind of fruit is shown. Let’s look at a representation of the flow if this was built with UIKit in Figure 1 below.

In this flow, the view controller holds a reference to the button and the view. When a user clicks on the button, the view controller takes this as the signal to compute a new kind of fruit. Once a new fruit is returned, the view controller tells the view to update the UI with it. In this case, the button click event drives the logic that changes the UI.
The challenges of using UIKit and view controllers
Even though this is a very simple example, we can see that the view controller has various responsibilities. With more complex views in a production app, these responsibilities mean the view controller can become massive and hard to manage. We have to write the code and dictate the logic for the interaction between the view controller, view, and each event, which can be error-prone and hard to read.
Of course, much of the pain of dealing with the view controller can be alleviated by having good code architecture and separation of concerns. The VIP architecture that our DoorDash iOS consumer application uses can extract out the business and presentation logic, such that the view controller doesn’t need to know any of that logic, and can just focus on showing the view on the screen given the data.
But any architecture still cannot avoid the view controller, as its purpose of serving as the glue between the events and the view is irreplaceable in an event-driven framework.
How a data-driven framework operates
While UIKit uses an event-driven framework, SwiftUI is based on a data-driven framework. In SwiftUI, views are a function of state, not a sequence of events (WWDC 2019). A view is bound to some data (or state) as a source of truth, and automatically updates whenever the state changes. This is achieved by defining views as functions that take in data-binding as an argument.
This data-driven framework completely eliminates the view controller as a middleman. What the user sees on the screen is directly controlled by a state, which can be any data type. Using the same fruit app example that we used above with UIKit, we can see an illustration of this concept below in Figure 2.

The fruit type is a state that is bound to the view, which means whenever the fruit is updated, it will automatically be reflected on the view. This means that when a user clicks the button, we just need to update the state, and the view will update to show the new fruit, without needing a controller to tell it to do so. Hence the term “data-driven” - the UI is a direct representation of data.
The benefits of a data-driven framework
Working with a data-driven framework means there are no more massive view controllers, and no need to define the logic of events to make view updates. The interface is coupled with the data, resulting in fewer lines of code and better readability. We can easily understand that the fruit the view shows is driven by the fruit state, unlike in UIKit, where we would have to dig through the code to see how the fruit is controlled.
The challenges of using SwiftUI
Any new framework or technology has its tradeoffs. Based on only the event and data-driven framework comparisons from above, SwiftUI may always appear to be the superior option, but that’s not the full story.
SwiftUI’s drawbacks are mainly associated with the fact that it was only released three years ago. SwiftUI is a new framework, so it’s going to take time for more developers to adopt and learn it. Given the ongoing adoption, there are fewer established code architectures based on SwiftUI. We have also experienced backward compatibility issues, where the exact same SwiftUI code works differently in iOS 14 and 15, which makes it very hard to debug.
Now that we have a basic understanding of the pros and cons of the two types of frameworks, let’s dive into some specific challenges we experienced when dealing with SwiftUI and its view rendering process, and how to write efficient code to preserve a view’s identity in order to create a smooth and optimal UI.
View in SwiftUI
There are some main concepts worth mentioning when working with SwiftUI:
- View as a function of state
- View’s identity
- View’s lifetime
First of all, data is the source of truth for the view. When the data changes, we receive the updates on a view. So we already know that views in SwiftUI are a function of a state (Figure 3). But what is this state in the SwiftUI world?

When you are switching the mindset from event-driven architecture to a declarative framework, there might be some questions. It’s not hard to get the basic understanding of SwiftUI, but it’s a little bit unclear what happens under the hood. We know that when the state of the view changes, the view is getting updated, but some questions naturally come up:
- How exactly does the data get updated?
- How does the view understand what exactly needs to change?
- Does it create a new view every time a small piece of data changes?
- How efficient and costly are the data updates?
It’s essential to understand how the framework operates internally. Getting the answers to these and other questions might help to resolve some unwanted behaviors in our apps, like poor performance, random bugs, or unexpected animations. It will help to develop well-optimized, bug-free apps.
About SwiftUI’s view hierarchy.
The main UI element in SwiftUI is a View. Performance and the quality of the visual part of the app depend on the efficiency of its definition and state manipulations. Let’s take a look at the default view that’s been created for a SwiftUI template in Xcode:
struct ContentView: View {
    var body: some View {
        Text("Hello, world!")
            .padding()
    }
}
There is a ContentView struct that conforms to the View protocol:
public protocol View {
    associatedtype Body : View

    @ViewBuilder var body: Self.Body { get }
}
A computed body property defines the content of the view. The composition of SwiftUI views forms a view hierarchy. The View protocol has an associated type, which is also a View. At some point, SwiftUI will try to render the ContentView, and it will simply ask for the ContentView’s body. However, if the content view will not contain a primitive Text view, but another custom view, SwiftUI will need to ask all the nested custom views for their bodies as well in order to display them. Let’s take a look at this example:
struct FruitsView: View {
    var body: some View {
        BananaView()
    }
}

struct BananaView: View {
    var body: some View {
        Text("I am banana!")
            .padding()
    }
}
In this case, FruitsView will ask BananaView for its body, since it needs to know what to display. BananaView asks the Text for its body. This is a set of recursive calls, as seen on Figure 4, because every view has a body, and the body returns some View back.

SwiftUI, in order to have a good performance, needs to cut it short and somehow break the recursion. In our case the recursion will end when SwiftUI will attempt to ask the Text for its body, because Text, as well as some other SwiftUI components, is a primitive type. It can be drawn without asking for the body. This is achieved with a Never type:
extension Text : View {
    public typealias Body = Never
}

extension Never : View {
    public typealias Body = Never
    public var body: Never { get }
}
Also, Never conforms to the View protocol. Thus, our recursion will end when we reach the primitive type, as shown on Figure 5, because SwiftUI will handle the primitive types in a special way.

Primitive types become the base for any view hierarchy. Text is one of the primitive view types, but there are also others:
- Text
- Image
- Spacer
- ZStack
- VStack
- HStack
- List
- Etc.
State management system
Every view has a state, which might be changed during the execution of our app. The state is a single source of truth for this view. View and its state have some mechanisms which drive the body updates, so every time the state of the view changes, the body is requested. In SwiftUI the state can be created in a variety of ways, for example:
- @State
- @StateObject
- @Binding
- @ObservedObject
- @EnvironmentObject.
@State
State is a source of truth for the view and it’s used when the scope of changes is limited to the view only. By wrapping value types as transient State properties, the framework allocates a persistent storage for this value type and makes it a dependency, so changes to the state will automatically be reflected in the view. It’s good practice to use a private keyword when declaring State, because it is designed to be used by the view internally.
@StateObject
This property wrapper must be applied to the type that conforms to the ObservedObject protocol and allows monitoring of the changes in this object and treats it as a state. SwiftUI creates a new instance of the object only once for each instance of the structure that declares the object. When published properties of the observable object change, SwiftUI updates the parts of any view that depend on those properties.
@ObservedObject
This is a property wrapper type that subscribes to an observable object and invalidates a view whenever the observable object changes. This property wrapper is very similar to @StateObject; the main difference is that the @StateObject is used to initially create the value and then we can pass it as a dependency to the other views using @ObservedObject.
@ObservedObject is used to keep track of an object that has already been created.
@Binding
This property wrapper is useful in almost every SwiftUI view. Binding is a property wrapper that can read and write a value owned by a source of truth, for example, a @State or one of @StateObject’s properties. The dollar sign ($) is used to prefix the @State property variable to get the projected value, and this projected value is a binding. Then you can pass a binding further down a view hierarchy and change it. The changes will be reflected on any view which uses it as a source of truth.
struct BananaView: View {
    @State private var isPeeled: Bool = false

    var body: some View {
        Text(isPeeled ? "Peeled banana!" : "Banana!")
            .background(.yellow)

        PeelBananaButton(isPeeled: $isPeeled)
    }
}

struct PeelBananaButton: View {
    @Binding var isPeeled: Bool

    var body: some View {
        Button("Peel Banana") {
            isPeeled = true
        }
    }
}
@EnvironmentObject
This property wrapper also doesn’t create or allocate the object itself. Instead, it provides a mechanism to monitor the environment of the view hierarchy. For example, the parent view, which has the source of truth (e.g. StateObject) has a few layers of subviews (Figure 6).

View C and View D depend on the data. Passing the data can be accomplished by continuously injecting the observed object multiple times, until these views have a reference to it. View A and B doesn’t really need to know about this object, since only view C and D need the data. This approach can create some boilerplate code and bring extra dependencies to the views which don’t need them.
An environment object is really helpful here. It is defined at a higher-level view and any child view in a view hierarchy can access the object and get the right data updates, as seen in Figure 7 below. The observed object can be accessed on an ancestor view as long as one of its ancestors adds it to the hierarchy using environmentObject(_:) modifier:

These are the instruments we can use to update the data and have the view reflect the updates. Every small change to the data flow might cause multiple view’s body computations. These computations can potentially affect the performance, for example in case of using unoptimized computed variables. SwiftUI is smart enough to detect the changes and can only redraw the parts of the view which have been actually affected by a data update. This redrawing is done with the help of AttributeGraph - an internal component used by SwiftUI to build and analyze the dependency graph for the data and its related views.
Identity of a view
In UIKit, views are classes and classes have pointers which identify their views. In SwiftUI, however, views are structs, and they don’t have pointers. In order to be efficient and optimized, SwiftUI needs to understand if the views are the same or distinct. It’s also important for the framework to identify the views in order to make a correct transition and render the view correctly once some of the view’s values have changed.
View’s identity is a concept that brings some light to SwiftUI rendering magic. There might be thousands of updates across your app, and some body properties are recomputed again and again. However it doesn’t always lead to the full re-rendering of the affected view. And the view’s identity is a key to understanding this. There are two ways of identifying the view in SwiftUI, through explicit identity or structural identity. Let's take a deep dive into both.
Explicit identity
Views can be identified using custom or data-driven identifiers. The pointer identity which is used in UIKit is an example of the explicit identity, since the pointers are being used to identify the view. You probably have seen the examples of it while iterating over your views in a for each loop. Explicit identity can be provided by using the identifier directly: .id(...) . It binds a view's identity to the given value, which needs to be hashable:
extension View {
        @inlinable public func id<ID>(_ id: ID) -> some View where ID : Hashable
}
Let’s say we have a set of fruits. Each fruit has a unique name and a color:
struct Fruit {
    let name: String
    let color: Color
}
To show a scrollable list of fruits, ForEach struct can be used:
struct FruitListView: View {
    let fruits = [Fruit(name: "Banana", color: .yellow),
                      Fruit(name: "Cherry", color: .red)]

    var body: some View {
        ScrollView {
            ForEach(fruits) { fruit in
                FruitView(fruit: fruit)
            }
        }
    }
}

struct FruitView: View {
    let fruit: Fruit

    var body: some View {
        Text("\(fruit.name)!")
            .foregroundColor(fruit.color)
            .padding()
    }
}
However, this will not compile and there will be an error: Referencing initializer 'init(_:content:)' on 'ForEach' requires that 'Fruit' conform to 'Identifiable'
This problem can be fixed by either implementing the Identifiable protocol in Fruit struct, or providing a keypath. Either way it will let the SwiftUI know which explicit identity the FruitView should have:
struct FruitListView: View {
    let fruits = [Fruit(name: "Banana", color: .yellow),
                      Fruit(name: "Cherry", color: .red)]

    var body: some View {
        ScrollView {
            ForEach(fruits, id: \.name) { fruit in
                FruitView(fruit: fruit)
            }
        }
    }
}
This new code will compile and FruitView will be identified by the name, since the name of the fruit is designed to be unique.
Another use case where the explicit identity is regularly used is an ability to do a manual scrolling to one of the sections of the scroll view.
struct ContentView: View {
    let headerID = "header"

    let fruits = [Fruit(name: "Banana", color: .yellow),
                      Fruit(name: "Cherry", color: .red)]

    var body: some View {
        ScrollView {
            ScrollViewReader { proxy in
                Text("Fruits")
                    .id(headerID)

                ForEach(fruits, id: \.name) { fruit in
                    FruitView(fruit: fruit)
                }

                Button("Scroll to top") {
                    proxy.scrollTo(headerID)
                }
            }
        }
    }
}
In this example, tapping on a button will scroll the view to the top. The .id() extension is used to provide custom identifiers to our views, giving them the explicit identity.
Structural identity
Every SwiftUI view must have an identity. If the view doesn’t have an explicit identity, it has a structural identity. A structural identity is when the view is identified using its type and its position in a view hierarchy. SwiftUI uses the view hierarchy to generate the implicit identity for the views.
Consider the following example:
struct ContentView: View {
    @State var isRounded: Bool = false

    var body: some View {
        if isRounded {
            PizzaView()
                .cornerRadius(25)
        } else {
            PizzaView()
                .cornerRadius(0)
        }

        PizzaView()
            .cornerRadius(isRounded ? 25 : 0)

        Toggle("Round", isOn: $isRounded.animation())
            .fixedSize()
    }
}
As seen in the example above, there are two different approaches to implement the animated corner radius change for the PizzaView.
The first approach creates two completely distinct views, depending on the boolean state. Actually SwiftUI will create an instance of ConditionalContent view behind the scenes. This ConditionalContent view is responsible for presenting one or another view based on the condition. And these pizza views have different view identities, because of the condition used. In this case SwiftUI will redraw the view once the toggle has changed, and it will apply the fade in/out transition for the change, as seen in Figure 8 below. This is important to understand that it’s not the same PizzaView, these are two different views and they have their own structural identities. It also can be implemented using the view modifier:
PizzaView()
            .cornerRadius(isRounded ? 25 : 0)
This will keep the view’s structural identity the same, and SwiftUI will not apply the fade in/out transition. It will animate the corner radius change, as shown in Figure 8 below, because for the framework it’s the same view, just with different property values.

In this case the structural identity of the view doesn’t change. Apple recommends preserving the view’s identity by putting conditionals within the view modifier as opposed to use if/else statements.
Structural identity and its understanding is a key for a better optimized app with fewer bugs. It also explains why using a conditional view modifier might be a bad idea.
There are a few things to keep in mind to achieve a better performance:
- Maintain the view’s identity. If you can, don’t use conditional statements to preserve the identity.
- Use stable identifiers for your view if they are explicitly provided.
- Avoid using AnyView if possible
A real world DoorDash example of view identity
Let’s take a look at an example within the DoorDash iOS application. The contacts view shows the list of contacts and allows the user to choose single or multiple contacts, as seen on Figure 9 below. The contacts list component is used in DoorDash today when sending a gift.
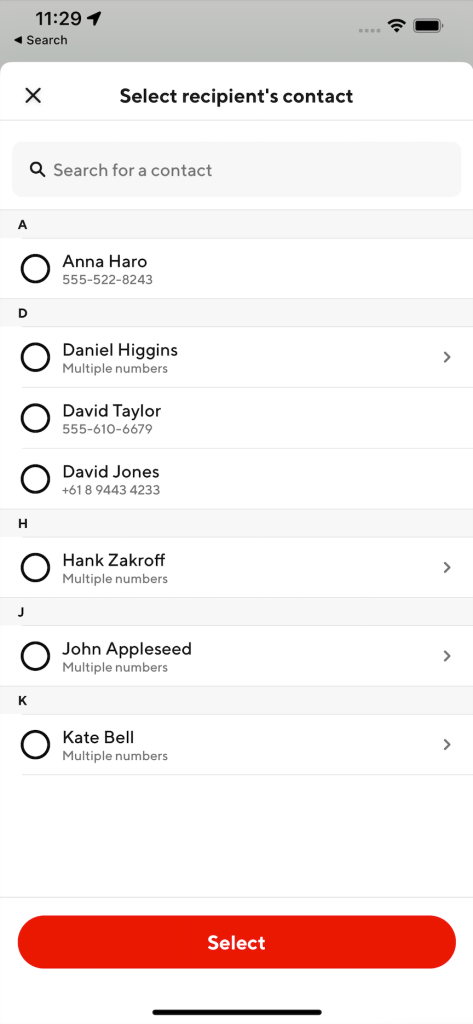
This view uses the Contacts framework to fetch the contacts on the device and transform those contacts into sections with titles to be displayed in SwiftUI’s `List` component.
We do this by iterating over our list of sections using a `ForEach` and displaying them in the list keyed by the unique identifier of the section.
```
List {
    ForEach(listSections, id: \.id) { contactsSection in
        // Display the contact section header & rows
    }
}
```
The `ContactSection` is responsible for encapsulating the properties needed to display the list of contacts in the view. It contains 3 properties:
- A unique identifier for the section
- The title of the section
- The list of contacts for the section
```
struct ContactSection {
    let id: String = UUID().uuidString
    let title: String
    let contacts: [Contacts]

    init(title: String, contacts: [Contacts]) {
        self.title = title
        self.contacts = contacts
    }
}
Our contacts are now displaying in the List, but we have one problem; when an invalid phone number is selected from the list, a toast message animates into the view to alert the customer. As the toast appears, the entire list renaminates (Figure 10) as if there is new data to present — not an ideal user experience.

As the view is animated, Swift is redrawing the view and subsequently our list. Each time we access the computed variable that generates the sections, the `ContactSection` struct is initialized with a new, different identifier for the same section.
In this case, the title of our sections is the first initial of the contact’s name, which makes each title unique. So we’re able to remove the `id` property from our `ContactSection` struct and key the list by the title instead of the inconsistent identifier.
List {
    ForEach(listSections, id: \.title) { contactsSection in
        // Display the contact section header & rows
    }
}
Now, as seen on Figure 11, the animation looks great!

When using the `List` component in SwiftUI, we want to remember to use a persistent identifier to key the list; it improves our animations and performance.
Conclusion
From the above, we can clearly see the advantages in terms of user experience and performance when we preserve a view’s identity and manage the dependencies correctly and efficiently. These concepts are essential to write better optimized, smooth, and effective iOS applications with SwiftUI. The framework uses a type-based diffing algorithm to determine what views to redraw for each change of the state, and it does it’s best to ensure that our user interface remains performant and optimized.However, it's important to understand that it’s not pure magic. We still need to write efficient code, and understand how the body invocations work, how the dependencies are managed, and how to preserve the view’s identity.